Konica Minolta Kodak Ngenuity 9090DB User Guide - Page 69
Cleaning the ink cartridge, Clean Print Head
 |
View all Konica Minolta Kodak Ngenuity 9090DB manuals
Add to My Manuals
Save this manual to your list of manuals |
Page 69 highlights
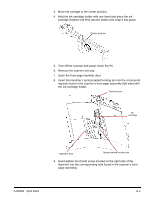
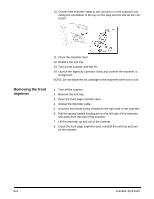
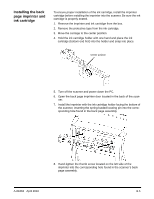
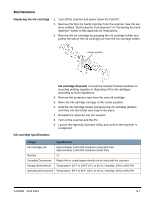
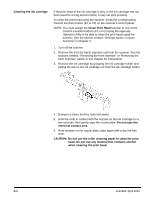
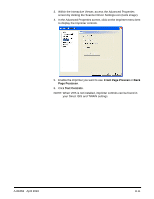
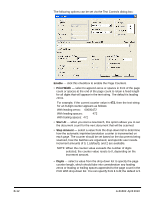
Cleaning the ink cartridge If the print head of the ink cartridge is dirty or the ink cartridge has not been used for a long period of time, it may not print properly. To clean the print head using the scanner, press the corresponding Custom Function button (F1 or F2) on the scanner's control panel. NOTE: You must assign the Clean Print Head function to one of the Custom Function buttons (F1 or F2) using the Ngenuity Operator Utility to be able to clean the print head using the scanner. See the section entitled, "Settings button: Custom functions" in Chapter 3. 1. Turn off the scanner. 2. Remove the front (or back) imprinter unit from the scanner. See the sections entitled, "Removing the front imprinter" or "Removing the back imprinter" earlier in this chapter for instructions. 3. Remove the ink cartridge by grasping the ink cartridge holder and pulling the tab on the ink cartridge out from the ink cartridge holder. 4. Dampen a clean, lint-free cloth with water. 5. Hold the cloth in contact with the nozzles on the ink cartridge for a few seconds, then gently wipe the nozzle plate. Do not wipe the electrical contact area. 6. If ink remains on the nozzle plate, wipe again with a dry, lint-free cloth. CAUTION: Do not use the roller cleaning paper to clean the print head. Do not use any material that contains alcohol when cleaning the print head. B-8 A-61662 April 2010
-
 1
1 -
2
-
3
-
4
-
5
-
6
-
7
-
8
-
9
-
10
-
11
-
12
-
13
-
14
-
15
-
16
-
17
-
18
-
19
-
20
-
21
-
22
-
23
-
24
-
25
-
26
-
27
-
28
-
29
-
30
-
31
-
32
-
33
-
34
-
35
-
36
-
37
-
38
-
39
-
40
-
41
-
42
-
43
-
44
-
45
-
46
-
47
-
48
-
49
-
50
-
51
-
52
-
53
-
54
-
55
-
56
-
57
-
58
-
59
-
60
-
61
-
62
-
63
-
 64
64 -
 65
65 -
 66
66 -
 67
67 -
 68
68 -
 69
69 -
 70
70 -
 71
71 -
 72
72 -
 73
73 -
 74
74 -
75
-
76
-
77
-
78
 |
 |
