Konica Minolta Kodak Ngenuity 9090DB User Guide - Page 55
Start, Close, the Ngenuity Operator Utility Home screen.
 |
View all Konica Minolta Kodak Ngenuity 9090DB manuals
Add to My Manuals
Save this manual to your list of manuals |
Page 55 highlights
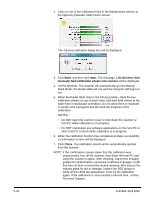
5-16 2. Click on one of the Calibration links in the Maintenance section of the Ngenuity Operator Utility Home screen. The Camera calibration dialog box will be displayed. 3. Click Both, and then click Start. The message, Lift skimmer, then manually feed calibration sheets into scanner will be displayed. 4. Lift the skimmer. The scanner will automatically go into Manual Feed Mode, the feeder table will rise and the transport will begin to run. 5. When the feeder table rises to the full-up position, stack the two calibration sheets on top of each other, and feed both sheets at the same time in landscape orientation. Do not allow them to separate. A counter and a progress bar will mark the progress of the calibration. NOTES: • Do NOT open the scanner cover or shut down the scanner or host PC while calibration is in progress. • Do NOT manipulate any software applications on the host PC or other host PC controls while calibration is in progress. 6. When the calibration function has completed all steps successfully, a confirmation screen will be displayed. 7. Click Close. The calibration sheets will be automatically ejected from the scanner. NOTE: If the confirmation screen states that the calibration was unsuccessful, turn off the scanner, shut down the host PC and clean the scanner's optics. After cleaning, inspect the imaging guides for contamination, excessive scratches or gouges, or dirt that has not been removed by normal cleaning. Also inspect the camera glass for dirt or damage. Inspect the LED arrays to verify all the LEDs are operational. Then try the calibration again. If the calibration is unsuccessful a second time, contact Technical Support. A-61662 April 2010
-
 1
1 -
2
-
3
-
4
-
5
-
6
-
7
-
8
-
9
-
10
-
11
-
12
-
13
-
14
-
15
-
16
-
17
-
18
-
19
-
20
-
21
-
22
-
23
-
24
-
25
-
26
-
27
-
28
-
29
-
30
-
31
-
32
-
33
-
34
-
35
-
36
-
37
-
38
-
39
-
40
-
41
-
42
-
43
-
44
-
45
-
46
-
47
-
48
-
49
-
 50
50 -
 51
51 -
 52
52 -
 53
53 -
 54
54 -
 55
55 -
 56
56 -
 57
57 -
 58
58 -
 59
59 -
 60
60 -
61
-
62
-
63
-
64
-
65
-
66
-
67
-
68
-
69
-
70
-
71
-
72
-
73
-
74
-
75
-
76
-
77
-
78
 |
 |
