Konica Minolta Kodak Ngenuity 9090DB User Guide - Page 52
Replacement procedures, Replacing tires, Replacing the skimmer rollers
 |
View all Konica Minolta Kodak Ngenuity 9090DB manuals
Add to My Manuals
Save this manual to your list of manuals |
Page 52 highlights
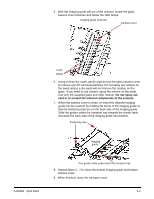
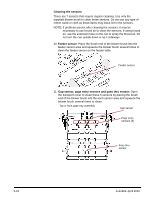
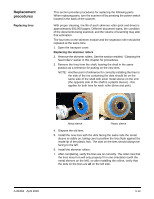
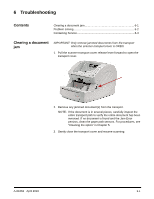
Replacement procedures Replacing tires This section provides procedures for replacing the following parts. When replacing parts, turn the scanner off by pressing the power switch located in the back of the scanner. With proper cleaning, tire life of each skimmer roller (pick and drive) is approximately 600,000 pages. Different document types, the condition of the documents being scanned, and the volume of scanning may alter that estimation. The four tires on the skimmer module and the separator roller should be replaced at the same time. 1. Open the transport cover. Replacing the skimmer rollers 2. Remove the skimmer rollers. See the section entitled, "Cleaning the feed rollers" earlier in this chapter for procedures. 3. Remove the tires from the shaft, leaving the shaft in the same position as a reference for putting on the new tires. NOTE: Another point of reference for correctly installing the tires is: the side of the tire containing the dots should be on the same side of the shaft with silver metal sleeve on the end (the opposite side of the shaft is a plastic sleeve) - this applies for both tires for each roller (drive and pick). Metal sleeve Plastic sleeve 4. Dispose the old tires. 5. Install the new tires with the dots facing the same side the metal sleeve is visible on, taking care to position the tires flush against the inside lip of the plastic hub. The dots on the tires should always be facing to the left. 6. Install the skimmer rollers. 7. After completing, verify the tires are on correctly. The roller core that the tires mount on will only properly fit in one orientation (with the metal sleeves on the left), so after installing the rollers, verify that the dots on the tires are all on the left side. A-61662 April 2010 5-13
-
 1
1 -
2
-
3
-
4
-
5
-
6
-
7
-
8
-
9
-
10
-
11
-
12
-
13
-
14
-
15
-
16
-
17
-
18
-
19
-
20
-
21
-
22
-
23
-
24
-
25
-
26
-
27
-
28
-
29
-
30
-
31
-
32
-
33
-
34
-
35
-
36
-
37
-
38
-
39
-
40
-
41
-
42
-
43
-
44
-
45
-
46
-
 47
47 -
 48
48 -
 49
49 -
 50
50 -
 51
51 -
 52
52 -
 53
53 -
 54
54 -
 55
55 -
 56
56 -
 57
57 -
58
-
59
-
60
-
61
-
62
-
63
-
64
-
65
-
66
-
67
-
68
-
69
-
70
-
71
-
72
-
73
-
74
-
75
-
76
-
77
-
78
 |
 |
