Konica Minolta bizhub PRESS C6000 IC-307 User Guide - Page 159
Installing the Remote Site Manager, Adding Creo color servers to the Remote Site Manager, Start
 |
View all Konica Minolta bizhub PRESS C6000 manuals
Add to My Manuals
Save this manual to your list of manuals |
Page 159 highlights
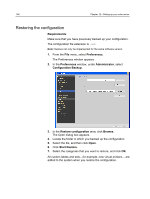
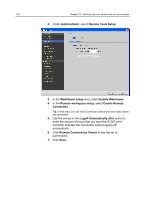
Installing the Remote Site Manager 151 Installing the Remote Site Manager Install the Remote Site Manager so that you can add servers, monitor their status, and obtain information about the printer, all from your computer. 1. On your desktop, click Start > Run. 2. In the Run dialog box, type the exact name of the server where the Remote Site Manager is located, as follows \\. 3. Click OK. 4. In the \Utilities\PC Utilities folder on the IC-307 print controller, locate the Remote_Site_Manager.exe file. 5. On your computer, double-click the Remote_Site_Manager.exe file. The Remote Site Manager is installed on your computer. The Remote Site Manager icon appears on your taskbar after the application is started. 6. Click OK. The Remote Site Manager appears under Start > Programs > Creo Color Server > Remote Site Manager. Adding Creo color servers to the Remote Site Manager Requirements: Using the Remote Site Manager software, set up servers via the Remote Site Manager Setup window. You can add up to 15 Creo color servers. 1. On the taskbar, right-click the Remote Site Manager icon. 2. From the menu that appears, select Setup. A message notifies you that you need to add a server before using the EZ Connect tool. 3. Click OK. The Remote Site Manager Setup window appears. 4. In the Remote Site Manager Setup window, click Add. 5. In the Hostname/IP box, type the exact name of the server that you want to add-for example, Server1. 6. In the Display Name box, type a name of your choice for the server. 7. Click Add. Your new server appears in the Remote Site Manager Setup window.
-
 1
1 -
2
-
3
-
4
-
5
-
6
-
7
-
8
-
9
-
10
-
11
-
12
-
13
-
14
-
15
-
16
-
17
-
18
-
19
-
20
-
21
-
22
-
23
-
24
-
25
-
26
-
27
-
28
-
29
-
30
-
31
-
32
-
33
-
34
-
35
-
36
-
37
-
38
-
39
-
40
-
41
-
42
-
43
-
44
-
45
-
46
-
47
-
48
-
49
-
50
-
51
-
52
-
53
-
54
-
55
-
56
-
57
-
58
-
59
-
60
-
61
-
62
-
63
-
64
-
65
-
66
-
67
-
68
-
69
-
70
-
71
-
72
-
73
-
74
-
75
-
76
-
77
-
78
-
79
-
80
-
81
-
82
-
83
-
84
-
85
-
86
-
87
-
88
-
89
-
90
-
91
-
92
-
93
-
94
-
95
-
96
-
97
-
98
-
99
-
100
-
101
-
102
-
103
-
104
-
105
-
106
-
107
-
108
-
109
-
110
-
111
-
112
-
113
-
114
-
115
-
116
-
117
-
118
-
119
-
120
-
121
-
122
-
123
-
124
-
125
-
126
-
127
-
128
-
129
-
130
-
131
-
132
-
133
-
134
-
135
-
136
-
137
-
138
-
139
-
140
-
141
-
142
-
143
-
144
-
145
-
146
-
147
-
148
-
149
-
150
-
151
-
152
-
153
-
 154
154 -
 155
155 -
 156
156 -
 157
157 -
 158
158 -
 159
159 -
 160
160 -
 161
161 -
 162
162 -
 163
163 -
 164
164 -
165
-
166
-
167
-
168
-
169
-
170
-
171
-
172
-
173
-
174
-
175
-
176
-
177
-
178
-
179
-
180
-
181
-
182
-
183
-
184
-
185
-
186
-
187
-
188
-
189
-
190
-
191
-
192
-
193
-
194
-
195
-
196
 |
 |