Konica Minolta bizhub PRESS C6000 IC-307 User Guide - Page 29
Troubleshooting calibration, Notes, Reset
 |
View all Konica Minolta bizhub PRESS C6000 manuals
Add to My Manuals
Save this manual to your list of manuals |
Page 29 highlights
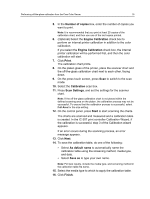
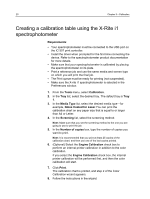
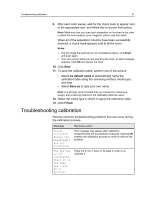
Troubleshooting calibration 21 9. After each color sweep, wait for the check mark to appear next to the appropriate icon, and follow the on-screen instructions. Note: Make sure that you scan each separation on the chart in the order in which the icons appear: cyan, magenta, yellow, and then black. When all of the separation columns have been successfully scanned, a check mark appears next to all the icons. Notes: ● If at any stage the scanning is not completed properly, click Reset and scan again. ● If an error occurs while you are scanning the chart, an alert message appears. Click OK and rescan the chart. 10. Click Next. 11. To save the calibration table, perform one of the actions: ● Select As default name to automatically name the calibration table using the screening method, media type, and date. ● Select Save as to type your own name. Note: It is strongly recommended that you include the media type, weight, and screening method in the calibration table file name. 12. Select the media type to which to apply the calibration table. 13. Click Finish. Troubleshooting calibration Resolve common troubleshooting problems that can occur during the calibration process. Message Values collected during the measurement are not monotonous. The Eye-One is not calibrated. Place it on the base and click OK to proceed. Recovery action This message may appear after calibration measurements are successfully measured. Clicking OK enables the calibration process to continue without any problem. Place the X-rite i1 back on its base in order to recalibrate it.
-
 1
1 -
2
-
3
-
4
-
5
-
6
-
7
-
8
-
9
-
10
-
11
-
12
-
13
-
14
-
15
-
16
-
17
-
18
-
19
-
20
-
21
-
22
-
23
-
 24
24 -
 25
25 -
 26
26 -
 27
27 -
 28
28 -
 29
29 -
 30
30 -
 31
31 -
 32
32 -
 33
33 -
 34
34 -
35
-
36
-
37
-
38
-
39
-
40
-
41
-
42
-
43
-
44
-
45
-
46
-
47
-
48
-
49
-
50
-
51
-
52
-
53
-
54
-
55
-
56
-
57
-
58
-
59
-
60
-
61
-
62
-
63
-
64
-
65
-
66
-
67
-
68
-
69
-
70
-
71
-
72
-
73
-
74
-
75
-
76
-
77
-
78
-
79
-
80
-
81
-
82
-
83
-
84
-
85
-
86
-
87
-
88
-
89
-
90
-
91
-
92
-
93
-
94
-
95
-
96
-
97
-
98
-
99
-
100
-
101
-
102
-
103
-
104
-
105
-
106
-
107
-
108
-
109
-
110
-
111
-
112
-
113
-
114
-
115
-
116
-
117
-
118
-
119
-
120
-
121
-
122
-
123
-
124
-
125
-
126
-
127
-
128
-
129
-
130
-
131
-
132
-
133
-
134
-
135
-
136
-
137
-
138
-
139
-
140
-
141
-
142
-
143
-
144
-
145
-
146
-
147
-
148
-
149
-
150
-
151
-
152
-
153
-
154
-
155
-
156
-
157
-
158
-
159
-
160
-
161
-
162
-
163
-
164
-
165
-
166
-
167
-
168
-
169
-
170
-
171
-
172
-
173
-
174
-
175
-
176
-
177
-
178
-
179
-
180
-
181
-
182
-
183
-
184
-
185
-
186
-
187
-
188
-
189
-
190
-
191
-
192
-
193
-
194
-
195
-
196
 |
 |
