Konica Minolta bizhub PRESS C6000 IC-307 User Guide - Page 175
Creating and printing the variable data job, the Creo Color Server. You can either close the Easy VDP
 |
View all Konica Minolta bizhub PRESS C6000 manuals
Add to My Manuals
Save this manual to your list of manuals |
Page 175 highlights
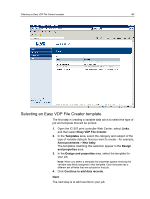
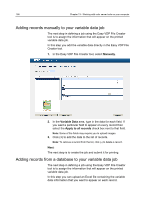
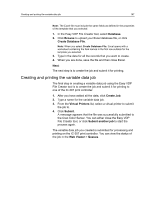
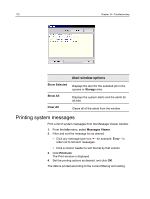
Creating and printing the variable data job 167 Note: The Excel file must include the same fields as defined in the properties of the template that you selected. 1. In the Easy VDP File Creator tool, select Database. 2. Click Browse to upload your Excel database file, or click Create Database File. Note: When you select Create Database File, Excel opens with a worksheet containing the field names in the first row suitable for the template you selected. 3. Type in the data for all the records that you want to create. 4. When you are done, save the file and then close Excel. Next: The next step is to create the job and submit it for printing. Creating and printing the variable data job The final step in creating a variable data job using the Easy VDP File Creator tool is to create the job and submit it for printing to one of the IC-307 print controller. 1. After you have added all the data, click Create Job. 2. Type a name for the variable data job. 3. From the Virtual Printers list, select a virtual printer to submit the job to. 4. Click Submit. A message appears that the file was successfully submitted to the Creo Color Server. You can either close the Easy VDP File Creator tool, or click Submit another job to start the process again. The variable data job you created is submitted for processing and printing on the IC-307 print controller. You can view the status of the job in the Web Viewer > Queues.
-
 1
1 -
2
-
3
-
4
-
5
-
6
-
7
-
8
-
9
-
10
-
11
-
12
-
13
-
14
-
15
-
16
-
17
-
18
-
19
-
20
-
21
-
22
-
23
-
24
-
25
-
26
-
27
-
28
-
29
-
30
-
31
-
32
-
33
-
34
-
35
-
36
-
37
-
38
-
39
-
40
-
41
-
42
-
43
-
44
-
45
-
46
-
47
-
48
-
49
-
50
-
51
-
52
-
53
-
54
-
55
-
56
-
57
-
58
-
59
-
60
-
61
-
62
-
63
-
64
-
65
-
66
-
67
-
68
-
69
-
70
-
71
-
72
-
73
-
74
-
75
-
76
-
77
-
78
-
79
-
80
-
81
-
82
-
83
-
84
-
85
-
86
-
87
-
88
-
89
-
90
-
91
-
92
-
93
-
94
-
95
-
96
-
97
-
98
-
99
-
100
-
101
-
102
-
103
-
104
-
105
-
106
-
107
-
108
-
109
-
110
-
111
-
112
-
113
-
114
-
115
-
116
-
117
-
118
-
119
-
120
-
121
-
122
-
123
-
124
-
125
-
126
-
127
-
128
-
129
-
130
-
131
-
132
-
133
-
134
-
135
-
136
-
137
-
138
-
139
-
140
-
141
-
142
-
143
-
144
-
145
-
146
-
147
-
148
-
149
-
150
-
151
-
152
-
153
-
154
-
155
-
156
-
157
-
158
-
159
-
160
-
161
-
162
-
163
-
164
-
165
-
166
-
167
-
168
-
169
-
 170
170 -
 171
171 -
 172
172 -
 173
173 -
 174
174 -
 175
175 -
 176
176 -
 177
177 -
 178
178 -
 179
179 -
 180
180 -
181
-
182
-
183
-
184
-
185
-
186
-
187
-
188
-
189
-
190
-
191
-
192
-
193
-
194
-
195
-
196
 |
 |
