Kyocera FS-6525MFP Fax System (U) Operation Guide Rev-4.2012.3 - Page 24
Setting Date and Time - default login
 |
View all Kyocera FS-6525MFP manuals
Add to My Manuals
Save this manual to your list of manuals |
Page 24 highlights
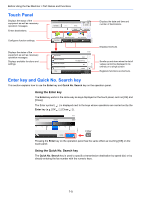
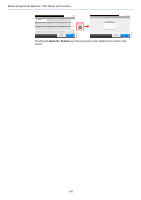
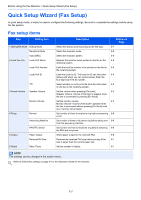
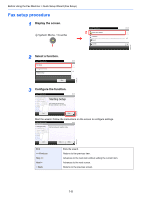
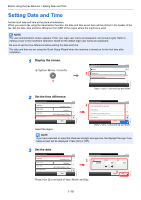
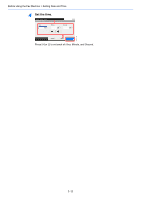
Before Using the Fax Machine > Setting Date and Time Setting Date and Time Set the local date and time at the place of installation. When you send a fax using the transmission function, the date and time as set here will be printed in the header of the fax. Set the date, time and time difference from GMT of the region where the machine is used. NOTE The user authentication screen appears. Enter your login user name and password, and press [Login]. Refer to Adding a User in the machine's Operation Guide for the default login user name and password. Be sure to set the time difference before setting the date and time. The date and time are set using the Quick Setup Wizard when the machine is turned on for the first time after installation. 1 Display the screen. 1 System Menu/Counter. System Menu System 2 Date/Timer Adjustment/Maintenance 10:10 5/5 GB0054_04 Use [ ] or [ ] to scroll up and down. 2 Set the time difference. System Menu/Counter. Date/Timer Date/Time Date Format Time Zone Auto Panel Reset 10:10 10/10/2012 10:10 1 DD/MM/YY 1/4 +09:00 Osaka, Sapporo, Tokyo On < Back Select the region. GB0610_00 System Menu/Counter. Date/Timer - Time Zone 2 -12:00 International Date Line West 10:10 -11:00 Samoa -11:00 Universal Coordinated Time-11 1/24 -10:00 Hawaii Cancel OK Use [ ] or [ ] to scroll up and down. GB0614_00 NOTE If you have selected an area that observes daylight savings time, the Daylight Savings Time Setup screen will be displayed. Press [On] or [Off]. 3 Set the date. System Menu/Counter. Date/Timer Date/Time Date Format Time Zone Auto Panel Reset 10:10 10/10/2012 10:10 1 DD/MM/YY 1/4 +09:00 Osaka, Sapporo, Tokyo On < Back System Menu/Counter. Date/Timer - Date/Time 2 Year Month GB0610_00 Press [+] or [-] to set each of Year, Month, and Day. 10:10 Day 3 Cancel Next > GB0611_00 1-10
-
 1
1 -
2
-
3
-
4
-
5
-
6
-
7
-
8
-
9
-
10
-
11
-
12
-
13
-
14
-
15
-
16
-
17
-
18
-
 19
19 -
 20
20 -
 21
21 -
 22
22 -
 23
23 -
 24
24 -
 25
25 -
 26
26 -
 27
27 -
 28
28 -
 29
29 -
30
-
31
-
32
-
33
-
34
-
35
-
36
-
37
-
38
-
39
-
40
-
41
-
42
-
43
-
44
-
45
-
46
-
47
-
48
-
49
-
50
-
51
-
52
-
53
-
54
-
55
-
56
-
57
-
58
-
59
-
60
-
61
-
62
-
63
-
64
-
65
-
66
-
67
-
68
-
69
-
70
-
71
-
72
-
73
-
74
-
75
-
76
-
77
-
78
-
79
-
80
-
81
-
82
-
83
-
84
-
85
-
86
-
87
-
88
-
89
-
90
-
91
-
92
-
93
-
94
-
95
-
96
-
97
-
98
-
99
-
100
-
101
-
102
-
103
-
104
-
105
-
106
-
107
-
108
-
109
-
110
-
111
-
112
-
113
-
114
-
115
-
116
-
117
-
118
-
119
-
120
-
121
-
122
-
123
-
124
-
125
-
126
-
127
-
128
-
129
-
130
-
131
-
132
-
133
-
134
-
135
-
136
-
137
-
138
-
139
-
140
-
141
-
142
-
143
-
144
-
145
-
146
-
147
-
148
-
149
-
150
-
151
-
152
-
153
-
154
-
155
-
156
-
157
-
158
-
159
-
160
-
161
-
162
-
163
-
164
-
165
-
166
-
167
-
168
-
169
-
170
-
171
-
172
-
173
-
174
-
175
-
176
-
177
-
178
-
179
-
180
-
181
-
182
-
183
-
184
-
185
-
186
-
187
-
188
-
189
-
190
-
191
-
192
-
193
-
194
-
195
-
196
-
197
-
198
-
199
-
200
-
201
-
202
-
203
-
204
-
205
-
206
-
207
-
208
-
209
-
210
-
211
-
212
-
213
-
214
-
215
-
216
-
217
-
218
-
219
-
220
-
221
-
222
-
223
-
224
-
225
-
226
-
227
-
228
-
229
-
230
-
231
-
232
-
233
-
234
-
235
-
236
-
237
-
238
 |
 |
