Kyocera FS-6525MFP Fax System (U) Operation Guide Rev-4.2012.3 - Page 53
Using favorites - scan to pc
 |
View all Kyocera FS-6525MFP manuals
Add to My Manuals
Save this manual to your list of manuals |
Page 53 highlights
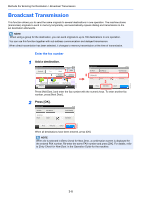
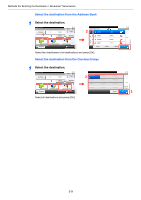
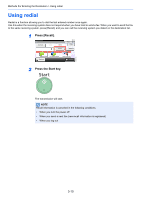
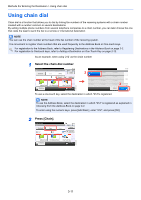
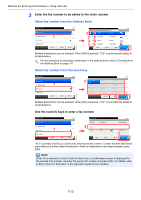
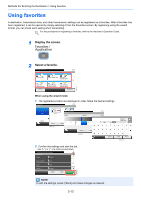
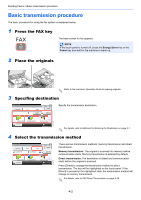
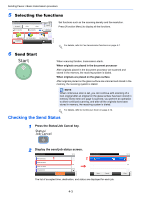
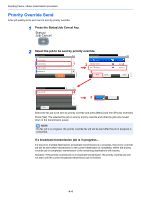
Methods For Entering the Destination > Using favorites Using favorites A destination, transmission time, and other transmission settings can be registered as a favorites. After a favorites has been registered, it can be opened by simply selecting it from the Favorites screen. By registering using the wizard format, you can check each setting when transmitting. For the procedure for registering a favorites, refer to the machine's Operation Guide. 1 Display the screen. 2 Select a favorite. Select the function. Favorites 10:10 ID Card Copy Paper Saving Copy Scan to PC (Address Entry) 1/1 Scan to PC (Address Book) Menu Scan to E-mail (Address Entry) Scan to E-mail (Address Book) Application GB0056_00 When using the wizard mode 1 The registered screens are displayed in order. Make the desired settings. Set Combine. Combine 10:10 Off Others 2 in 1 Cancel GB0016_99 Adjust the density. Density4 in 1 Lighter Normal 10:10 Darker File Name Entry -3 -2 -1 0 < Back Next > Cancel GB0008_99 +1 +2 +3 ABC A/a qwe r t asd < Back Next > @z x fg cv Cancel Input: 0 Limit: 128 Del. yu i op hj kl bnm. < Back Next > GB0057_99 2 Confirm the settings and start the job. Use [ ] or [ ] to scroll up and down. Press [Start] to start copying. Confirmation Copies 1 Copies 10:10 Paper Selection Auto 1/6 Zoom 100% Density Normal 0 Cancel < Back Start GB0820_00 NOTE To edit the settings, press [
-
 1
1 -
2
-
3
-
4
-
5
-
6
-
7
-
8
-
9
-
10
-
11
-
12
-
13
-
14
-
15
-
16
-
17
-
18
-
19
-
20
-
21
-
22
-
23
-
24
-
25
-
26
-
27
-
28
-
29
-
30
-
31
-
32
-
33
-
34
-
35
-
36
-
37
-
38
-
39
-
40
-
41
-
42
-
43
-
44
-
45
-
46
-
47
-
 48
48 -
 49
49 -
 50
50 -
 51
51 -
 52
52 -
 53
53 -
 54
54 -
 55
55 -
 56
56 -
 57
57 -
 58
58 -
59
-
60
-
61
-
62
-
63
-
64
-
65
-
66
-
67
-
68
-
69
-
70
-
71
-
72
-
73
-
74
-
75
-
76
-
77
-
78
-
79
-
80
-
81
-
82
-
83
-
84
-
85
-
86
-
87
-
88
-
89
-
90
-
91
-
92
-
93
-
94
-
95
-
96
-
97
-
98
-
99
-
100
-
101
-
102
-
103
-
104
-
105
-
106
-
107
-
108
-
109
-
110
-
111
-
112
-
113
-
114
-
115
-
116
-
117
-
118
-
119
-
120
-
121
-
122
-
123
-
124
-
125
-
126
-
127
-
128
-
129
-
130
-
131
-
132
-
133
-
134
-
135
-
136
-
137
-
138
-
139
-
140
-
141
-
142
-
143
-
144
-
145
-
146
-
147
-
148
-
149
-
150
-
151
-
152
-
153
-
154
-
155
-
156
-
157
-
158
-
159
-
160
-
161
-
162
-
163
-
164
-
165
-
166
-
167
-
168
-
169
-
170
-
171
-
172
-
173
-
174
-
175
-
176
-
177
-
178
-
179
-
180
-
181
-
182
-
183
-
184
-
185
-
186
-
187
-
188
-
189
-
190
-
191
-
192
-
193
-
194
-
195
-
196
-
197
-
198
-
199
-
200
-
201
-
202
-
203
-
204
-
205
-
206
-
207
-
208
-
209
-
210
-
211
-
212
-
213
-
214
-
215
-
216
-
217
-
218
-
219
-
220
-
221
-
222
-
223
-
224
-
225
-
226
-
227
-
228
-
229
-
230
-
231
-
232
-
233
-
234
-
235
-
236
-
237
-
238
 |
 |