Netgear RND4475 Software Manual - Page 26
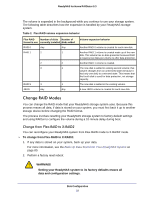
Change to a Different Flex-RAID Format, To change Flex-RAID disk formatting, WARNING
 |
UPC - 606449056761
View all Netgear RND4475 manuals
Add to My Manuals
Save this manual to your list of manuals |
Page 26 highlights
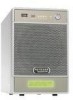
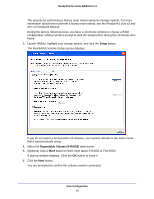
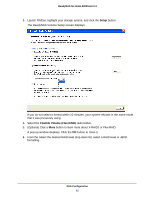
ReadyNAS for Home RAIDiator 5.3 If you select Auto, your ReadyNAS system automatically chooses a RAID level based on the number of disks that are installed in your system, as follows: Number of installed disks RAID level automatically chosen 1 RAID 0 2 RAID 1 3 RAID 5 4 7. Click the Next button. A dialog box displays prompting you to confirm the volume creation command. 8. Click the OK button. The volume is formatted. This can take quite a while, depending on the size of your hard disk drives. 9. (Optional) Restore any backed-up data to the reformatted disks. For more information, see Recover Data to Your ReadyNAS System on page 84. Change to a Different Flex-RAID Format Flex-RAID offers you several different disk formats, depending on the number of disks installed in your ReadyNAS storage system. For more information, see Flex-RAID on page 20. You can reconfigure your system to use a different Flex-RAID format. To change Flex-RAID disk formatting: 1. If any data is stored on your system, back up your data. For more information, see the Back Up Data Stored On Your ReadyNAS System on page 80. 2. Perform a factory reset reboot. WARNING! Setting your ReadyNAS system to its factory defaults erases all data and configuration settings. The process for performing a factory reset reboot varies by storage system. For more information about how to perform a factory reset reboot, see the ReadyNAS Duo v2 and NV+ v2 Hardware Manual. Disk Configuration 26
-
 1
1 -
2
-
3
-
4
-
5
-
6
-
7
-
8
-
9
-
10
-
11
-
12
-
13
-
14
-
15
-
16
-
17
-
18
-
19
-
20
-
 21
21 -
 22
22 -
 23
23 -
 24
24 -
 25
25 -
 26
26 -
 27
27 -
 28
28 -
 29
29 -
 30
30 -
 31
31 -
32
-
33
-
34
-
35
-
36
-
37
-
38
-
39
-
40
-
41
-
42
-
43
-
44
-
45
-
46
-
47
-
48
-
49
-
50
-
51
-
52
-
53
-
54
-
55
-
56
-
57
-
58
-
59
-
60
-
61
-
62
-
63
-
64
-
65
-
66
-
67
-
68
-
69
-
70
-
71
-
72
-
73
-
74
-
75
-
76
-
77
-
78
-
79
-
80
-
81
-
82
-
83
-
84
-
85
-
86
-
87
-
88
-
89
-
90
-
91
-
92
-
93
-
94
-
95
-
96
-
97
-
98
-
99
-
100
-
101
-
102
-
103
-
104
-
105
-
106
 |
 |