Netgear RND4475 Software Manual - Page 33
Manage Shares, View Shares
 |
UPC - 606449056761
View all Netgear RND4475 manuals
Add to My Manuals
Save this manual to your list of manuals |
Page 33 highlights
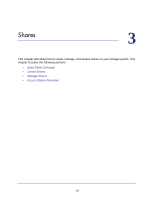
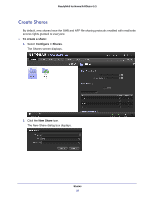
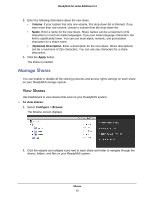
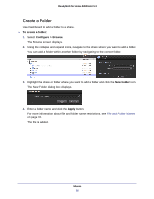
ReadyNAS for Home RAIDiator 5.3 3. Enter the following information about the new share: • Volume. If your system has only one volume, this drop-down list is dimmed. If you have more than one volume, choose a volume from the drop-down list. • Name. Enter a name for the new share. Share names can be a maximum of 31 characters in most non-Asian languages. If you use Asian language characters, the limit is significantly lower. You can use most alpha, numeric, and punctuation characters for a share name. • (Optional) Description. Enter a description for the new share. Share descriptions can be a maximum of 255 characters. You can use any characters for a share description. 4. Click the Apply button. The share is created. Manage Shares You can enable or disable all file-sharing protocols and access rights settings on each share on your ReadyNAS storage system. View Shares Use Dashboard to view shares that exist on your ReadyNAS system. To view shares: 1. Select Configure > Browse. The Browse screen displays. 2. Click the expand and collapse icons next to each share and folder to navigate through the shares, folders, and files on your ReadyNAS system. Shares 33
-
 1
1 -
2
-
3
-
4
-
5
-
6
-
7
-
8
-
9
-
10
-
11
-
12
-
13
-
14
-
15
-
16
-
17
-
18
-
19
-
20
-
21
-
22
-
23
-
24
-
25
-
26
-
27
-
 28
28 -
 29
29 -
 30
30 -
 31
31 -
 32
32 -
 33
33 -
 34
34 -
 35
35 -
 36
36 -
 37
37 -
 38
38 -
39
-
40
-
41
-
42
-
43
-
44
-
45
-
46
-
47
-
48
-
49
-
50
-
51
-
52
-
53
-
54
-
55
-
56
-
57
-
58
-
59
-
60
-
61
-
62
-
63
-
64
-
65
-
66
-
67
-
68
-
69
-
70
-
71
-
72
-
73
-
74
-
75
-
76
-
77
-
78
-
79
-
80
-
81
-
82
-
83
-
84
-
85
-
86
-
87
-
88
-
89
-
90
-
91
-
92
-
93
-
94
-
95
-
96
-
97
-
98
-
99
-
100
-
101
-
102
-
103
-
104
-
105
-
106
 |
 |