Netgear RND4475 Software Manual - Page 63
DNS, Ethernet settings, the Domain Name Server
 |
UPC - 606449056761
View all Netgear RND4475 manuals
Add to My Manuals
Save this manual to your list of manuals |
Page 63 highlights
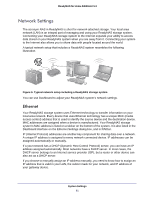
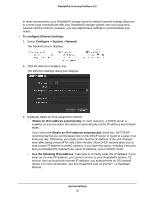
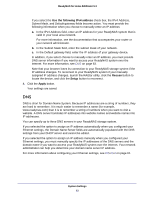
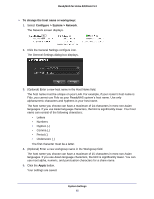
ReadyNAS for Home RAIDiator 5.3 If you select the Use the following IPv4 address check box, the IPv4 Address, Subnet Mask, and Default gateway fields become active. You must provide the following information when you choose to manually enter an IP address: a. In the IPv4 Address field, enter an IP address for your ReadyNAS system that is valid in your local area network. For more information, see the documentation that accompanies your router or your network administrator. b. In the Subnet Mask field, enter the subnet mask of your network. c. In the Default gateway field, enter the IP address of your gateway device. In addition, if you select choose to manually enter an IP address, you must provide DNS server information if you want to access your ReadyNAS system over the Internet. For more information, see DNS on page 63. Note that your browser loses its connection to your ReadyNAS storage system if the IP address changes. To reconnect to your ReadyNAS system if your manually assigned IP address changes, launch the RAIDar utility, click the Rescan button to locate the device, and click the Setup button to reconnect. 4. Click the Apply button. Your settings are saved. DNS DNS is short for Domain Name System. Because IP addresses are a string of numbers, they are hard to remember. It is much easier to remember a name (for example, www.readynas.com) than it is to remember a string of numbers when you want to visit a website. A DNS server translates IP addresses into website names and website names into IP addresses. You can specify up to three DNS servers in your ReadyNAS storage system. If you selected the option to assign an IP address automatically when you configured your Ethernet settings, the Domain Name Server fields are automatically populated with the DNS settings from your DHCP server and cannot be edited. If you selected the option to assign an IP address manually when you configured your Ethernet settings, you must manually specify the IP addresses of the DNS servers and the domain name if you want to access your ReadyNAS system over the Internet. Your network administrator can help you determine your domain name server IP address. For more information about configuring your Ethernet settings, see Ethernet on page 61. System Settings 63
-
 1
1 -
2
-
3
-
4
-
5
-
6
-
7
-
8
-
9
-
10
-
11
-
12
-
13
-
14
-
15
-
16
-
17
-
18
-
19
-
20
-
21
-
22
-
23
-
24
-
25
-
26
-
27
-
28
-
29
-
30
-
31
-
32
-
33
-
34
-
35
-
36
-
37
-
38
-
39
-
40
-
41
-
42
-
43
-
44
-
45
-
46
-
47
-
48
-
49
-
50
-
51
-
52
-
53
-
54
-
55
-
56
-
57
-
 58
58 -
 59
59 -
 60
60 -
 61
61 -
 62
62 -
 63
63 -
 64
64 -
 65
65 -
 66
66 -
 67
67 -
 68
68 -
69
-
70
-
71
-
72
-
73
-
74
-
75
-
76
-
77
-
78
-
79
-
80
-
81
-
82
-
83
-
84
-
85
-
86
-
87
-
88
-
89
-
90
-
91
-
92
-
93
-
94
-
95
-
96
-
97
-
98
-
99
-
100
-
101
-
102
-
103
-
104
-
105
-
106
 |
 |