Netgear RND4475 Software Manual - Page 91
you might permanently delete your source files. NETGEAR
 |
UPC - 606449056761
View all Netgear RND4475 manuals
Add to My Manuals
Save this manual to your list of manuals |
Page 91 highlights
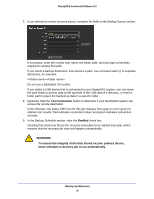
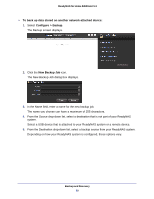
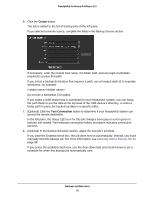
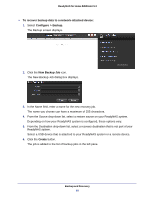
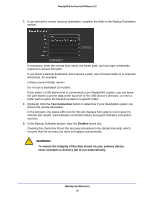
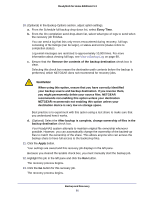
ReadyNAS for Home RAIDiator 5.3 9. (Optional) In the Backup Options section, adjust option settings. a. From the Schedule full backup drop-down list, select how frequently you want a full backup to be run. b. From the On completion send drop-down list, select what type of logs to send when the recovery job finishes. You can send a log that lists only errors encountered during recovery, full logs consisting of file listings (can be large), or status and errors (status refers to completion status). Log email messages are restricted to approximately 10,000 lines. For more information about viewing full logs, see View a Backup Log on page 98. c. (Optional) Select the Remove the contents of the backup destination check box. Selecting this check box erases the destination path contents before the backup is performed, which NETGEAR does not recommend for recovery jobs. WARNING! When using this option, ensure that you have correctly identified your backup source and backup destination. If you reverse them, you might permanently delete your source files. NETGEAR recommends not enabling this option unless your destination device is very low on storage space. Best practice is to experiment with this option using a test share to make sure that you understand how it works. d. (Optional) Select the After backup is complete, change ownership of files in the backup destination check box. Your ReadyNAS system attempts to maintain original file ownership whenever possible. However, you can automatically change the ownership of the backed-up files to match the ownership of the share. This allows anyone who can access the backup share to have full access to the backed-up files. 10. Click the Apply button. Your settings are saved and this job displays in the left pane. If you cleared the Enable button in step 8, you must manually start the job. If you selected the Enable check box in step 8, this backup job will run according to the schedule you established. Backup and Recovery 91
-
 1
1 -
2
-
3
-
4
-
5
-
6
-
7
-
8
-
9
-
10
-
11
-
12
-
13
-
14
-
15
-
16
-
17
-
18
-
19
-
20
-
21
-
22
-
23
-
24
-
25
-
26
-
27
-
28
-
29
-
30
-
31
-
32
-
33
-
34
-
35
-
36
-
37
-
38
-
39
-
40
-
41
-
42
-
43
-
44
-
45
-
46
-
47
-
48
-
49
-
50
-
51
-
52
-
53
-
54
-
55
-
56
-
57
-
58
-
59
-
60
-
61
-
62
-
63
-
64
-
65
-
66
-
67
-
68
-
69
-
70
-
71
-
72
-
73
-
74
-
75
-
76
-
77
-
78
-
79
-
80
-
81
-
82
-
83
-
84
-
85
-
 86
86 -
 87
87 -
 88
88 -
 89
89 -
 90
90 -
 91
91 -
 92
92 -
 93
93 -
 94
94 -
 95
95 -
 96
96 -
97
-
98
-
99
-
100
-
101
-
102
-
103
-
104
-
105
-
106
 |
 |