Netgear RND4475 Software Manual - Page 44
Install ReadyNAS Remote Client Software
 |
UPC - 606449056761
View all Netgear RND4475 manuals
Add to My Manuals
Save this manual to your list of manuals |
Page 44 highlights
ReadyNAS for Home RAIDiator 5.3 Install ReadyNAS Remote Client Software Before you can access shares using ReadyNAS Remote, you must install the ReadyNAS Remote client software on your Mac or PC. To install the ReadyNAS Remote client software on your computer: 1. Install the ReadyNAS Remote client software. A wizard guides you through the installation process. When you complete the installation, you are prompted to create a ReadyNAS Remote account. 2. Follow the wizard's prompts to create a free ReadyNAS Remote account. Remember the user ID and password you create; you need these credentials to access shares. A pop-up window displays when you successfully register with the ReadyNAS Remote web service. Shares 44
-
 1
1 -
2
-
3
-
4
-
5
-
6
-
7
-
8
-
9
-
10
-
11
-
12
-
13
-
14
-
15
-
16
-
17
-
18
-
19
-
20
-
21
-
22
-
23
-
24
-
25
-
26
-
27
-
28
-
29
-
30
-
31
-
32
-
33
-
34
-
35
-
36
-
37
-
38
-
 39
39 -
 40
40 -
 41
41 -
 42
42 -
 43
43 -
 44
44 -
 45
45 -
 46
46 -
 47
47 -
 48
48 -
 49
49 -
50
-
51
-
52
-
53
-
54
-
55
-
56
-
57
-
58
-
59
-
60
-
61
-
62
-
63
-
64
-
65
-
66
-
67
-
68
-
69
-
70
-
71
-
72
-
73
-
74
-
75
-
76
-
77
-
78
-
79
-
80
-
81
-
82
-
83
-
84
-
85
-
86
-
87
-
88
-
89
-
90
-
91
-
92
-
93
-
94
-
95
-
96
-
97
-
98
-
99
-
100
-
101
-
102
-
103
-
104
-
105
-
106
 |
 |
Shares
44
ReadyNAS for Home RAIDiator 5.3
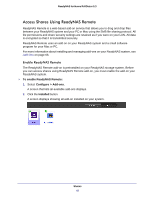
Install ReadyNAS Remote Client Software
Before you can access shares using ReadyNAS Remote, you must install the ReadyNAS
Remote client software on your Mac or PC.
To install the ReadyNAS Remote client software on your computer:
1.
Install the ReadyNAS Remote client software.
A wizard guides you through the installation process.
When you complete the installation, you are prompted to create a ReadyNAS Remote
account.
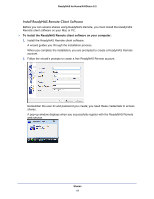
2.
Follow the wizard’s prompts to create a free ReadyNAS Remote account
.
Remember the user ID and password you create; you need these credentials to access
shares.
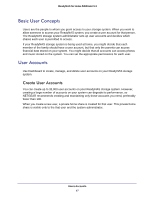
A pop-up window displays when you successfully register with the ReadyNAS Remote
web service.