Panasonic VDR M50 Dvd Camcorder - Page 50
Basic Techniques, Basic Operation Of Dvd Video Camera - sd card error
 |
UPC - 037988251209
View all Panasonic VDR M50 manuals
Add to My Manuals
Save this manual to your list of manuals |
Page 50 highlights
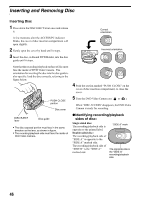
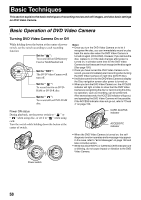
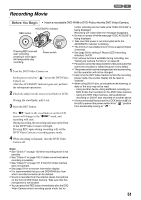
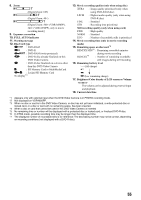
Basic Techniques This section explains the basic techniques of recording movies and still images, and also basic settings on DVD Video Camera. Basic Operation of DVD Video Camera Turning DVD Video Camera On or Off While holding down the button at the center of power switch, set the switch according to each recording function: Set to " ": To record still on SD Memory Card or MultiMediaCard Set to "OFF": The DVD Video Camera will turn off. Set to " ": To record movie on DVDRAM or DVD-R disc Set to " ": To record still on DVD-RAM disc. Note: • Once you turn the DVD Video Camera on to let it recognize the disc, you can immediately record or play back the same disc when the DVD Video Camera is turned on again (DVD-RAM). However, if you remove the disc, replace it, or if the date changes after power is turned on, it will take some time for the DVD Video Camera to start because it must recognize the disc again (See page 150). • Once you have turned the DVD Video Camera on to record, you can immediately start recording when turning the DVD Video Camera on next time (DVD-R disc). • It will take some time for the DVD Video Camera to display the Disc navigation screen after power is turned on. • When you turn the DVD Video Camera on, the ACCESS indicator will light or blink to show that the DVD Video Camera is recognizing the disc or card: During this time, no operation, such as recording, can be performed. After several seconds, the ACCESS indicator will go out, and operating the DVD Video Camera will be possible. If the ACCESS indicator does not go out, refer to "Check 4" on page 150. Power ON status During playback, set the power switch to " " or " " when using disc, or set it to " " when using card. Turn the switch while holding down the button at the center of switch. CARD ACCESS indicator ACCESS/PC indicator • When the DVD Video Camera is turned on, the self- diagnosis function operates and a message may appear. In this case, refer to "Error Messages" on page 152 and take corrective action. • While the ACCESS/PC or CARD ACCESS indicator is lit or blinking, do not cause impact or vibration to the DVD Video Camera. Power switch 50
-
 1
1 -
2
-
3
-
4
-
5
-
6
-
7
-
8
-
9
-
10
-
11
-
12
-
13
-
14
-
15
-
16
-
17
-
18
-
19
-
20
-
21
-
22
-
23
-
24
-
25
-
26
-
27
-
28
-
29
-
30
-
31
-
32
-
33
-
34
-
35
-
36
-
37
-
38
-
39
-
40
-
41
-
42
-
43
-
44
-
 45
45 -
 46
46 -
 47
47 -
 48
48 -
 49
49 -
 50
50 -
 51
51 -
 52
52 -
 53
53 -
 54
54 -
 55
55 -
56
-
57
-
58
-
59
-
60
-
61
-
62
-
63
-
64
-
65
-
66
-
67
-
68
-
69
-
70
-
71
-
72
-
73
-
74
-
75
-
76
-
77
-
78
-
79
-
80
-
81
-
82
-
83
-
84
-
85
-
86
-
87
-
88
-
89
-
90
-
91
-
92
-
93
-
94
-
95
-
96
-
97
-
98
-
99
-
100
-
101
-
102
-
103
-
104
-
105
-
106
-
107
-
108
-
109
-
110
-
111
-
112
-
113
-
114
-
115
-
116
-
117
-
118
-
119
-
120
-
121
-
122
-
123
-
124
-
125
-
126
-
127
-
128
-
129
-
130
-
131
-
132
-
133
-
134
-
135
-
136
-
137
-
138
-
139
-
140
-
141
-
142
-
143
-
144
-
145
-
146
-
147
-
148
-
149
-
150
-
151
-
152
-
153
-
154
-
155
-
156
-
157
-
158
-
159
-
160
-
161
-
162
-
163
-
164
-
165
-
166
-
167
-
168
-
169
-
170
-
171
-
172
-
173
-
174
 |
 |