Ricoh Aficio MP 2000 Network Guide - Page 58
Remote Maintenance by telnet, Using telnet, access
 |
View all Ricoh Aficio MP 2000 manuals
Add to My Manuals
Save this manual to your list of manuals |
Page 58 highlights
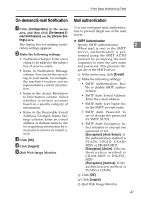
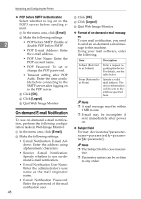
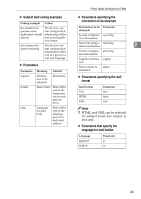
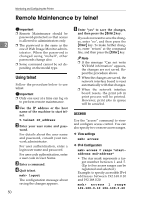
Monitoring and Configuring the Printer Remote Maintenance by telnet Important ❒ Remote Maintenance should be password-protected so that access is allowed to administrators only. 2 ❒ The password is the same as the one of Web Image Monitor admin- istrator. When the password is changed using "mshell", other passwords change also. ❒ Some command cannot be set depending on the model type. Using telnet Follow the procedure below to use telnet. Important ❒ Only one user at a time can log on to perform remote maintenance. A Use the IP address or the host name of the machine to start telnet. % telnet IP_address B Enter your user name and pass- word. For details about the user name and password, consult your network administrator. For user authentication, enter a login user name and password. For user code authentication, enter a user code in User Name. C Enter a command. D Quit telnet. msh> logout The configuration message about saving the changes appears. 50 E Enter "yes" to save the changes, and then press the {Enter} key. If you do not want to save the changes, enter "no", and then press the {Enter} key. To make further changes, enter "return" at the command line, and then press the {Enter} key. Note ❒ If the message "Can not write NVRAM information" appears, the changes are not saved. Repeat the procedure above. ❒ When the changes are saved, the network interface board is reset automatically with that changes. ❒ When the network interface board resets, the print job in print process will be printed. However, print jobs in queue will be canceled. access Use the "access" command to view and configure access control. You can also specify two or more access ranges. ❖ View settings msh> access ❖ IPv4 Configuration msh> access range "startaddress end-address" • The star mark represents a target number between 1 and 5. (Up to five access ranges can be registered and selected.) Example: to specify accessible IPv4 addresses between 192.168.0.10 and 192.168.0.20: msh> access 1 range 192.168.0.10 192.168.0.20
-
 1
1 -
2
-
3
-
4
-
5
-
6
-
7
-
8
-
9
-
10
-
11
-
12
-
13
-
14
-
15
-
16
-
17
-
18
-
19
-
20
-
21
-
22
-
23
-
24
-
25
-
26
-
27
-
28
-
29
-
30
-
31
-
32
-
33
-
34
-
35
-
36
-
37
-
38
-
39
-
40
-
41
-
42
-
43
-
44
-
45
-
46
-
47
-
48
-
49
-
50
-
51
-
52
-
 53
53 -
 54
54 -
 55
55 -
 56
56 -
 57
57 -
 58
58 -
 59
59 -
 60
60 -
 61
61 -
 62
62 -
 63
63 -
64
-
65
-
66
-
67
-
68
-
69
-
70
-
71
-
72
-
73
-
74
-
75
-
76
-
77
-
78
-
79
-
80
-
81
-
82
-
83
-
84
-
85
-
86
-
87
-
88
-
89
-
90
-
91
-
92
-
93
-
94
-
95
-
96
-
97
-
98
-
99
-
100
-
101
-
102
-
103
-
104
-
105
-
106
-
107
-
108
-
109
-
110
-
111
-
112
-
113
-
114
-
115
-
116
-
117
-
118
-
119
-
120
-
121
-
122
 |
 |