Samsung SCH-U365 User Manual Ver.fb03_f6 (English(north America)) - Page 65
Creating and Sending Picture Messages
 |
View all Samsung SCH-U365 manuals
Add to My Manuals
Save this manual to your list of manuals |
Page 65 highlights
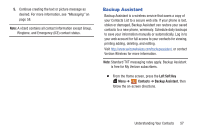
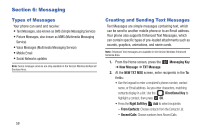
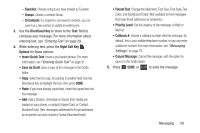
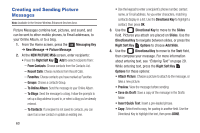
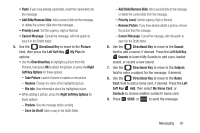
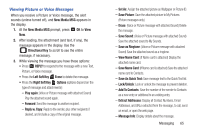
Creating and Sending Picture Messages Note: Available in the Verizon Wireless Enhanced Services Area. Picture Messages combine text, pictures, and sound, and can be sent to other mobile phones, to Email addresses, to your Online Album, or to a blog. 1. From the Home screen, press the Messaging Key ➔ New Message ➔ Picture Message. 2. At the NEW PICTURE MSG screen, enter recipients: • Press the Right Soft Key Add to select recipients from: - From Contacts: Choose contacts from the Contacts List. - Recent Calls: Choose numbers from Recent Calls. - Favorites: Choose contacts you have marked as Favorites. - Groups: Choose a contacts Group. - To Online Album: Send the message to your Online Album. - To Blogs: Send the message to a blog. Follow the prompts to set up a blog address to post to, or select a blog you've already entered. - To Contacts: If a recipient is not saved to contacts, you can save it as a new contact or update an existing one. 60 • Use the keypad to enter a recipient's phone number, contact name, or Email address. As you enter characters, matching contacts display in a list. Use the Directional Key to highlight a contact, then press OK. 3. Use the Directional Key to move to the Slides field. Pictures you attach are placed on Slides. Use the Directional Key to navigate between slides, or press the Right Soft Key Options to choose Add Slide. 4. Use the Directional Key to move to the Text: field, then compose your message. For more information about entering text, see "Entering Text" on page 29. While entering text, press the Right Soft Key Options for these options: • Attach Picture: Choose a picture to attach to the message, or take a new picture. • Preview: View the message before sending. • Save As Draft: Save a copy of the message in the Drafts folder. • Insert Quick Text: Insert a pre-loaded phrase. • Copy: Select text to copy, for pasting in another field. Use the Directional Key to highlight the text, then press DONE.
-
 1
1 -
2
-
3
-
4
-
5
-
6
-
7
-
8
-
9
-
10
-
11
-
12
-
13
-
14
-
15
-
16
-
17
-
18
-
19
-
20
-
21
-
22
-
23
-
24
-
25
-
26
-
27
-
28
-
29
-
30
-
31
-
32
-
33
-
34
-
35
-
36
-
37
-
38
-
39
-
40
-
41
-
42
-
43
-
44
-
45
-
46
-
47
-
48
-
49
-
50
-
51
-
52
-
53
-
54
-
55
-
56
-
57
-
58
-
59
-
 60
60 -
 61
61 -
 62
62 -
 63
63 -
 64
64 -
 65
65 -
 66
66 -
 67
67 -
 68
68 -
 69
69 -
 70
70 -
71
-
72
-
73
-
74
-
75
-
76
-
77
-
78
-
79
-
80
-
81
-
82
-
83
-
84
-
85
-
86
-
87
-
88
-
89
-
90
-
91
-
92
-
93
-
94
-
95
-
96
-
97
-
98
-
99
-
100
-
101
-
102
-
103
-
104
-
105
-
106
-
107
-
108
-
109
-
110
-
111
-
112
-
113
-
114
-
115
-
116
-
117
-
118
-
119
-
120
-
121
-
122
-
123
-
124
-
125
-
126
-
127
-
128
-
129
-
130
-
131
-
132
-
133
-
134
-
135
-
136
-
137
-
138
-
139
-
140
-
141
-
142
-
143
-
144
-
145
-
146
-
147
-
148
-
149
-
150
-
151
-
152
-
153
-
154
-
155
-
156
-
157
-
158
-
159
-
160
-
161
-
162
-
163
-
164
-
165
-
166
-
167
-
168
-
169
-
170
-
171
-
172
-
173
-
174
-
175
 |
 |