Seagate OneTouch II OneTouch II Installation Guide - Page 30
Set up Retrospe, t Express, k up your, omputer
 |
View all Seagate OneTouch II manuals
Add to My Manuals
Save this manual to your list of manuals |
Page 30 highlights
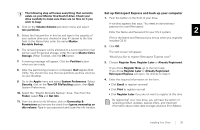
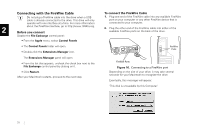
The following step will erase everything that currently exists on your Maxtor OneTouch II drive. Check your drive carefully to make sure there are no files on it you Set up Retrospect Express and back up your computer 1. Push the button on the front of your drive. wish to keep. A window appears that says: 'You need an administrator 4. Click on the Volume Scheme pull-down menu and select two partitions. password to start Retrospect.' Enter the Name and Password for your OS X system. 2 5. Select the first partition in this list and type in the capacity of your system drive (you checked in step #1 above) to the Size field. In the Name field, enter the name Maxtor (This is the Name and Password you set up when you originally installed OS X) Bootable Backup. 2. Click OK. 6. The remaining space will be allocated to a second partition that can be used for general storage, enter the name Maxtor Extra The next screen will appear: Storage. When finished, click the OK button. 'Would you like to register Retrospect Express now?' 7. A warning message will appear. Click the Partition button when you are ready. 8. After the partitioning process is completed, Quit Apple's Disk Utility. You should now see the two partitions as drive volumes on your Desktop. 9. Go to the Apple menu and select System Preferences. Select Security, click on the Turn Off FileVaulting button, then Quit System Preferences. 10. Select the "Maxtor Bootable Backup" drive. Then from the Finder, select File and Get Info. 11. From the drive's Info Window, click on Ownership & Permissions and remove the check from Ignore ownership on this volume. Type in your password and close the info window. 3. Choose Register Now, Register Later or Already Registered. If you chose Register Now, go to the next step. If you chose Register Later or Already Registered, Retrospect Express will open. Go directly to Step 5. 4. Enter the required information on the form. • Click Email to register via email • Click Print to register via mail • Click Register Later if you do not want to register at this time. By registering1 your new drive, you will have the option of receiving product updates, special offers, and important information about other data storage solutions from Maxtor. Installing Your Drive 28
-
 1
1 -
2
-
3
-
4
-
5
-
6
-
7
-
8
-
9
-
10
-
11
-
12
-
13
-
14
-
15
-
16
-
17
-
18
-
19
-
20
-
21
-
22
-
23
-
24
-
 25
25 -
 26
26 -
 27
27 -
 28
28 -
 29
29 -
 30
30 -
 31
31 -
 32
32 -
 33
33 -
 34
34 -
 35
35 -
36
-
37
-
38
-
39
-
40
-
41
-
42
-
43
-
44
-
45
-
46
-
47
-
48
-
49
-
50
-
51
-
52
-
53
-
54
-
55
-
56
-
57
-
58
-
59
-
60
-
61
-
62
-
63
-
64
-
65
-
66
-
67
-
68
 |
 |