Seagate OneTouch II OneTouch II Installation Guide - Page 43
Underst, ng Restore Po - specifications
 |
View all Seagate OneTouch II manuals
Add to My Manuals
Save this manual to your list of manuals |
Page 43 highlights
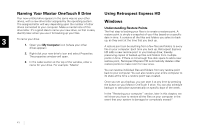
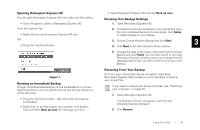
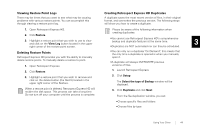
Naming Your Maxtor OneTouch II Drive Using Retrospect Express HD Your new untitled drive appears in the same way as your other drives, with a new drive letter assigned by the operating system. Windows The assigned letter will vary depending upon the number of other drives connected to your computer. Make a mental note of this drive letter. It¹s a good idea to name your new drive, so that is easy identify later when you use it for backing up your files. Understanding Restore Points The first step to backing your files is to create a restore point. A restore point is simply a snapshot of your files based on a specific 3 To name your drive: 1. Open your My Computer icon (where your other drives appear.) date in time. It contains all the files and folders you select to back up, as they exist at the time that you back up. A restore point can be anything from a few files and folders to every file on your computer. Each time you back up, Retrospect Express 2. Right-click your new drive¹s icon and select Properties. The properties window will open. HD adds a new restore point to your backup drive; thereby preserving copies of backed-up files and folders from multiple points in time. If there is not enough free disk space to add a new 3. In the Label section at the top of the window, enter a name for your drive. For example: 'Maxtor.' restore point, Retrospect Express HD automatically deletes older restore points to make room for new ones. You can restore individual files and folders from any restore point back to your computer. You can also restore your entire computer to its state at the time a restore point was created. Once you set up a backup, you can start it at any time by pressing the button on your Maxtor OneTouch II drive. You can also schedule backups to take place automatically on specific days of the week. In the "Restoring your computer" section, later in this chapter, we will show you how to restore all the files on your computer in the event that your system is damaged or completely erased.2 41
-
 1
1 -
2
-
3
-
4
-
5
-
6
-
7
-
8
-
9
-
10
-
11
-
12
-
13
-
14
-
15
-
16
-
17
-
18
-
19
-
20
-
21
-
22
-
23
-
24
-
25
-
26
-
27
-
28
-
29
-
30
-
31
-
32
-
33
-
34
-
35
-
36
-
37
-
 38
38 -
 39
39 -
 40
40 -
 41
41 -
 42
42 -
 43
43 -
 44
44 -
 45
45 -
 46
46 -
 47
47 -
 48
48 -
49
-
50
-
51
-
52
-
53
-
54
-
55
-
56
-
57
-
58
-
59
-
60
-
61
-
62
-
63
-
64
-
65
-
66
-
67
-
68
 |
 |
