Seagate OneTouch II OneTouch II Installation Guide - Page 54
of the restoration. If needed, you can press
 |
View all Seagate OneTouch II manuals
Add to My Manuals
Save this manual to your list of manuals |
Page 54 highlights
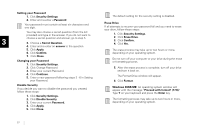
5. Click Restore The next window displays a calendar with a listing of all your restore points. 6. Select the date that contains the restore point you wish to restore from. 7. Click the restore point you wish to restore from. 8. Click Next. You are now asked which files and folders you wish to restore. 9. Place a check next to My Computer to select your entire computer for restore. 10. Click Next. You will now select where you want to restore your files. 11. Select To Their original location on: - to restore them to the exact location that they were initially copied from. All data will be lost on the current source location during this process. 12. Click Restore. At this point, Retrospect Express HD will start restoring files to your system. A status bar will show the progress of the restoration. If needed, you can press Stop to end the restore process. If your system restore was successful, you can exit Retrospect. 13. Click the red 'X' in the upper right corner of the window. 14. Restart your computer. Your system may require more than one restart. Follow any additional on-screen instructions, if necessary, to complete your system restore. 3 Using Your Drive 52
-
 1
1 -
2
-
3
-
4
-
5
-
6
-
7
-
8
-
9
-
10
-
11
-
12
-
13
-
14
-
15
-
16
-
17
-
18
-
19
-
20
-
21
-
22
-
23
-
24
-
25
-
26
-
27
-
28
-
29
-
30
-
31
-
32
-
33
-
34
-
35
-
36
-
37
-
38
-
39
-
40
-
41
-
42
-
43
-
44
-
45
-
46
-
47
-
48
-
 49
49 -
 50
50 -
 51
51 -
 52
52 -
 53
53 -
 54
54 -
 55
55 -
 56
56 -
 57
57 -
 58
58 -
 59
59 -
60
-
61
-
62
-
63
-
64
-
65
-
66
-
67
-
68
 |
 |