Seagate OneTouch II OneTouch II Installation Guide - Page 64
Bottom of Dr
 |
View all Seagate OneTouch II manuals
Add to My Manuals
Save this manual to your list of manuals |
Page 64 highlights
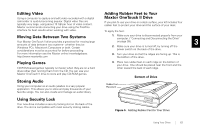
Editing Video Using a computer to capture and edit video recorded with a digital camcorder is quickly becoming popular. Digital video files are typically very large, using about 13 GB per hour of video content. Maxtor recommends connecting your drive using the FireWire interface for best results when working with video. Adding Rubber Feet to Your Maxtor OneTouch II Drive If you plan to use your drive on a desk surface, your kit includes four rubber feet to protect your drive and the surface of your desk. To apply the feet: Moving Data Between Two Systems Your Maxtor OneTouch II drive provides a great tool for moving large amounts of data between two systems- whether they be Windows PCs, Macintosh Computers or both. Certain considerations must be accounted for before proceeding. For more information see the Maxtor online knowledgebase: http://www.maxtorkb.com 1. Make sure your drive is disconnected properly from your computer. ("Connecting and Disconnecting the Drive" on page 39). 3 2. Make sure your drive is turned off, by turning off the power switch on the back of the drive. 3. Turn your drive so that the ridges are facing up. This is the bottom of the drive. Playing Games CD-ROM-based games typically run faster when they are on a hard drive rather than running them from the CD. You can use your Maxtor OneTouch II drive to store and play CD-ROM games. Storing Audio Using your computer as an audio jukebox is a very popular application. This allows you to store and play thousands of your favorite songs. You can also create and manage an audio library. 4. Place two rubber feet on each ridge on the bottom of your drive. One should be placed near the front and the other toward the back of each ridge. Rubber Feet Placement Bottom of Drive Using Security Lock Your new drive includes a security locking slot on the back of the drive. The slot is compatible with most security locking cables. Figure 5. Adding Rubber Feet to Your Drive Using Your Drive 62
-
 1
1 -
2
-
3
-
4
-
5
-
6
-
7
-
8
-
9
-
10
-
11
-
12
-
13
-
14
-
15
-
16
-
17
-
18
-
19
-
20
-
21
-
22
-
23
-
24
-
25
-
26
-
27
-
28
-
29
-
30
-
31
-
32
-
33
-
34
-
35
-
36
-
37
-
38
-
39
-
40
-
41
-
42
-
43
-
44
-
45
-
46
-
47
-
48
-
49
-
50
-
51
-
52
-
53
-
54
-
55
-
56
-
57
-
58
-
 59
59 -
 60
60 -
 61
61 -
 62
62 -
 63
63 -
 64
64 -
 65
65 -
 66
66 -
 67
67 -
 68
68
 |
 |
