Sharp DC500 FO-DC500 FO-DC525 FO-DC600 Operation Manual
Sharp DC500 - B/W Laser - All-in-One Manual
 |
View all Sharp DC500 manuals
Add to My Manuals
Save this manual to your list of manuals |
Sharp DC500 manual content summary:
- Sharp DC500 | FO-DC500 | FO-DC525 | FO-DC600 Operation Manual - Page 1
FO-DC500/FO-DC525 FO-DC600 DOCUMENT COMMUNICATION SYSTEM OPERATION MANUAL 1. Installation 2. Sending and Receiving Documents 3. Network Scanner Option 4. Network Printer Option 5. Making Copies 6. Special Functions 7. Optional Settings 8. Printing Lists and Reports 9. Maintenance 10. Troubleshooting - Sharp DC500 | FO-DC500 | FO-DC525 | FO-DC600 Operation Manual - Page 2
manufacturer could void the user's authority to operate digital device, pursuant to part 15 of the FCC Rules via a telephone facsimile machine unless such message clearly contains in a machine, please refer to the appropriate instructions in the operation manual." As an ENERGY STAR partner, SHARP - Sharp DC500 | FO-DC500 | FO-DC525 | FO-DC600 Operation Manual - Page 3
. Transmission time* Approx. 2 seconds Toner cartridge yield** (continuous printing, 4% page coverage, letter paper) Initial starter cartridge (included with machine): Approx. 3000 pages Replacement cartridge (FO-50ND): Approx. 6000 pages Drum cartridge yield** (continuous printing, 4% page - Sharp DC500 | FO-DC500 | FO-DC525 | FO-DC600 Operation Manual - Page 4
paper must be loaded one page at a time.) Paper capacity FO-DC500: 250 sheets (20 lb) FO-DC525/600: 750 sheets (20 lb) (FO-DC500/600: 500-sheet cassette available as option) Compression scheme MMR, MR, MH, Sharp Length: 5.0 to 14.3" (128 to 364 mm) Manual feeding: Width: 5.8 to 11.0" (148 to 279 - Sharp DC500 | FO-DC500 | FO-DC525 | FO-DC600 Operation Manual - Page 5
W FO-DC500 FO-DC525/600 Width: 21.5" (546 mm) 21.5" (546 mm) Depth: 16.2" (412 mm) 16.2" (412 mm) Height: 13.6" (346 mm) 17.0" (431 mm) (Not including paper tray or attachments) Approx. 31.3 lbs. (14.2 kg) 48.5 lbs. (22.0 kg) (Not including supplies, paper tray or attachments) As a part of - Sharp DC500 | FO-DC500 | FO-DC525 | FO-DC600 Operation Manual - Page 6
fire or electric shock. If an object falls into the machine that you cannot safely remove, unplug the machine and consult a qualified service representative. • Do not place this machine on an unstable cart, stand or table. The machine could be seriously damaged if it falls. • Avoid using a telephone - Sharp DC500 | FO-DC500 | FO-DC525 | FO-DC600 Operation Manual - Page 7
the Print Cartridges 18 Loading Printing Paper 22 Entering Your Name and Fax Number 25 Setting Fax by Automatic Dialing 45 Creating and Using Personal Books 54 Cover Sheet 61 Batch Page Numbering (Page Counter 63 Receiving Faxes 64 Substitute Reception to Memory 66 Dual-line Option (FO - Sharp DC500 | FO-DC500 | FO-DC525 | FO-DC600 Operation Manual - Page 8
Network Scanner Software 97 Inbound Routing 104 Using an LDAP Server: Searching for Destinations and User Authorization 110 4. Network Printer Option 121 Installing the Printer Driver 122 Setting 192 Blocking Reception of Unwanted Faxes 195 Telephone Billing 197 Distinctive Ring 199 6 - Sharp DC500 | FO-DC500 | FO-DC525 | FO-DC600 Operation Manual - Page 9
The Housing 217 Replacing the Verification Stamp 218 10. Troubleshooting 219 Problems and Solutions 219 Messages and Signals 226 Clearing Paper Jams 229 FCC Regulatory Information 232 QUICK REFERENCE GUIDE 236 GUÍA DE REFERENCIA RÁPIDA 237 GUIDE DE RÉFÉRENCE RAPIDE 238 Index 239 7 - Sharp DC500 | FO-DC500 | FO-DC525 | FO-DC600 Operation Manual - Page 10
a paper jam has occurred. A message will appear in the display to indicate the problem. 4 LINE IN USE light (FO-DC500/525 only) This lights when the machine is using the telephone line. 5 DATA light This blinks when the machine is receiving a print job over the network (only when the network printer - Sharp DC500 | FO-DC500 | FO-DC525 | FO-DC600 Operation Manual - Page 11
this light is on, the machine can receive data (print jobs) over the network. The light is turned on or off with the ON LINE key. (Only available when the network printer option is installed). 7 FAX1 / FAX 2 lights (FO-DC600 only) When the dual line option is installed, FAX 1 lights when Line 1 is - Sharp DC500 | FO-DC500 | FO-DC525 | FO-DC600 Operation Manual - Page 12
/ [ 28 M / ? 37 - 09 O / ) 19 K / ] 29 @ 38 . / , 10 P / = 20 L / + 30 .com 39 DEL (FO-DC600 only) 12 13 14 15 16 17 18 19 20 21 22 40 Q / ! 50 SYMBOL 41 W / " 51 A / | 42 E / # 52 S 43 Dial Keys Press one of these keys to dial a fax number automatically, or specify an email recipient if the - Sharp DC500 | FO-DC500 | FO-DC525 | FO-DC600 Operation Manual - Page 13
when sending a fax. 18 LIFE key Press this key, followed by START/ ENTER , to check the total number of pages printed STOP by the machine. (Press to a document directly from the feeder without reading it into memory. 22 LINE key (FO-DC600 only) When the dual line option has been installed - Sharp DC500 | FO-DC500 | FO-DC525 | FO-DC600 Operation Manual - Page 14
document. 25 PRIORITY key Press this key when you need to transmit a document ahead of other documents waiting in memory for transmission. 26 BROADCAST key Press this key to send a document to a group of fax machines, or to a group of e-mail recipients if the network scanner option is installed. 12 - Sharp DC500 | FO-DC500 | FO-DC525 | FO-DC600 Operation Manual - Page 15
a document. At any other time, press this key to print out the Help List, a quick reference guide to the operation of the machine. 32 Dial keypad (numeric keys) Use these keys to dial and program fax numbers. 33 REDIAL key Press this key to automatically redial the last number dialed. 34 SPEAKER key - Sharp DC500 | FO-DC500 | FO-DC525 | FO-DC600 Operation Manual - Page 16
are missing, contact your dealer. Power cord Telephone line cord Toner cartridge Drum cartridge ADF exit tray Received Rapid Key document tray labels Paper size labels Operation manual Points to keep in mind when setting up Do not place the machine in direct sunlight. Do not place the - Sharp DC500 | FO-DC500 | FO-DC525 | FO-DC600 Operation Manual - Page 17
as shown. Insert the male end into a 120 V, 60 Hz, grounded (3-prong) AC outlet. Important! The machine requires its own dedicated power outlet. The power outlet must not be shared with any other devices. In particular, do not use an extension cord to connect multiple devices to the outlet. Press - Sharp DC500 | FO-DC500 | FO-DC525 | FO-DC600 Operation Manual - Page 18
line cord Insert one end of the line cord into the jack on the back of the machine marked TEL. LINE. Insert the other end into a standard (RJ11C) single-line wall telephone jack. Note: The machine is set for touch-tone dialing. If you are on a pulse dial (rotary) line, you must - Sharp DC500 | FO-DC500 | FO-DC525 | FO-DC600 Operation Manual - Page 19
the left side of the ADF exit tray ➋. Pull out the tray extension ➌. 1 2 3 Attaching the received document tray Slide the received document tray into the machine as shown. When it stops, lift the end slightly and push in so that the tray locks into place. Important! The received document tray must - Sharp DC500 | FO-DC500 | FO-DC525 | FO-DC600 Operation Manual - Page 20
below to install or replace the toner and drum cartridges. ♦ The initial starter toner cartridge included with the machine can print approximately 3000 letter-size pages (4% coverage of each page; continuous printing). ♦ The replacement toner cartridge (FO-50ND) can print approximately 6000 letter - Sharp DC500 | FO-DC500 | FO-DC525 | FO-DC600 Operation Manual - Page 21
exposure to light will damage the drum cartridge. Install the cartridge promptly after removing it from its packaging. • Make sure the drum cartridge is inserted in as far as it will go. 5 If you are installing a new toner cartridge, remove the new toner cartridge from its packaging. Remove the tape - Sharp DC500 | FO-DC500 | FO-DC525 | FO-DC600 Operation Manual - Page 22
the Rapid Key overlay), or until DRUM COUNTER CLEAR is selected in the display, and then START/ ENTER twice. • Note: The toner counter automatically resets each time you replace the toner cartridge. There is normally no need to reset the toner counter manually. Should you find it necessary to - Sharp DC500 | FO-DC500 | FO-DC525 | FO-DC600 Operation Manual - Page 23
cartridge: Sharp FO-50ND toner cartridge Hint: When the toner cartridge nears empty, try taking it out of the machine and shaking it. This may increase the number of pages that can be printed before the toner runs out. When to replace the drum cartridge When the drum cartridge nears the end of its - Sharp DC500 | FO-DC500 | FO-DC525 | FO-DC600 Operation Manual - Page 24
to 500 sheets of letter or legal paper can be loaded in the paper cassette. FO-DC500: A paper cassette is available as an option. To have the cassette installed, consult your dealer. FO-DC525: A paper cassette is included as a standard feature. FO-DC600: One paper cassette is included as a standard - Sharp DC500 | FO-DC500 | FO-DC525 | FO-DC600 Operation Manual - Page 25
received document tray. • The received document tray must be attached for the machine to operate properly. Loading paper in the paper cassette (if installed) Note: To use A4 paper in the paper cassette, you must have a service technician adjust the cassette. 1 Grasp the hand-hold on the cassette and - Sharp DC500 | FO-DC500 | FO-DC525 | FO-DC600 Operation Manual - Page 26
, print side up. • Make sure the stack of paper is not higher than the two tabs on the paper guide and the two metal tabs. If it is, remove some of the paper. • If you find it difficult to load the paper, remove the cassette from the machine. (Pull the cassette out as far as it - Sharp DC500 | FO-DC500 | FO-DC525 | FO-DC600 Operation Manual - Page 27
fax page you send. Important! FCC regulations require that your name, telephone/fax number, and the date and time appear on each fax message you send. Enter your name and fax machine include this information automatically at the top of your fax NUMBER 4 Enter your fax number (max. of 20 digits) by - Sharp DC500 | FO-DC500 | FO-DC525 | FO-DC600 Operation Manual - Page 28
Fax Number 5 Press START/ ENTER . 6 Flip the Rapid Key overlay down (if it is up), and enter your name by pressing the appropriate letter keys as shown below. (Max. of 24 characters.) Example: SHARP Caps Lock . • To clear a mistake, press DEL . • To enter a number as part of a name, press the - Sharp DC500 | FO-DC500 | FO-DC525 | FO-DC600 Operation Manual - Page 29
1. Installation Setting the Date and Time Setting the Date and Time The date and time appear in the display, in reports, and at the top of each page you transmit. Set the date and time by pressing the keys on the operation panel as shown below. 1 Press MENU and then or until ENTRY MODE is - Sharp DC500 | FO-DC500 | FO-DC525 | FO-DC600 Operation Manual - Page 30
Setting the Date and Time 6 Enter the year (four digits). Example: 2004 2 0 0 4 7 Enter a two-digit number for the hour ("01" to "12") and a two-digit number for the minute ("00" to "59"). Example: 9:25 0 9 2 5 8 Press to select A.M. or to select P.M. 9 Press START/ ENTER to start the clock. 10 - Sharp DC500 | FO-DC500 | FO-DC525 | FO-DC600 Operation Manual - Page 31
1. Installation Setting the Date and Time Daylight Saving Time If desired, you can set the clock to move forward and backward automatically at the beginning and end of Daylight Saving Time. 1 Press MENU and then or until ENTRY MODE is selected in the display. Display: MENU MODE 1:RECEIVE MODE - Sharp DC500 | FO-DC500 | FO-DC525 | FO-DC600 Operation Manual - Page 32
Volume Adjustment Volume Adjustment You can adjust the volume of the speaker and ringer using Speaker and . 1 SPEAKER Press . 2 Press or to select the desired volume level. Display: ONHOOK DIAL MODE SPEAKER VOLUME HIGH ONHOOK DIAL MODE SPEAKER VOLUME MIDDLE ONHOOK DIAL MODE SPEAKER - Sharp DC500 | FO-DC500 | FO-DC525 | FO-DC600 Operation Manual - Page 33
1. Installation Volume Adjustment Ringer 1 Press the or to select the desired volume level. (Make sure SPEAKER has not been pressed.) Display: RINGER VOLUME HIGH • The ringer will ring once at the selected level, and then the date and time will reappear in the display. RINGER VOLUME MIDDLE - Sharp DC500 | FO-DC500 | FO-DC525 | FO-DC600 Operation Manual - Page 34
5.8" (148 mm) 5.0" (128 mm) Maximum size 10.1" (257 mm) 14.3" (364 mm) Minimum weight 14 lbs. (52 g/m²) Maximum weight 20 lbs. (80 g/m²) Note: 11" x 17" paper must be loaded one page at a time. 32 - Sharp DC500 | FO-DC500 | FO-DC525 | FO-DC600 Operation Manual - Page 35
clips, staples, and pins must be removed from documents before loading in the feeder. If these are not removed, they may damage the machine. ♦ Documents which are patched, taped, torn, smaller than the minimum size, carbon backed, easily smudged, or have a slick, coated surface should be photocopied - Sharp DC500 | FO-DC500 | FO-DC525 | FO-DC600 Operation Manual - Page 36
in, as this may cause double-feeding or jamming. ♦ If your document consists of several large the scanner to prevent skewing. 1 Adjust the document guides to the width of your document. 2 Place the . The top edge of the document should enter the machine first. • SEND READY will appear in the display. - Sharp DC500 | FO-DC500 | FO-DC525 | FO-DC600 Operation Manual - Page 37
/Receive Documents Adjusting the Resolution and Contrast If desired, you can adjust the resolution and contrast before sending a document. Resolution The machine has four resolution settings: STANDARD FINE SUPER FINE ULTRA FINE HALF TONE Use STANDARD for ordinary documents. This setting gives you - Sharp DC500 | FO-DC500 | FO-DC525 | FO-DC600 Operation Manual - Page 38
or more times until the indicator light next to the desired setting comes on. Contrast RESOLUTION HALF TONE STANDARD FINE SUPER FINE ULTRA FINE The machine has three contrast settings. The default setting is AUTO. AUTO DARK LIGHT Use AUTO for normal documents. Use DARK for faint documents. Use - Sharp DC500 | FO-DC500 | FO-DC525 | FO-DC600 Operation Manual - Page 39
and then dial by pressing the numeric keys. ♦ Normal Dialing allows you to listen to the line through the speaker to make sure the other fax machine is responding. (Note that the speaker is not a speakerphone; it cannot be used for talking.) ♦ If you have connected an extension telephone to the - Sharp DC500 | FO-DC500 | FO-DC525 | FO-DC600 Operation Manual - Page 40
. • If a person answers and you are using an extension phone, ask them to press their Start key. When you hear the fax tone, press START/ ENTER on your machine. Using the REDIAL key REDIAL You can press to redial the last number dialed. To send a document, press START/ ENTER when you - Sharp DC500 | FO-DC500 | FO-DC525 | FO-DC600 Operation Manual - Page 41
the full fax number in the Rapid Key or Speed Dial number. It is usually convenient to program your most frequently dialed numbers in Rapid Keys. ♦ Up to 59 Rapid Keys can be programmed for shared use. ♦ Up to 100 Speed Dial numbers can be programmed for shared use on the FO-DC500/525. Up - Sharp DC500 | FO-DC500 | FO-DC525 | FO-DC600 Operation Manual - Page 42
to use ("1" to "100" on the FO-DC500/525, or "1" to "200" on the FO-DC600). (If you enter less than three fax number by pressing the numeric keys (maximum of 60 digits including pauses). • To clear a mistake, press DEL . • If a pause is required between any of the digits to access a special service - Sharp DC500 | FO-DC500 | FO-DC525 | FO-DC600 Operation Manual - Page 43
(max. of 20 characters). (Make sure the Rapid Key overlay is flipped down.) Example: SHARP = Caps Lock S H / } A/ | R/$ P/= 01 Q / ! 11 SYMBOL Lock . • To clear a mistake, press DEL . • To enter a number as part of a name, press fax number. After making the selection, press START/ ENTER . 41 - Sharp DC500 | FO-DC500 | FO-DC525 | FO-DC600 Operation Manual - Page 44
as a Chain Dialing number. After you dial an area code or access code using a Rapid Key or Speed Dial number set for Chain Dialing, the machine will wait for you to dial the remainder of the number (you can dial the remainder of the number by pressing a Rapid Key, by pressing - Sharp DC500 | FO-DC500 | FO-DC525 | FO-DC600 Operation Manual - Page 45
for which you want to make changes in Step 5, and then change the number(s) and/or name(s) when they appear in the display (Steps 7 and 9). Clearing auto-dial numbers Note: You cannot clear a number if it is used in a program or timer operation, or if it is included in a Group Key. First - Sharp DC500 | FO-DC500 | FO-DC525 | FO-DC600 Operation Manual - Page 46
the numeric keys. (If you enter less than three digits, press START/ ENTER to complete the entry.) 6 Press START/ ENTER . 7 STOP Return to Step 5 to clear another number, or press repeatedly to return to the date and time display. 44 - Sharp DC500 | FO-DC500 | FO-DC525 | FO-DC600 Operation Manual - Page 47
after loading the document. Your machine will call the receving fax machine immediately after the current job is finished (ahead of any previously stored jobs in memory), and the document will be scanned as soon as the connection is established. ♦ The FO-DC500/525 can hold approximately 500 pages - Sharp DC500 | FO-DC500 | FO-DC525 | FO-DC600 Operation Manual - Page 48
Sending a Fax by Automatic Dialing Rapid Key Dialing If the number you other documents waiting for transmission, press PRIORITY . • To send the document directly from the feeder (not through memory), press DOCUMENT M/? . (Flip up the Rapid Key overlay if it is down.) 2 Press the appropriate Rapid - Sharp DC500 | FO-DC500 | FO-DC525 | FO-DC600 Operation Manual - Page 49
2. Send/Receive Documents Sending a Fax by Automatic Dialing Speed Dialing If the number documents waiting for transmission, press PRIORITY . • To send the document directly from the feeder (not through memory), press DOCUMENT M/? . (Flip up the Rapid Key overlay if it is down.) 2 SPEED DIAL - Sharp DC500 | FO-DC500 | FO-DC525 | FO-DC600 Operation Manual - Page 50
through memory), press DOCUMENT M/? . (Flip up the Rapid Key overlay if it is down.) 2 Enter the number of the receiving machine by pressing the numeric keys. • If a pause is required between any of the digits to access a special service or an outside line, - Sharp DC500 | FO-DC500 | FO-DC525 | FO-DC600 Operation Manual - Page 51
/Receive Documents Searching for an auto-dial number If you don't remember the Rapid Key or Speed Dial number in which you have programmed a particular fax number, you can search for the number by following the steps below. Once you have found the number, you can dial it and transmit the - Sharp DC500 | FO-DC500 | FO-DC525 | FO-DC600 Operation Manual - Page 52
at the factory. To change the setting, see page 207.) If Quick On-Line is set to OFF the transmission will be canceled and STOP MEMORY FULL ERROR will appear in the display. Press to clear the message. Try the transmission again later when - Sharp DC500 | FO-DC500 | FO-DC525 | FO-DC600 Operation Manual - Page 53
TX STATUS is selected in the display. Display: MEMORY STATUS REPORT 1:COPY STATUS 2:MEMORY TX STATUS 3:MEMORY RX STATUS 4:MESSAGE CLEAR 2 Press START/ ENTER . Number of stored transmission jobs 3-digit memory number assiged to job • The fax jobs appear. • To print out the list of the jobs - Sharp DC500 | FO-DC500 | FO-DC525 | FO-DC600 Operation Manual - Page 54
Sending a Fax by Automatic Dialing 3 Press or to scroll through the list of jobs or until MESSAGE CLEAR is selected in the display. Display: MEMORY STATUS REPORT 1:COPY STATUS 2:MEMORY TX STATUS 3:MEMORY RX STATUS 4:MESSAGE CLEAR 2 Press START/ ENTER . 3 Enter the 3-digit memory number of - Sharp DC500 | FO-DC500 | FO-DC525 | FO-DC600 Operation Manual - Page 55
If a line error occurs during any type of memory transmission, your fax will automatically redial the number and attempt to complete the transmission. Retransmission will begin from the page which was being transmitted when the error occurred. The machine has been set at the factory to make 10 - Sharp DC500 | FO-DC500 | FO-DC525 | FO-DC600 Operation Manual - Page 56
own personal use. Up to 20 books can be created in the FO-DC500/525, or 40 books in the FO-DC600. ♦ Up to 59 Rapid Key numbers and 16 Speed Dial the display. ENTRY MODE 06:ID # MODE 07:SYSTEM # MODE 08:STORE JUNK FAX # 09:DEPT. PASSCODE 10:BOOK ENTRY MODE 3 Press START/ ENTER . Make sure that SET - Sharp DC500 | FO-DC500 | FO-DC525 | FO-DC600 Operation Manual - Page 57
number from 01 to 20 (FO-DC500/525) or 01 to 40 (FO- DC600). • This number will identify the personal book. 6 Enter a name for the personal book by pressing the letter entry keys. (Make sure the Rapid Key overlay is down.) Example: SHARP = Caps Lock S H / } A/ | R/$ P/= • For more information - Sharp DC500 | FO-DC500 | FO-DC525 | FO-DC600 Operation Manual - Page 58
be programmed.) • If you do not store your login name in the book, user authentication will not be required when you open the book, but it will be instead directly enter your login name, the default sender name programmed in the machine (page 85) and your e-mail address as stored on the LDAP server - Sharp DC500 | FO-DC500 | FO-DC525 | FO-DC600 Operation Manual - Page 59
cannot be used if any computers involved in the transmission are running Windows XP • This sender's name and the e-mail address entered in These are used whenever a sender's name and e-mail address are not entered manually when sending a document to an e-mail recipient. 17 Press START/ ENTER . - Sharp DC500 | FO-DC500 | FO-DC525 | FO-DC600 Operation Manual - Page 60
page 39. ♦ Use a Rapid Key to fax a document as explained on page 46. ♦ Use a Speed Dial number to fax a document as explained on page 47. ♦ Key and Speed Dial numbers from your book (see page 154). ♦ Broadcast a fax to multiple destinations using Rapid Keys, Speed Dial numbers, or a Group Key in - Sharp DC500 | FO-DC500 | FO-DC525 | FO-DC600 Operation Manual - Page 61
Personal Books 2. Send/Receive Documents ♦ Poll one or more fax machines using Rapid Keys and Speed Dial numbers from your book ( the job status of the fax can be checked without opening your book. To clear a Rapid Key or Speed Dial number in a book, open the book and then clear the key or number. - Sharp DC500 | FO-DC500 | FO-DC525 | FO-DC600 Operation Manual - Page 62
operation is pending that uses a number in a book, the book cannot be cleared until the operation is completed or canceled. 1 Press MENU and then or until ENTRY ENTRY MODE 06:ID # MODE 07:SYSTEM # MODE 08:STORE JUNK FAX # 09:DEPT. PASSCODE 10:BOOK ENTRY MODE 3 Press START/ ENTER and then or - Sharp DC500 | FO-DC500 | FO-DC525 | FO-DC600 Operation Manual - Page 63
2. Send/Receive Documents Cover Sheet Cover Sheet You can have the machine generate a cover sheet and send it as the last page of your fax transmission. The cover sheet includes the date and time, the receiver's name and number if a Rapid Key or Speed Dial number is used, the sender's - Sharp DC500 | FO-DC500 | FO-DC525 | FO-DC600 Operation Manual - Page 64
then revert to SEND READY. • To cancel the cover sheet selection, press STOP . 3 Dial the receiving party and transmit the fax. If desired, you can set your fax to automatically send a cover sheet with every transmission (you do not have to press COVER SHEET C each time). This is accomplished - Sharp DC500 | FO-DC500 | FO-DC525 | FO-DC600 Operation Manual - Page 65
Batch Page Numbering (Page 2. Sending/ Receiving Faxes Batch Page Numbering (Page Counter) You can it in the total number of pages (the number will be adjusted automatically). 4 Dial the receiving machine and transmit the document. ♦ If you need to cancel a batch number entry, remove the document - Sharp DC500 | FO-DC500 | FO-DC525 | FO-DC600 Operation Manual - Page 66
Receiving Faxes Receiving Faxes The machine has two modes for receiving faxes: AUTO mode: Select this mode when you only want to receive faxes on the line connected to the machine. The machine will answer all calls automatically and receive incoming faxes. MANUAL mode: Select this mode when you - Sharp DC500 | FO-DC500 | FO-DC525 | FO-DC600 Operation Manual - Page 67
202). ♦ If you pick up an extension phone before the machine answers, you can talk to the other party and/or receive a fax as explained in the following section, Using MANUAL Reception Mode. Using MANUAL Reception Mode 1 When the machine rings, answer the call on an extension phone connected to the - Sharp DC500 | FO-DC500 | FO-DC525 | FO-DC600 Operation Manual - Page 68
page 158) are also received to memory. When you have received a fax to memory, FAX RCVD IN MEMORY will appear in the display, along with NO PAPER, REPLACE TONER, or PAPER JAM. When you add paper, replace the toner cartridge, or clear the jam, the stored faxes will automatically print out. You can - Sharp DC500 | FO-DC500 | FO-DC525 | FO-DC600 Operation Manual - Page 69
network printer option cannot both be installed on the same machine. After your dealer installs the dual line kit, connect your second phone line to the LINE 2 jack. Caution: Do not insert the line into the port on the LAN board (if installed). This will damage the LAN board. LINE 2 ♦ Manual fax - Sharp DC500 | FO-DC500 | FO-DC525 | FO-DC600 Operation Manual - Page 70
FO and enter your name by pressing the appropriate letter keys as shown below. (Max. of 24 characters.) Example: SHARP = Caps Lock S H / } A/ | R/$ P/= 01 Q / ! 11 SYMBOL 02 W / , press Caps Lock . • To clear a mistake, press DEL . • To enter a number as part of a name, press the appropriate - Sharp DC500 | FO-DC500 | FO-DC525 | FO-DC600 Operation Manual - Page 71
/Receive Documents Dual-line Option (FO-DC600 only) 6 Enter the fax number (maximum of 20 digits) of Line 1. • To insert a space between digits, press . • To clear a mistake, press STOP . 7 Press START/ ENTER . OWN PASSCODE SET LINE 2: SENDER'S NUMBER 8 Enter the fax number (maximum of 20 - Sharp DC500 | FO-DC500 | FO-DC525 | FO-DC600 Operation Manual - Page 72
Dual-line Option (FO-DC600 only) ♦ If you wish to restrict either of the lines to line to transmission only or reception only. You can also use this procedure to select the reception mode (AUTO or MANUAL) for Line 1 (the reception mode for Line 2 is fixed at AUTO). 1 Press MENU and then so that - Sharp DC500 | FO-DC500 | FO-DC525 | FO-DC600 Operation Manual - Page 73
" and "RX" stands for "reception". "AUTO" and "MANU" indicate AUTO and MANUAL reception modes. Settings for Line 1: LINE 1 SETTING 1=TX AND RX (AUTO) 2= . Verification Stamp Option When transmitting a document, you can have the machine stamp each document page as it is scanned. After scanning, you - Sharp DC500 | FO-DC500 | FO-DC525 | FO-DC600 Operation Manual - Page 74
of Windows: Windows 98/ME/NT 4.0/2000/XP Installing the PC-Fax driver in your computer To install the PC-Fax driver in your computer, see the installation guide in the CD-ROM in the FO-LN1 network interface kit. The installation guide ("Installation Guide.pdf") is located in the PC-FAX folder - Sharp DC500 | FO-DC500 | FO-DC525 | FO-DC600 Operation Manual - Page 75
the Print window, select "SHARP FO-DC Series FAX" for the printer and then click OK. A window will appear to let you enter the destination fax number (or select it from the address book) and select any other fax settings. When finished, click OK. The document will be sent to the machine, which will - Sharp DC500 | FO-DC500 | FO-DC525 | FO-DC600 Operation Manual - Page 76
, SharpDesk. Scan a document and transmit the image file to... An FTP server, for downloading by recipients at their convenience Any e-mail address Scan destinations can be stored in Rapid Keys on the machine, for easy one-touch scanning and transmission. 74 Your computer desktop, for processing - Sharp DC500 | FO-DC500 | FO-DC525 | FO-DC600 Operation Manual - Page 77
install the FO-LN1 network interface kit and the FO-NS2 network scanner kit, and enter the network scanner product key. The machine must be comes with the network scanner kit (see page 97 for installation instructions). User's guides in PDF format for the programs are also included on the CD-ROM. - Sharp DC500 | FO-DC500 | FO-DC525 | FO-DC600 Operation Manual - Page 78
be set to unlimited. To check the IP address currently assigned to the machine when DHCP is used, print out the network setting list as explained on the display. Display: MENU MODE 5:PROGRAM/GROUP MODE 6:SERIAL POLLING MODE 7:MEMORY POLL MODE 8:NETWORK SETTING 2 Press START/ ENTER . • Make sure - Sharp DC500 | FO-DC500 | FO-DC525 | FO-DC600 Operation Manual - Page 79
, and 2) press JOB STATUS and check the display to see if the machine is sending or receiving a fax.) 7 If you are entering a permanent IP address, press START/ ENTER . IP ADDRESS 8 Enter the IP address of your machine (to move the cursor to the right, press ). When finished, press START - Sharp DC500 | FO-DC500 | FO-DC525 | FO-DC600 Operation Manual - Page 80
and check the display to see if the machine is sending or receiving a fax.) Initializing the network interface board Normally the network . Press to select "YES" and then press START/ ENTER . Wait while the machine writes the setting to the NIC board ("DO NOT POWER DOWN" will appear in the - Sharp DC500 | FO-DC500 | FO-DC525 | FO-DC600 Operation Manual - Page 81
and network interface board settings. ♦ To check the IP address of the machine, select PRINT NETWORK SETTINGS in Step 3 below. 1 Press MENU and then in MENU MODE the display. 5:PROGRAM/GROUP MODE 6:SERIAL POLLING MODE 7:MEMORY POLL MODE 8:NETWORK SETTING 2 Press START/ ENTER and then . • - Sharp DC500 | FO-DC500 | FO-DC525 | FO-DC600 Operation Manual - Page 82
the IP address (the number of digits between periods will vary depending on the address). If you need to check the IP address of the machine, print out the network settings as explained on page 79. Mail server and DNS server To configure your mail server and DNS server settings, click - Sharp DC500 | FO-DC500 | FO-DC525 | FO-DC600 Operation Manual - Page 83
machine power off and then back on. The next time you attempt to access the Web page, you will be prompted for the password. For the User name, enter "user" if you are accessing the page as a user in the transmission are running Windows XP For detailed information on all the settings in the Web page - Sharp DC500 | FO-DC500 | FO-DC525 | FO-DC600 Operation Manual - Page 84
COMMON book. ♦ Scan to E-mail can be performed by manually entering the destination e- mail address at the time of transmission, the Web page, or using the operation panel on the machine (to use the operation panel, see page 94). ♦ To the computer. ♦ Fax destinations can also be stored in Rapid Keys - Sharp DC500 | FO-DC500 | FO-DC525 | FO-DC600 Operation Manual - Page 85
store a destination, click the desired destination type (E-mail, FTP, Fax or Group) under Destination Management in the Web page menu. In book. To select a Rapid Key or Speed Dial number, select the Location Assigned Manually checkbox and select a Rapid Key or Speed Dial number from the list. Enter - Sharp DC500 | FO-DC500 | FO-DC525 | FO-DC600 Operation Manual - Page 86
is begun by pressing the Rapid Key or Speed Dial number on the machine that contains your computer as a Scan to Desktop destination. To use Scan and set up the Network Scanner Tool, access the Web page in the machine from your browser on your computer, and click Destination Management in the menu - Sharp DC500 | FO-DC500 | FO-DC525 | FO-DC600 Operation Manual - Page 87
"Scanned image from FO-DCXXX" (where "XXX" is "500" on the FO-DC500 and FO-DC525, and "600" on the FO-DC600), and the on page 81, even if a sender is manually entered at the time of transmission. Note: In MODE the display. 6:SERIAL POLLING MODE 7:MEMORY POLL MODE 8:NETWORK SETTING 2 Press START - Sharp DC500 | FO-DC500 | FO-DC525 | FO-DC600 Operation Manual - Page 88
= 20 L / + 30 .com 39 DEL • To enter a space, press Space . • To change case, press Caps Lock . • To clear a mistake, press DEL . • To enter a number, press the appropriate numeric key. To enter the symbol on a letter key (the character to the involved in the transmission are running Windows XP 86 - Sharp DC500 | FO-DC500 | FO-DC525 | FO-DC600 Operation Manual - Page 89
or NO COMPRESSION). • TIFF is a bitmap format that can be compressed without loss of data. TIFF images can be viewed by many viewer programs. PDF is a widely used format that requires Adobe Acrobat Reader to view. • G4 provides the greatest amount of compression and works well with most black and - Sharp DC500 | FO-DC500 | FO-DC525 | FO-DC600 Operation Manual - Page 90
default sender as explained in the procedure beginning on page 85 of this manual. ♦ If you need to change the e-mail subject, use the procedure resolution is FINE. Note that STANDARD and SUPER FINE are primarily for faxing and are not recommended for scanning. 2 Press e-mail . Display: SCAN - Sharp DC500 | FO-DC500 | FO-DC525 | FO-DC600 Operation Manual - Page 91
START/ ENTER , enter your e-mail address, and press START/ ENTER . • FILE FORMAT Press to select the desired combination of file format (TIFF or PDF) and compression (G3, G4 or NO COMPRESSION), and then press START/ ENTER . • MESSAGE Use the letter entry keys to enter a message (see Step - Sharp DC500 | FO-DC500 | FO-DC525 | FO-DC600 Operation Manual - Page 92
a default sender as explained in the procedure beginning on page 85 of this manual. ♦ If you are sending the image to an e-mail destination and need is FINE. Note that STANDARD and SUPER FINE are primarily for faxing and are not recommended for scanning. 2 Press the appropriate Rapid Key. - Sharp DC500 | FO-DC500 | FO-DC525 | FO-DC600 Operation Manual - Page 93
START/ ENTER , enter your e-mail address, and press START/ ENTER . • FILE FORMAT Press to select the desired combination of file format (TIFF or PDF) and compression (G3, G4 or NO COMPRESSION), and then press START/ ENTER . • MESSAGE Use the letter entry keys to enter a message (maximum of - Sharp DC500 | FO-DC500 | FO-DC525 | FO-DC600 Operation Manual - Page 94
a default sender as explained in the procedure beginning on page 85 of this manual. ♦ If you are sending the image to an e-mail destination and need to resolution is FINE. Note that STANDARD and SUPER FINE are primarily for faxing and are not recommended for scanning. 2 SPEED DIAL Press and then - Sharp DC500 | FO-DC500 | FO-DC525 | FO-DC600 Operation Manual - Page 95
START/ ENTER , enter your e-mail address, and press START/ ENTER . • FILE FORMAT Press to select the desired combination of file format (TIFF or PDF) and compression (G3, G4 or NO COMPRESSION), and then press START/ ENTER . • MESSAGE Use the letter entry keys to enter a message (maximum of - Sharp DC500 | FO-DC500 | FO-DC525 | FO-DC600 Operation Manual - Page 96
Dial numbers using the operation panel of the machine. This will allow you to send documents to e-mail recipients without having to manually enter the email address each time. ♦ SET is selected. DESTINATION SETTING 1=SET 2=CLEAR 4 Press START/ ENTER . DESTINATION SET PRESS RAPID OR SPEED 94 - Sharp DC500 | FO-DC500 | FO-DC525 | FO-DC600 Operation Manual - Page 97
" on the FO-DC500/525, or "1" to "200" on the FO-DC600). (If FAX 2=E-MAIL 7 Press START/ ENTER . 8 Enter the e-mail address of the recipient by pressing the letter entry keys (for details, see Step 5 on page 86; max. of 60 characters). (Make sure the Rapid Key overlay is flipped down.) • To clear - Sharp DC500 | FO-DC500 | FO-DC525 | FO-DC600 Operation Manual - Page 98
1:TIFF-G4 2:TIFF-G3 3:TIFF-NO COMPRESSION 4:PDF-G4 5:PDF-G3 12 Press or to select the file format (TIFF or PDF) and compression method (G3, G4, or NO needed in the following steps. Clearing a Rapid Key or Speed Dial number To clear a Rapid Key or Speed Dial number, select CLEAR in Step 3 of the - Sharp DC500 | FO-DC500 | FO-DC525 | FO-DC600 Operation Manual - Page 99
Sharpdesk in more than 5 computers, please contact your Sharp dealer. Software Programs For detailed information on each of the software programs, please refer to the user's guides on the CD-ROM. Sharpdesk (Desktop Document Management Software) Sharpdesk lets you manage a variety of electronic - Sharp DC500 | FO-DC500 | FO-DC525 | FO-DC600 Operation Manual - Page 100
Tool. ♦ Sent as e-mail. ♦ Saved in Sharpdesk. User's Guides for Software Programs The Manual folder in the CD-ROM contains user's guides (in PDF format) for each of the software programs. ♦ Sharpdesk User's Guide ♦ Network Scanner Tool User's Guide Acrobat Reader Version 4.05 or later is needed to - Sharp DC500 | FO-DC500 | FO-DC525 | FO-DC600 Operation Manual - Page 101
FO-DC500 in the installation windows. ♦ Be sure to check the system requirements for installation of each of the software programs in the user's guides and on the information screen during installation. ♦ The user's guides give detailed instructions . 1 Quit any software applications and/or resident - Sharp DC500 | FO-DC500 | FO-DC525 | FO-DC600 Operation Manual - Page 102
windows means "FO-DC525". In addition, some windows of the setup wizard refer to the FO-DC500/525/600 as "Copier". 1 When the Sharp Network Scanner Tool Setup Wizard appears, click OK after confirming that the FO-DC500/525/600 is connected to the network. Follow the on-screen instructions - Sharp DC500 | FO-DC500 | FO-DC525 | FO-DC600 Operation Manual - Page 103
Software FO-DC500/525/ 600, however, an entry is necessary). 3 Select the Process Definitions that you wish to use and click Next. Each process that you select will be assigned a Rapid Key or Speed Dial number on the machine. • Network Scanner Tool is shipped with 3 pre-defined sets of instructions - Sharp DC500 | FO-DC500 | FO-DC525 | FO-DC600 Operation Manual - Page 104
was not set, "FO-DC500(600)" (or a higher number if there are multiple FO-DC500/525/600 machines on the network) will Windows Start button, pointing to Programs, Sharpdesk and then selecting Network Scanner Tool Configuration. For more details, see online Help or the Network Scanner Tool User's Guide - Sharp DC500 | FO-DC500 | FO-DC525 | FO-DC600 Operation Manual - Page 105
software programs with the Sharpdesk Uninstaller Click Start and then point to Programs (All Programs in Windows XP), Sharpdesk, and then Uninstall. Follow the instructions on the screen. If an additional FO-DC500/525/600 machine is installed on the network If an additional FO-DC500/525/600 machine - Sharp DC500 | FO-DC500 | FO-DC525 | FO-DC600 Operation Manual - Page 106
each of the forwarding e-mail addresses in that set. When multiple sets are stored, the machine checks each activated set and forwards the fax as appropriate. ♦ You can also configure one set to have all received faxes forwarded to the e-mail addresses in the set. For example, to have all received - Sharp DC500 | FO-DC500 | FO-DC525 | FO-DC600 Operation Manual - Page 107
SETTING 3 Press START/ ENTER . Make sure that SET is selected. 4 Press START/ ENTER . 3FA:EXNTRAYNMSOFDEER SETTING EN1T=ESRET#(01-10, , ) 2=CLEAR 3=ON/OFF FAX TRANSFER SET SETTING #= 5 Enter a 2-digit number from 01 to 41. This number is used to identify the set that you are storing - Sharp DC500 | FO-DC500 | FO-DC525 | FO-DC600 Operation Manual - Page 108
Inbound Routing 10 Enter a sender's fax number (max. 20 digits) by pressing the numeric keys and then press START/ ENTER . Repeat until all you have entered all desired sender's numbers. Example: - Sharp DC500 | FO-DC500 | FO-DC525 | FO-DC600 Operation Manual - Page 109
ENTRY MODE 07:SYSTEM # MODE 08:STORE JUNK FAX # 09:DEPT. PASSCODE 10:BOOK ENTRY MODE 11:FAX TRANSFER SETTING 3 Press START/ ENTER . and then or 3FA:EXNTRAYNMSOFDEER SETTING to EN1T=ESRET#(01-10, , ) select CLEAR. 2=CLEAR 3=ON/OFF 4 Press START/ ENTER . FAX TRANSFER CLEAR SETTING #= 107 - Sharp DC500 | FO-DC500 | FO-DC525 | FO-DC600 Operation Manual - Page 110
SETTING. ENTRY MODE 07:SYSTEM # MODE 08:STORE JUNK FAX # 09:DEPT. PASSCODE 10:BOOK ENTRY MODE 11:FAX TRANSFER SETTING 3 Press START/ ENTER . and then or to 3FA:EXNTRAYNMSOFDEER SETTING EN1T=ESRET#(01-10, , ) select ON/OFF. 2=CLEAR 3=ON/OFF 4 Press START/ ENTER . 3FA:EXNTRAYNMSOFDEER ON - Sharp DC500 | FO-DC500 | FO-DC525 | FO-DC600 Operation Manual - Page 111
are forwarded. If desired, you can change this setting to have the machine print only faxes that are not successfully forwarded. See Option Setting 37 on page 210. File format The file format when a fax is converted to e-mail is PDF or TIFF as selected in SCAN TO E-MAIL SET-UP (see page 85 - Sharp DC500 | FO-DC500 | FO-DC525 | FO-DC600 Operation Manual - Page 112
. LDAP server settings To use an LDAP server to search for destinations and for user authorization, you must first configure your LDAP server settings in the Web page of the machine. Open the Web page in your browser on your computer (see page 80) and click LDAP under Setup in the menu - Sharp DC500 | FO-DC500 | FO-DC525 | FO-DC600 Operation Manual - Page 113
for Search Root, Port Number, Timeout, User Name, Password, and Authentication Type (types supported are Anonymous, SIMPLE and DIGEST-MD5). Consult the previous section, you can search for a destination on the LDAP server when faxing or sending an image by Scan to E-mail. ♦ Destinations on the LDAP - Sharp DC500 | FO-DC500 | FO-DC525 | FO-DC600 Operation Manual - Page 114
User only or fax only in the LDAP settings in the machine's Web page, only e-mail or only fax destinations will appear clear the message and try a different keyword. • If the machine was unable to establish communication with the LDAP server, an error message will appear. Follow the instructions - Sharp DC500 | FO-DC500 | FO-DC525 | FO-DC600 Operation Manual - Page 115
3. Network Scanner Using an LDAP Server: Searching for Destinations and User Authorization 6 Press or until the desired name is selected in the display. • To check the e-mail address and/or fax number that is listed for a name, press after selecting the name. (Press to return when finished.) - Sharp DC500 | FO-DC500 | FO-DC525 | FO-DC600 Operation Manual - Page 116
for Destinations and User Authorization 9 Complete the not press the operation. , this completes • Fax: Transmission will begin immediately. This completes the FORMAT Press to select the desired combination of file format (TIFF or PDF) and compression (G3, G4 or NO COMPRESSION), and then press - Sharp DC500 | FO-DC500 | FO-DC525 | FO-DC600 Operation Manual - Page 117
Using an LDAP Server: Searching for Destinations and User Authorization 11 When you have finished changing the options when using the operation panel of the machine.) In the E-mail Destination Control or Fax Destination Control page (click Email or Fax under Destination Management in the Web page - Sharp DC500 | FO-DC500 | FO-DC525 | FO-DC600 Operation Manual - Page 118
close and the selected destination will be entered in the E-mail Destination Control or Fax Destination Control page. Enabling user authentication You can use the LDAP server to restrict use of the machine to authorized users. When this is done, a valid login name and password (and an e-mail address - Sharp DC500 | FO-DC500 | FO-DC525 | FO-DC600 Operation Manual - Page 119
Using an LDAP Server: Searching for Destinations and User Authorization 3. Network Scanner ♦ When a Global Address Book ♦ When START/ ENTER is pressed to send a fax after answering a call on an extension phone connected to the same line as the machine. Follow the steps below to log in. 1 When - Sharp DC500 | FO-DC500 | FO-DC525 | FO-DC600 Operation Manual - Page 120
machine's Web page or consult your network administrator). To clear the message, press START/ ENTER . Logging in from the sender list If your login name is stored in your personal book, you can select the sender name stored in your personal book to log in. This saves you the trouble of manually - Sharp DC500 | FO-DC500 | FO-DC525 | FO-DC600 Operation Manual - Page 121
server. Press START/ ENTER to clear the message. Check your personal book USER LOCK OUT" will appear and it will not be possible to operate the machine for 1 minute. • If the machine was unable to establish communication with the LDAP server, an error message will appear. Follow the instructions - Sharp DC500 | FO-DC500 | FO-DC525 | FO-DC600 Operation Manual - Page 122
Server: Searching for Destinations and User Authorization Storing your login name in a personal book To store your login name when using the operation panel of the machine to create a personal book, see the procedure on page 54. To store your login name when using the machine's Web page to create - Sharp DC500 | FO-DC500 | FO-DC525 | FO-DC600 Operation Manual - Page 123
order shown. 1. Your dealer must install the FO-LN1 network interface kit and the FO-NP1 network scanner kit. The machine must be connected to the network. 2. The IP address of the machine must be set as explained in the following section. 3. The printer driver must be installed in all computers on - Sharp DC500 | FO-DC500 | FO-DC525 | FO-DC600 Operation Manual - Page 124
hardware and software in order to install the printer driver. Computer Operating System CPU RAM • IBM PC/AT or compatible computer equipped with an Ethernet interface • Windows 98 Second Edition, Windows Me, Windows NT 4.0 Workstation/Server (Service Pack 3 or later), Windows 2000 Professional - Sharp DC500 | FO-DC500 | FO-DC525 | FO-DC600 Operation Manual - Page 125
through a server. Follow the appropriate instructions below for your operating system and your network type to install the printer driver. Client-server network: Installing the printer driver in the server To use the printer on a client-server network, the printer driver must first be installed in - Sharp DC500 | FO-DC500 | FO-DC525 | FO-DC600 Operation Manual - Page 126
Installing the Printer Driver 4 Select "Create a new port" and select "Standard TCP/IP Port" from the list. Click Next. 5 The "Add Standard TCP/IP Printer Port Wizard" will appear. Click Next. 6 Enter the IP address of the printer (the port name is filled in automatically). • If you need to check - Sharp DC500 | FO-DC500 | FO-DC525 | FO-DC600 Operation Manual - Page 127
4. Network Printer Installing the Printer Driver 7 Select Custom and then click the Settings button. 8 The "Configure Standard TCP/IP Port Monitor" window will appear. Select LPR for the protocol, and enter any name for the queue name. Click OK. 125 - Sharp DC500 | FO-DC500 | FO-DC525 | FO-DC600 Operation Manual - Page 128
your CD-ROM drive. If the "Readme First" window appears, click Cancel to close the window. 13 Enter the path Q:\Option\English\2kxp_pclxl (substitute the letter of your CD-ROM drive for "Q") and click the OK button. 14 The printer driver name will appear in the Add Printer Wizard. Click Next. 126 - Sharp DC500 | FO-DC500 | FO-DC525 | FO-DC600 Operation Manual - Page 129
4. Network Printer Installing the Printer Driver 15 Follow the instructions on your screen. When the "Printer Sharing" window appears, select Share as. If you would like to change the name, enter a new name (this must be 8 characters or less to allow sharing with Windows 98/Me computers). Click - Sharp DC500 | FO-DC500 | FO-DC525 | FO-DC600 Operation Manual - Page 130
Installing the Printer Driver Windows NT Server 1 The first step is to install Microsoft TCP/IP Printing. Click the Windows Start button, point to Settings, and then click on Control Panel. 2 In the Control Panel window, double-click Network to open the Network window. Click the Services tab. If " - Sharp DC500 | FO-DC500 | FO-DC525 | FO-DC600 Operation Manual - Page 131
the correct path is entered and click the Continue button. 5 Follow the instructions on your screen to install the component. When finished, restart Windows. 6 The next step is to install the printer driver using the Add Printer Wizard. Click the Start button, point to Settings, and then click on - Sharp DC500 | FO-DC500 | FO-DC525 | FO-DC600 Operation Manual - Page 132
into your CD-ROM drive. If the "Readme First" window appears, click Cancel to close the window. 15 Enter the path Q:\Option\English\Nt_pclxl (substitute the letter of your CD-ROM drive for "Q") and click the OK button. 16 The printer driver name will appear in the Add Printer Wizard. Click Next. 130 - Sharp DC500 | FO-DC500 | FO-DC525 | FO-DC600 Operation Manual - Page 133
allow sharing with Windows 98/Me computers). Click Next. 18 Follow the instructions on your screen to finish installing the printer driver. Client-Server Network: Installing the Printer Driver in a Client Computer Note: When using the FO-DC525, "FO-DC500" in the installation windows means "FO-DC525 - Sharp DC500 | FO-DC500 | FO-DC525 | FO-DC600 Operation Manual - Page 134
tray/casette configuration (for the FO-DC525, select "FO-DC500 ser. (Tray + Cassette)". 9 Follow the instructions on the screen. When the following window appears, click Browse and select "SHARPFO-DC500(600)" (or the name that was entered for the printer when the printer driver was installed in the - Sharp DC500 | FO-DC500 | FO-DC525 | FO-DC600 Operation Manual - Page 135
Printer in the Printers window to run the Add Printer Wizard and then click Next. 3 Select Network Printer and click Next. 4 Click Browse and select "SHARPFO-DC500(600)" (or the name that was entered for the printer when the printer driver was installed in the server). 5 Follow the instructions - Sharp DC500 | FO-DC500 | FO-DC525 | FO-DC600 Operation Manual - Page 136
Follow Steps 1 through 14 of the procedure for installing the printer driver in Windows 2000 Server. In Step 15, select "Do not share this printer", click Next, and then follow the instructions on your screen to finish installing the printer driver. During the procedure you will need to enter the IP - Sharp DC500 | FO-DC500 | FO-DC525 | FO-DC600 Operation Manual - Page 137
4. Network Printer Installing the Printer Driver Windows 98/Me Before installing the printer driver in Windows 98/Me, you must first install the IP Peer-to-Peer Redirector. The IP Peer-to-Peer Redirector is installed from the CD-ROM in the FO-LN1 network interface kit. Follow these steps to install - Sharp DC500 | FO-DC500 | FO-DC525 | FO-DC600 Operation Manual - Page 138
when you installed the IP Peer-to-Peer Redirector and click Next. 16 Follow the instructions on your screen to finish installing the printer driver. Printer Status Monitor and Printer Administration Utility The Printer Status Monitor allows you to monitor the status of print jobs that you send to - Sharp DC500 | FO-DC500 | FO-DC525 | FO-DC600 Operation Manual - Page 139
computer are communicating correctly. 1 From the Windows desktop, click on the Start button. 2 Point to Settings and then click on Printers. 3 Right click on the Sharp printer icon and then click on Properties. 4 Click on Print Test Page. 5 Follow the instructions on the screen to print the test - Sharp DC500 | FO-DC500 | FO-DC525 | FO-DC600 Operation Manual - Page 140
and for network printing (the print count includes received faxes and lists printed from the operation panel of the machine). ♦ Alert messages alert you to problems in the machine that affect printing, such as paper jams, out of paper, and out of toner. You can select the conditions that cause an - Sharp DC500 | FO-DC500 | FO-DC525 | FO-DC600 Operation Manual - Page 141
4. Network Printer Setting Up Status and Alert Messages Next, click Status Message Parameters in the Web page menu. Enter the email addresses to which status messages are - Sharp DC500 | FO-DC500 | FO-DC525 | FO-DC600 Operation Manual - Page 142
that the ON LINE indicator on the machine is lit. If the ON LINE indicator is not lit, press ON LINE to switch the machine to the online state. 1 When , open the Printers folder in Windows, rightclick on the Sharp printer icon, and select Properties (Windows NT: Document Defaults, Windows 2000/XP: - Sharp DC500 | FO-DC500 | FO-DC525 | FO-DC600 Operation Manual - Page 143
4. Network Printer Printing from a Computer Canceling a print job Follow the steps below to cancel a print job. ♦ If there is a problem with a print job that is sent to the machine (for example, the machine does not have the paper size specified for the job) the ALARM light on the machine will - Sharp DC500 | FO-DC500 | FO-DC525 | FO-DC600 Operation Manual - Page 144
depending on your operating system). 2 Right-click the Sharp printer driver icon and select Properties (Windows NT: Document Defaults, Windows 2000/XP: Printing Preferences) from the sidebar menu. 3 The properties of the SHARP FO-DC Series printer driver will appear. 4 Select the desired settings on - Sharp DC500 | FO-DC500 | FO-DC525 | FO-DC600 Operation Manual - Page 145
Settings The print settings that can be selected in the Paper, Page Layout, Quality, and Options tabs of the printer driver are described below. Paper tab 4. Network Printer Paper Size Select the paper size to be used for printing. If the paper size set in the application is different from this - Sharp DC500 | FO-DC500 | FO-DC525 | FO-DC600 Operation Manual - Page 146
Printer Driver Settings Paper Source Select the paper source to be used. When Auto Select is selected, the source which contains the same size of paper as the paper size setting is automatically selected. If a specific source is selected, paper is drawn from that source regardless of the paper - Sharp DC500 | FO-DC500 | FO-DC525 | FO-DC600 Operation Manual - Page 147
Printer Driver Settings 4. Network Printer N-up N-up allows multiple document pages (where N is the number of pages) to be printed on a single sheet of paper the Details of N-up button to open the "Details of N-up" window. This allows you to select the layout order for N-up printing. Limitation - Sharp DC500 | FO-DC500 | FO-DC525 | FO-DC600 Operation Manual - Page 148
Printer Driver Settings First Page Only Select this checkbox to print the Watermark on the first page only. Edit Watermark Click the Edit Watermark button to open the "Edit Watermark" window. This window lets you modify, add, or delete a Watermark. XY Image Shift This setting lets you shift the - Sharp DC500 | FO-DC500 | FO-DC525 | FO-DC600 Operation Manual - Page 149
printer. When this checkbox is not selected, printing will take place using fonts downloaded from the computer. Limitation: When the All Raster setting is selected, this function cannot be used. Options tab Input Option Use this setting to specify the paper sources that are installed in the machine - Sharp DC500 | FO-DC500 | FO-DC525 | FO-DC600 Operation Manual - Page 150
double as an office copier. ♦ You can perform all steps of a copy job even when the machine is busy printing other copy jobs, or when it is printing a received fax after the line has been disconnected. Your copy job will be automatically stored in memory and then printed when all previous printing - Sharp DC500 | FO-DC500 | FO-DC525 | FO-DC600 Operation Manual - Page 151
B (flip up the Rapid Key overlay). Make sure that COPY STATUS is selected in the display. Display: MEMORY STATUS REPORT 1:COPY STATUS 2:MEMORY TX STATUS 3:MEMORY RX STATUS 4:MESSAGE CLEAR 2 Press START/ ENTER . Number of stored copy jobs • The copy jobs appear. • To print out the list - Sharp DC500 | FO-DC500 | FO-DC525 | FO-DC600 Operation Manual - Page 152
Making Copies 3 Press or to scroll through the list of jobs. To cancel a job, press or to select the job, press DEL , and then press START/ ENTER . 4 STOP When you have finished checking the list, press twice to return to the date and time display. 150 - Sharp DC500 | FO-DC500 | FO-DC525 | FO-DC600 Operation Manual - Page 153
The Broadcasting function allows you to send the same fax to as many as 179 destinations on the FO-DC500/525, or 279 destinations on the FO-DC600, in a single operation. First load the document, then enter the numbers of the receiving machines. The document will be automatically transmitted to each - Sharp DC500 | FO-DC500 | FO-DC525 | FO-DC600 Operation Manual - Page 154
START/ ENTER . (Note: A maximum of 20 full fax numbers can be entered. Less can be entered if a . 6 If you are sending the document to only fax destinations, press START/ ENTER twice. Transmission will begin. Note: If fax destinations have also been selected, the selections for the file format are - Sharp DC500 | FO-DC500 | FO-DC525 | FO-DC600 Operation Manual - Page 155
E-MAIL SETUP (page 85 and following) is used if a file format is not selected in Step 2 below. If the Group Key also contains fax destinations, only "TIFF-G4" and "PDF-G4" can be used for the format. 1 Load the document(s). • SEND READY will appear in the display. • Press RESOLUTION and/or CONTRAST - Sharp DC500 | FO-DC500 | FO-DC525 | FO-DC600 Operation Manual - Page 156
in one Group Key on the FO-DC500/525, or 258 numbers on the FO-DC600. ♦ If the network scanner option is installed, e-mail addresses can also be stored in a Group Key. ♦ To store a fax number or e-mail address in a 2:GROUP ENTRY MODE 3 Press START/ ENTER . GROUP ENTRY MODE 1=SET 2=CLEAR 154 - Sharp DC500 | FO-DC500 | FO-DC525 | FO-DC600 Operation Manual - Page 157
START/ ENTER .) GROUP SET PRESS GROUP KEY 5 Press any Rapid Key not already programmed to select it as a Group Key. (If you are clearing a Group Key, press it and go to Step 9.) 01 Q / ! 11 SYMBOL 02 W / " 12 A / | 03 E / # 13 S 04 R / $ 14 D 05 T / % 15 F 06 Y / & 16 G / { 07 U / ' 17 - Sharp DC500 | FO-DC500 | FO-DC525 | FO-DC600 Operation Manual - Page 158
Broadcasting 9 Press START/ ENTER . 10 STOP Return to Step 5 to program another Group Key, or press repeatedly until you return to the date and time display. Editing a group If necessary, you can add numbers to or delete numbers from a group by repeating the programming procedure for the Group - Sharp DC500 | FO-DC500 | FO-DC525 | FO-DC600 Operation Manual - Page 159
memory instead of immediately printing it out. When the receiving party enters the correct passcode, the document is printed out. ♦ Confidential transmission is only possible when the receiving machine is a Sharp model with confidential reception capability. ♦ To use this function, your name and fax - Sharp DC500 | FO-DC500 | FO-DC525 | FO-DC600 Operation Manual - Page 160
is established. Confidential reception When another machine sends you a document by confidential transmission, your machine holds it in memory instead of immediately printing it out. The document cannot be printed out until you enter the correct passcode. Your fax has 10 "mailboxes" in which - Sharp DC500 | FO-DC500 | FO-DC525 | FO-DC600 Operation Manual - Page 161
number to send you confidential faxes. 1 CONFIDENTIAL Press Z/< 3:CONFIDENTIAL CODE SET 4:CONFIDENTIAL CODE CLEAR 2 Press START/ ENTER . 3 by pressing the letter entry keys (make sure the Rapid Key overlay is down). Example: SHARP = Caps Lock S H / } A/ | R/$ P/= • For more information on - Sharp DC500 | FO-DC500 | FO-DC525 | FO-DC600 Operation Manual - Page 162
Operations 7 Press START/ ENTER . Note: After entering the passcode, the machine will print it out for your records. If you forget the passcode and have kept no record, contact your Sharp dealer. Clearing a passcode 1 CONFIDENTIAL Press Z/< (flip up the Rapid Key Display: CONFIDENTIAL - Sharp DC500 | FO-DC500 | FO-DC525 | FO-DC600 Operation Manual - Page 163
When you have received a confidential document, RCVD CONF. FAX will appear in the display. Print out the Confidential Reception selected in the display. 2:CONFIDENTIAL DATA PRINT 3:CONFIDENTIAL CODE SET 4:CONFIDENTIAL CODE CLEAR 2 Press START/ ENTER . 3 Enter your mailbox number. 4 Enter - Sharp DC500 | FO-DC500 | FO-DC525 | FO-DC600 Operation Manual - Page 164
If desired, you can dial more than one fax number to receive documents consecutively from a group of fax machines (this is called "Serial Polling"; a maximum of 179 fax machines can be polled in one operation on the FODC500/525, or 279 fax machines on the FO-DC600). 1 Press MENU and then or until - Sharp DC500 | FO-DC500 | FO-DC525 | FO-DC600 Operation Manual - Page 165
you press the Group Key. Being polled (Memory polling) To let another fax machine poll your machine, you must first store the document(s) in memory using the following procedure. Transmission will take place when the other fax machine calls your machine and activates polling. You can choose whether - Sharp DC500 | FO-DC500 | FO-DC525 | FO-DC600 Operation Manual - Page 166
POLL MODE is selected in the display. Display: MENU MODE 4:OPTIONAL SETTING 5:PROGRAM/GROUP MODE 6:SERIAL POLLING MODE 7:MEMORY POLL MODE 4 Press START/ ENTER . MEMORY POLLED MODE 1=SET 2=CLEAR 5 Make sure that "SET" is selected in the display and then press START/ ENTER . Display when no - Sharp DC500 | FO-DC500 | FO-DC525 | FO-DC600 Operation Manual - Page 167
START/ ENTER . • The document will be scanned into memory, and your fax will go on polling standby. Clearing a document To clear a memory poll document (or documents) from memory, follow the steps below: 1 Press MENU and then or until MEMORY POLL MODE is selected in the display. Display - Sharp DC500 | FO-DC500 | FO-DC525 | FO-DC600 Operation Manual - Page 168
. The steps for programming these numbers are described in the following pages. Note: System and ID numbers can only be used if the other fax machine is also a Sharp machine. Turning Polling Security on and off Polling Security is turned on or off with Option Setting 8 as explained on page 203. 166 - Sharp DC500 | FO-DC500 | FO-DC525 | FO-DC600 Operation Manual - Page 169
Polling Storing and clearing fax numbers for polling permission You can store up to 10 fax numbers in your machine's list of permitted numbers. 1 Press MENU and then or until ENTRY MODE is selected in the display. Display: MENU MODE 1:RECEIVE MODE 2:LISTING MODE 3:ENTRY - Sharp DC500 | FO-DC500 | FO-DC525 | FO-DC600 Operation Manual - Page 170
Polling Programming and clearing a System number One 4-digit System number can be programmed in your machine for giving and receiving polling permission. Polling will take place if your System number matches the other fax machine's System number or one of its ID numbers. 1 Press MENU and then or - Sharp DC500 | FO-DC500 | FO-DC525 | FO-DC600 Operation Manual - Page 171
Polling Storing and clearing ID numbers for polling permission Up to five 4-digit ID numbers can be programmed in your machine for giving and receiving polling permission. Polling will take place if one of your ID numbers matches the other fax machine's System number. 1 Press MENU and then or - Sharp DC500 | FO-DC500 | FO-DC525 | FO-DC600 Operation Manual - Page 172
Operations The Timer function allows you to store a fax job to be performed automatically at a specified time. Press X/> . (Flip up the Rapid Key overlay if it is down.) Display: TIMER MODE 1=SET 2=CLEAR 2 Make sure that "SET" is selected and then press START/ ENTER . TIMER SET 1:SEND MODE - Sharp DC500 | FO-DC500 | FO-DC525 | FO-DC600 Operation Manual - Page 173
SEND MODE) (Continued from Initial procedure.) 8 Dial the receiving machine using one of the following methods: • Press a Rapid Key. , press START/ ENTER to complete the entry). • Enter a full fax number with the numeric keys. 9 Press START/ ENTER . 10 Press memory. 171 6. Special Functions - Sharp DC500 | FO-DC500 | FO-DC525 | FO-DC600 Operation Manual - Page 174
If you enter less than 3 digits for the number, press START/ ENTER to complete the entry.) • Enter a full fax number with the numeric keys and then press START/ ENTER . • Press a Group Key. Note: If you need to and then press START/ ENTER . • The document will be scanned into memory. 172 - Sharp DC500 | FO-DC500 | FO-DC525 | FO-DC600 Operation Manual - Page 175
START/ ENTER . 10 Dial the receiving machine using one of the following methods: • Press a Rapid Key. . • Press SPEED DIAL and enter a Speed Dial number (if you enter less than 3 digits, press START/ ENTER to complete the entry). • Enter a full fax number with the numeric keys. 11 Press - Sharp DC500 | FO-DC500 | FO-DC525 | FO-DC600 Operation Manual - Page 176
(if you enter less than 3 digits, press START/ ENTER to complete the entry). • Enter a full fax number with the numeric keys. 9 Press START/ ENTER . Serial Polling (Continued from Initial procedure.) 8 Dial the machines to be polled using one or more of the following methods: • Press one or - Sharp DC500 | FO-DC500 | FO-DC525 | FO-DC600 Operation Manual - Page 177
(See page 212.) 1 Press TIMER (flip up the Rapid Key X/> overlay if it is down) and then or to select "CLEAR". Display: TIMER MODE 1=SET 2=CLEAR 2 Press START/ ENTER . 3 Enter the 2-digit number assigned to the operation. 4 Press START/ ENTER . 5 STOP Press repeatedly until you return - Sharp DC500 | FO-DC500 | FO-DC525 | FO-DC600 Operation Manual - Page 178
to store multiple fax jobs in memory for automatic transmission to one destination at a set time. If you often send faxes to a particular . In Step 10 of the initial procedure, select "Batch transmission". Clearing a Batch Key To clear a Batch Key, follow the procedure on page 185. Storing documents - Sharp DC500 | FO-DC500 | FO-DC525 | FO-DC600 Operation Manual - Page 179
designated time along with any other jobs stored under the same key. After transmission, all jobs in the batch will be cleared from memory. Canceling a document stored for batch transmission If necessary, you can cancel a document stored for a batch transmission before transmission takes place. To - Sharp DC500 | FO-DC500 | FO-DC525 | FO-DC600 Operation Manual - Page 180
option is installed, an e-mail, FTP, or Desktop destination can be selected. (This is not possible if a timer setting is included.) ♦ To clear a mistake in the procedures that follow, press STOP . Initial procedure To program a Program Key, first perform the following procedure. After you have - Sharp DC500 | FO-DC500 | FO-DC525 | FO-DC600 Operation Manual - Page 181
is installed and a timer setting is not included) Confidential transmission Polling Serial Polling Batch transmission (only possible if a timer setting was made) Memory Polling (only possible if a timer setting was not made; not possible if the program is within a personal book) 179 6. Special - Sharp DC500 | FO-DC500 | FO-DC525 | FO-DC600 Operation Manual - Page 182
from Initial procedure.) 14 Dial the receiving machine using one of the following methods: • START/ ENTER to complete the entry). • Enter a full fax number with the numeric keys. • Press e-mail , 17 If you want the document to be sent through memory, press START/ ENTER . If you want the - Sharp DC500 | FO-DC500 | FO-DC525 | FO-DC600 Operation Manual - Page 183
START/ ENTER . 16 Dial the receiving machine using one of the following methods: • Press a Rap.id Key. • Press SPEED DIAL and enter a Speed Dial number (if you enter less than 3 digits, press START/ ENTER to complete the entry). • Enter a full fax number with the numeric keys. 17 Press - Sharp DC500 | FO-DC500 | FO-DC525 | FO-DC600 Operation Manual - Page 184
3 digits, press START/ ENTER to complete the entry). • Enter a full fax number with the numeric keys. 15 Press START/ ENTER . 16 STOP Press time display. Serial Polling (Continued from Initial procedure.) 14 Dial the machines to be polled using one or more of the following methods: • - Sharp DC500 | FO-DC500 | FO-DC525 | FO-DC600 Operation Manual - Page 185
DIAL and enter a Speed Dial number. (If you enter less than 3 digits for the number, press START/ ENTER to complete the entry.) • Enter a full fax number with the numeric keys and then press START/ ENTER . • Press a Group Key. • Press e-mail , enter an e-mail address, and then press START - Sharp DC500 | FO-DC500 | FO-DC525 | FO-DC600 Operation Manual - Page 186
display. Batch transmission (Continued from Initial procedure.) 14 Dial the receiving machine using one of the following methods: • Press a Rapid Key. digits, press START/ ENTER to complete the entry). • Enter a full fax number with the numeric keys. 15 Press START/ ENTER . 16 RESOLUTION - Sharp DC500 | FO-DC500 | FO-DC525 | FO-DC600 Operation Manual - Page 187
Entering and Using Programs Being Polled (Memory polling) (Continued from Initial procedure.) 14 Press 1 to Press repeatedly until you return to the date and time display. 6. Special Functions Clearing a Program Key To clear a Program Key, follow these steps: 1 Press MENU and then or until - Sharp DC500 | FO-DC500 | FO-DC525 | FO-DC600 Operation Manual - Page 188
Programs 3 Press START/ ENTER and then or PROGRAM ENTRY MODE to 1=SET select CLEAR. 2=CLEAR 4 Press START/ ENTER . PROGRAM CLEAR PRESS PROGRAM KEY 5 Press the Program Key that you want to clear. 01 Q / ! 11 SYMBOL 02 W / " 12 A / | 03 E / # 13 S 04 R / $ 14 D 05 T / % 15 F 06 - Sharp DC500 | FO-DC500 | FO-DC525 | FO-DC600 Operation Manual - Page 189
and Using Programs Using a Program Key Follow the steps below to perform a programmed operation. 1 If this is a transmission operation or memory polling operation, load the document. 2 Press the appropriate Program Key. 01 Q / ! 11 SYMBOL 02 W / " 12 A / | 03 E / # 13 S 04 R / $ 14 D 05 - Sharp DC500 | FO-DC500 | FO-DC525 | FO-DC600 Operation Manual - Page 190
copying (single copies and sorted multiple copies only) and any type of transmission from memory. ♦ Note that any blank sides must be included when scanning the pages (if the number of pages is not equal each time the machine scans the stack, an error will result). The blank sides will not, however - Sharp DC500 | FO-DC500 | FO-DC525 | FO-DC600 Operation Manual - Page 191
is used to hold all received faxes in memory instead of immediately printing them out. To print the faxes, the programmed Print Hold code must CODE CLEAR 3 Press START/ ENTER . 4 Press the numeric keys to enter the desired Print Hold code (4 digits). 5 Press START/ ENTER . • The machine will - Sharp DC500 | FO-DC500 | FO-DC525 | FO-DC600 Operation Manual - Page 192
Option Setting 38 can be set to YES. Printing received faxes When a fax has been received to memory because the Print Hold function is turned on, RCVD PRINT HOLD FAX will appear in the display. Follow the steps below to print the fax (or faxes). 1 Press MENU and then . • Make sure that PRINT HOLD - Sharp DC500 | FO-DC500 | FO-DC525 | FO-DC600 Operation Manual - Page 193
that PRINT HOLD is selected in the display. Display: MENU MODE 6:SERIAL POLLING MODE 7:MEMORY POLL MODE 8:NETWORK SETTING 9: PRINT HOLD 2 Press START/ ENTER and then . • Make sure that PRINT HOLD CODE CLEAR is selected in the display. PRINT HOLD 1:PRINT HOLD DATA PRINT 2:PRINT HOLD CODE SET - Sharp DC500 | FO-DC500 | FO-DC525 | FO-DC600 Operation Manual - Page 194
of the machine to authorized users. When it is activated, a department code must be entered before an operation can be performed. ♦ Department Control can only be activated by your Sharp dealer. If ENTRY MODE 06:ID # MODE 07:SYSTEM # MODE 08:STORE JUNK FAX # 09:DEPT. PASSCODE 10:BOOK ENTRY MODE 192 - Sharp DC500 | FO-DC500 | FO-DC525 | FO-DC600 Operation Manual - Page 195
: Enter the 2-digit number that identifies the Department Code you want to clear. Note:It is not possible to clear the Department Code that you are currently using to access the machine. It is also not possible clear a Department Code if only one code is programmed. 6 Programming: Enter a Department - Sharp DC500 | FO-DC500 | FO-DC525 | FO-DC600 Operation Manual - Page 196
♦ If you do not begin the operation within one minute after entering the code, the machine will return to controlled access mode. Note: You do not need to enter a Department Code to receive faxes manually (by picking up an extension phone connected to the same line and pressing START/ ENTER on - Sharp DC500 | FO-DC500 | FO-DC525 | FO-DC600 Operation Manual - Page 197
3:ENTRY MODE 2 Press START/ ENTER and then or until STORE JUNK FAX # is selected. ENTRY MODE 06:ID # MODE 07:SYSTEM # MODE 08:STORE JUNK FAX # 09:DEPT. PASSCODE 10:BOOK ENTRY MODE 3 Press START/ ENTER . JUNK FAX # MODE 1=SET 2=CLEAR 4 Make sure that "SET" is selected and then press START - Sharp DC500 | FO-DC500 | FO-DC525 | FO-DC600 Operation Manual - Page 198
number that you will enter in the next step. Clearing: Enter the 2-digit number that identifies the fax number you want to clear, and go to Step 7. 6 Enter the fax number. 7 Press START/ ENTER . 8 STOP Return to Step 5 to enter (or clear) another fax number, or press repeatedly to return to the - Sharp DC500 | FO-DC500 | FO-DC525 | FO-DC600 Operation Manual - Page 199
, you can have the machine send a code to the PBX that identifies the sender for billing purposes each time a fax is sent. Telephone billing , you can have users enter an assigned billing code (any number up 9 digits long) each time they use the machine. The machine will automatically send this - Sharp DC500 | FO-DC500 | FO-DC525 | FO-DC600 Operation Manual - Page 200
Telephone Billing 1 Load the document (s). • If you are using Normal Dialing, press SPEAKER or pick up an extension phone connected to the same line. • SEND READY will appear in the display. 2 Enter your number to access an outside line (max. of 3 digits). 3 Flip down the Rapid Key overlay and - Sharp DC500 | FO-DC500 | FO-DC525 | FO-DC600 Operation Manual - Page 201
normal number. If you subscribe to a distinctive ring service, you can set the machine to automatically answer when your second number is called. This allows you to use the second number as an exclusive fax number. To have your fax - Sharp DC500 | FO-DC500 | FO-DC525 | FO-DC600 Operation Manual - Page 202
Distinctive Ring RING PATTERN 1 RING PATTERN 2 RING PATTERN 3 STANDARD RING OFF SETTING Two short rings One short, one long, and one short ring Two short rings and one long ring Your standard (normal) ring pattern Turn distinctive ring off 4 Press START/ ENTER . 5 STOP Press repeatedly to - Sharp DC500 | FO-DC500 | FO-DC525 | FO-DC600 Operation Manual - Page 203
The optional settings allow you to customize the machine to better suit your needs. An initial setting OPTIONAL SETTING 2 Press START/ ENTER . OPTIONAL SETTING MODE 01:DEFAULT FAX RESOLUTION 02:# OF RINGS AUTO RX 03:# OF RINGS MANUAL RX 04: AUTO LISTING 3 Press the numeric keys to enter the - Sharp DC500 | FO-DC500 | FO-DC525 | FO-DC600 Operation Manual - Page 204
Optional Settings Optional Settings Setting 01: DEFAULT FAX RESOLUTION This option sets the default resolution (the 1 Setting 03: NUMBER OF RINGS MANUAL RECEPTION You can also have the machine automatically answer a call after a certain number of rings in MANUAL reception mode. To turn on this - Sharp DC500 | FO-DC500 | FO-DC525 | FO-DC600 Operation Manual - Page 205
ERROR/TIMER/ MEMORY: SEND ONLY ALWAYS PRINTS NEVER PRINTS A report will be printed after an error, timer operation, or memory operation A ERROR ONLY Setting 06: RECALL TIMES This sets the maximum number of times your fax will automatically redial if the line is busy. Enter any number from 0 0 - Sharp DC500 | FO-DC500 | FO-DC525 | FO-DC600 Operation Manual - Page 206
setting: YES Setting 10: AUTO COVER SHEET Select YES to have the fax automatically generate a cover sheet and send it as the last page of COPY CUT-OFF This setting determines how the machine will copy documents that are longer than the printing paper. Select CONTINUE to have the remainder of the - Sharp DC500 | FO-DC500 | FO-DC525 | FO-DC600 Operation Manual - Page 207
effective when transmitting from memory. Press or to make the selection and then press START/ ENTER . ♦ Initial setting: YES Setting 16: CASSETTE SELECTION Note: This setting will only appear if the machine has two paper cassettes, or if the machine has one paper cassette and Option Setting - Sharp DC500 | FO-DC500 | FO-DC525 | FO-DC600 Operation Manual - Page 208
that the "1ST PRIORITY" source runs out of paper. If you wish to have the incoming fax received to memory in this case, select "NONE". When you have completed the selection, press START/ ENTER . FO-DC600: If the machine has two paper cassettes and Option Setting 31 (Seperate Mode) is turned - Sharp DC500 | FO-DC500 | FO-DC525 | FO-DC600 Operation Manual - Page 209
When you transmit a multi-page document, this setting determines whether the machine will dial the receiving party and begin transmitting while scanning is still in with the department code entered by an operator to access the fax) appear at the top of each transmitted document. This will appear in - Sharp DC500 | FO-DC500 | FO-DC525 | FO-DC600 Operation Manual - Page 210
number, or AFTER if it must receive the billing code after dialling a telephone number, and then press START/ ENTER . (Refer to your PBX manual or consult your PBX adminstrator for this information.) Note: If you select AFTER for the BILLING CODE DIAL selection, you must press REDIAL SPEAKER - Sharp DC500 | FO-DC500 | FO-DC525 | FO-DC600 Operation Manual - Page 211
pattern to which your fax will answer if you subscribe to a distinctive ring service. Press or to select machine draw a sheet of paper from one of the paper sources after each fax reception (and after each print job if the network printer option is installed). By loading colored (or large) paper - Sharp DC500 | FO-DC500 | FO-DC525 | FO-DC600 Operation Manual - Page 212
if the selected paper source runs out of paper.) Note for FO-DC500: This setting is only available if your dealer has installed the paper cassette option. the machine print all faxes that are forwarded by the Inbound Routing function. Select PRINT ERROR ONLY to have the machine only print faxes - Sharp DC500 | FO-DC500 | FO-DC525 | FO-DC600 Operation Manual - Page 213
to select NO, press START/ ENTER , enter the 4-digit Print Hold code, and press START/ ENTER . (Note: NO cannot be selected if a received fax is being held in memory by the Print Hold function. First print the fax and then turn off Print Hold.) ♦ Initial setting: NO 7. Optional Settings 211 - Sharp DC500 | FO-DC500 | FO-DC525 | FO-DC600 Operation Manual - Page 214
You can print lists showing settings and information entered in the machine. You can also print out reports on recent activity and combined maximum of 30 operations can appear). The report is divided into two parts: the SEND REPORT, which shows information on transmissions (including Scan to E-mail - Sharp DC500 | FO-DC500 | FO-DC525 | FO-DC600 Operation Manual - Page 215
turned off and the report is not printed manually for 30 operations, the information on the oldest TYPE NOTE The name or fax number of the other machine involved in the transaction. The document was sent directly from the feeder, not from memory. One of the following notes will appear under NOTE - Sharp DC500 | FO-DC500 | FO-DC525 | FO-DC600 Operation Manual - Page 216
paper or document jammed, preventing the transaction. BUSY - The fax was not sent because the line was busy. COM.E-0 to COM.E-31 - A telephone line error prevented the transaction. See Line Error in Problems and Solutions in Chapter 9. CE-01 to CE-05 - An error occurred when the machine attempted - Sharp DC500 | FO-DC500 | FO-DC525 | FO-DC600 Operation Manual - Page 217
List (List 06) The top part of this list shows the programs that have been entered. The bottom part shows the fax numbers that have been programmed into activated. ♦ Each time you print out the report, the data is cleared and a new period begins. Confidential Reception List (List 09) This list - Sharp DC500 | FO-DC500 | FO-DC525 | FO-DC600 Operation Manual - Page 218
report is printed out automatically after a fax operation is completed to allow you to check the result. The machine is set at the factory to print out document will also appear below the report if the document was sent from memory (this does not occur when the transmission is a Scan to E-mail/FTP - Sharp DC500 | FO-DC500 | FO-DC525 | FO-DC600 Operation Manual - Page 219
vertical lines on transmitted images and copies. (If necessary, wipe with denatured alcohol.) White backplate Scanning glass Rollers The Housing Wipe the external parts and surface of the machine with a dry cloth. Caution! Do not use benzene or thinner. These solvents may damage or discolor the - Sharp DC500 | FO-DC500 | FO-DC525 | FO-DC600 Operation Manual - Page 220
can be obtained from your dealer. 1 Remove the ADF exit tray. 2 Press down on the protruding tab of the green ink cartridge and pull the cartridge out with your fingers. 3 Insert the new ink cartridge into the machine (make sure that the tab is facing out). 4 Replace the ADF exit tray. 218 1 2 3 - Sharp DC500 | FO-DC500 | FO-DC525 | FO-DC600 Operation Manual - Page 221
sharing the same telephone line. • Check with the other party to make sure their fax machine is functioning properly. • Have your telephone line checked for line noise. • Try connecting the machine to a different telephone line. • If the problem still occurs, your machine may need service - Sharp DC500 | FO-DC500 | FO-DC525 | FO-DC600 Operation Manual - Page 222
paper. • Make sure that the telephone line cord is plugged into the TEL. LINE jack, and not the TEL. SET jack. • If the receiving machine is in manual mode with no attendant, reception will not be possible. • If the receiving machine is not a Sharp model, make sure it is G3 compatible. • Check - Sharp DC500 | FO-DC500 | FO-DC525 | FO-DC600 Operation Manual - Page 223
is still too low, your machine may need service. Make a copy or print a report to check your machine's printing ability. • The toner cartridge may need replacement. The printed image appears dirty and/or the paper jams frequently. • Have a service technician clean the print compartment. The - Sharp DC500 | FO-DC500 | FO-DC525 | FO-DC600 Operation Manual - Page 224
the drum cartridge. The printing paper comes out blank when you try to receive a document. • Make sure that the document is loaded properly in the feeder of the transmitting machine. Make a copy or print a report to confirm the printing ability of your machine. General problems Problem Solution - Sharp DC500 | FO-DC500 | FO-DC525 | FO-DC600 Operation Manual - Page 225
on page 78. If the problem persists after resetting the board, contact your dealer for service. Cannot connect to the network the printer driver installed? Install the printer driver. • Make sure that the machine is selected as the printer in the software application and that the machine is - Sharp DC500 | FO-DC500 | FO-DC525 | FO-DC600 Operation Manual - Page 226
the machine to see if a message appears. Correct the problem indicated by the message. The paper specified in the • Make sure that the desired paper is set in the paper software application is not tray or cassette of the machine and select "Auto" used. for the paper source in the printer driver - Sharp DC500 | FO-DC500 | FO-DC525 | FO-DC600 Operation Manual - Page 227
10. Troubleshooting Problems and Solutions Network scanner problems Problem Solution The recipient can not open the image data. • Does the recipient have a software program (viewer) that is compatible with the format of the file sent? Try sending the image using a different file format (TIFF - Sharp DC500 | FO-DC500 | FO-DC525 | FO-DC600 Operation Manual - Page 228
IN MEMORY A fax has been received in memory because the toner cartridge needs replacement, you have run out of printing paper, or the paper is jammed. The fax will automatically print out when the problem is fixed. LINE ERROR Transmission or reception was not successful. Press STOP to clear the - Sharp DC500 | FO-DC500 | FO-DC525 | FO-DC600 Operation Manual - Page 229
Messages and Signals 10. Troubleshooting MEMORY FULL ERROR PRESS STOP KEY MENU MODE NO CONF. FUNCTION NO PAPER ONHOOK DIAL MODE OUTPUT TRAY OFF PAPER JAM RCVD CONF. FAX REMOVE ORIGINAL(S) SIZE ERROR REPLACE TONER The memory is full (this message appears when Option Setting 23, Quick On-line, is - Sharp DC500 | FO-DC500 | FO-DC525 | FO-DC600 Operation Manual - Page 230
during scanning of a multi-page document. Scanning will automatically resume when sufficient memory becomes free (for example, after several pages are transmitted). Network scanner transmission, reception, or copying. Indicates that an extension phone connected to the fax is off hook. 228 - Sharp DC500 | FO-DC500 | FO-DC525 | FO-DC600 Operation Manual - Page 231
10. Troubleshooting Clearing Paper Jams Clearing Paper Jams Clearing a jammed document If the original document doesn't feed properly during transmission or copying, or REMOVE ORIGINAL(S) appears in the display, first try pressing START/ ENTER . If - Sharp DC500 | FO-DC500 | FO-DC525 | FO-DC600 Operation Manual - Page 232
Clearing Paper Jams Clearing jammed printing paper If the printing paper jams, PAPER JAM will appear in the display. Follow the steps below to clear the jam toner cartridge and place it on a sheet of paper. 3 Remove the drum cartridge. 4 Remove the jammed paper. • Make sure no torn pieces of paper - Sharp DC500 | FO-DC500 | FO-DC525 | FO-DC600 Operation Manual - Page 233
Clearing Paper Jams 10. Troubleshooting OR 5 Replace the drum cartridge. • Make sure the drum cartridge is inserted in as far as it will go. 6 Replace the toner cartridge and then close the print compartment cover. 7 If you have a paper cassette and the display still indicates that paper is jammed - Sharp DC500 | FO-DC500 | FO-DC525 | FO-DC600 Operation Manual - Page 234
instructions product is part of the service. If trouble is experienced with this equipment, or for repair or warranty information, please contact your authorized Sharp problem is resolved. This equipment may not be used on coin service provided by the telephone company. Connection to party line service - Sharp DC500 | FO-DC500 | FO-DC525 | FO-DC600 Operation Manual - Page 235
SHEET (1/3) MSDS No. B-1020 Section 1. Product and Company Identification Product Name: Toner Cartridge of FO-50ND / DUNT-455BSCZZ Supplier Identification: Sharp Corporation 22 Precautions: None Methods for Cleaning Up: Wipe off with paper or cloth. DO NOT use vacuum cleaner when a large - Sharp DC500 | FO-DC500 | FO-DC525 | FO-DC600 Operation Manual - Page 236
2002 Date Issued :May. 28, 1998 MATERIAL SAFETY DATA SHEET (2/3) MSDS No. B-1020 Section 8. Exposure Control/Personal Protection Engineering Measures Ventilation: intended in Sharp equipment. For use other than normal customer-operating procedures (such as in bulk toner processing facilities), - Sharp DC500 | FO-DC500 | FO-DC525 | FO-DC600 Operation Manual - Page 237
throw the toner cartridge or toner into a n open flame. The hot toner may scatter supplied to us by the manufacturer and Sharp offers no warranties as to its accuracy and accepts no responsibilities for any typographical errors which may appear on these sheets. It is the responsibility of the user - Sharp DC500 | FO-DC500 | FO-DC525 | FO-DC600 Operation Manual - Page 238
Dialing 1. Lift extension phone or press SPEAKER . 2. Dial the fax number (if using an extension phone, dial on the extension phone a number from 1 to 100 (FODC500/525) or 200 (FO-DC600) (press START/ ENTER if you entered less than 3 digits). (If clearing a number, select it as explained - Sharp DC500 | FO-DC500 | FO-DC525 | FO-DC600 Operation Manual - Page 239
MEMORIZACIÓN DE NÚMEROS DE FAX DE MARCACIÓN AUTOMÁTICA CLEAR). 4. Pulse START/ ENTER . 5. Para memorizar un número de Tecla rápida, pulse la Tecla rápida deseada. Para memorizar un número de Marcación SPEED DIAL abreviada, pulse e introduzca un número del 1 al 100 (FO-DC500/525) o al 200 (FO - Sharp DC500 | FO-DC500 | FO-DC525 | FO-DC600 Operation Manual - Page 240
CLEAR.) 4. Pressez la touche START/ ENTER . 5. Pour enregistrer un numéro à composition par touche rapide, pressez la touche rapide souhaitée. Pour enregistrer un numéro à composition accélérée, pressez la touche SPEED DIAL et entrez un numéro compris entre 1 et 100 (FO-DC500/ 525) ou 200 (FO - Sharp DC500 | FO-DC500 | FO-DC525 | FO-DC600 Operation Manual - Page 241
80 Document feeder, 34 Document guides, 34 Document restrictions, 33 Document sizes, 32 Document, maximum scanning area, 33 Drum cartridge Installing and replacing, 18-21 Duplex Scanning, 188 E Error Correction Mode (ECM), 204 F Fax status, 51 Fax Transfer, 210 Fax Transfer List, 216 Fine Resolution - Sharp DC500 | FO-DC500 | FO-DC525 | FO-DC600 Operation Manual - Page 242
, 78 LEDs, 219 Network scanner software, 97, 104 Network settings, printing, 79 Normal Dialing, 37 Number of rings in AUTO reception, 202 Number of rings in manual reception, 202 O Optional Setting List, 215 P Page numbering, batch, 63 Paper jams, clearing, 229-231 Paper, loading, 22 Passcode List - Sharp DC500 | FO-DC500 | FO-DC525 | FO-DC600 Operation Manual - Page 243
, 16 Time, setting, 27 Timer, 170 Index Timer List, 214 Toner cartridge Installing and replacing, 18-21 Toner cartridge indicator, 21 Transaction Report, 216 Print Selection, 203 U User authentication, 116 V Verification Stamp, 71, 209 Replacing, 218 W Web page in machine, accessing, 80 241 - Sharp DC500 | FO-DC500 | FO-DC525 | FO-DC600 Operation Manual - Page 244
- Sharp DC500 | FO-DC500 | FO-DC525 | FO-DC600 Operation Manual - Page 245
- Sharp DC500 | FO-DC500 | FO-DC525 | FO-DC600 Operation Manual - Page 246
- Sharp DC500 | FO-DC500 | FO-DC525 | FO-DC600 Operation Manual - Page 247
IN, OR USED IN CONJUNCTION WITH THIS PRODUCT. Sharp is not responsible for any damages or loss, either direct, incidental or consequential, which you, the end-user, may experience as a result of your purchase or use of the hardware, software or firmware embodied in or used in conjunction with this - Sharp DC500 | FO-DC500 | FO-DC525 | FO-DC600 Operation Manual - Page 248
CANADA LTD. 335 Britannia Road East, Mississauga, Ontario L4Z 1W9 http://www.sharp.ca SHARP CORPORATION FOR YOUR RECORDS Please record the model number and serial number below Number Serial Number Date of Purchase Place of Purchase FO-DC500/FO-DC525/FO-DC600 PRINTED IN THAILAND (TINSE4302XHTF)
-
 1
1 -
 2
2 -
 3
3 -
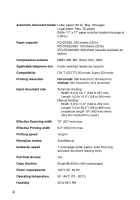 4
4 -
 5
5 -
 6
6 -
 7
7 -
8
-
9
-
10
-
11
-
12
-
13
-
14
-
15
-
16
-
17
-
18
-
19
-
20
-
21
-
22
-
23
-
24
-
25
-
26
-
27
-
28
-
29
-
30
-
31
-
32
-
33
-
34
-
35
-
36
-
37
-
38
-
39
-
40
-
41
-
42
-
43
-
44
-
45
-
46
-
47
-
48
-
49
-
50
-
51
-
52
-
53
-
54
-
55
-
56
-
57
-
58
-
59
-
60
-
61
-
62
-
63
-
64
-
65
-
66
-
67
-
68
-
69
-
70
-
71
-
72
-
73
-
74
-
75
-
76
-
77
-
78
-
79
-
80
-
81
-
82
-
83
-
84
-
85
-
86
-
87
-
88
-
89
-
90
-
91
-
92
-
93
-
94
-
95
-
96
-
97
-
98
-
99
-
100
-
101
-
102
-
103
-
104
-
105
-
106
-
107
-
108
-
109
-
110
-
111
-
112
-
113
-
114
-
115
-
116
-
117
-
118
-
119
-
120
-
121
-
122
-
123
-
124
-
125
-
126
-
127
-
128
-
129
-
130
-
131
-
132
-
133
-
134
-
135
-
136
-
137
-
138
-
139
-
140
-
141
-
142
-
143
-
144
-
145
-
146
-
147
-
148
-
149
-
150
-
151
-
152
-
153
-
154
-
155
-
156
-
157
-
158
-
159
-
160
-
161
-
162
-
163
-
164
-
165
-
166
-
167
-
168
-
169
-
170
-
171
-
172
-
173
-
174
-
175
-
176
-
177
-
178
-
179
-
180
-
181
-
182
-
183
-
184
-
185
-
186
-
187
-
188
-
189
-
190
-
191
-
192
-
193
-
194
-
195
-
196
-
197
-
198
-
199
-
200
-
201
-
202
-
203
-
204
-
205
-
206
-
207
-
208
-
209
-
210
-
211
-
212
-
213
-
214
-
215
-
216
-
217
-
218
-
219
-
220
-
221
-
222
-
223
-
224
-
225
-
226
-
227
-
228
-
229
-
230
-
231
-
232
-
233
-
234
-
235
-
236
-
237
-
238
-
239
-
240
-
241
-
242
-
243
-
244
-
245
-
246
-
247
-
248
 |
 |
MODEL
FO-DC500/FO-DC525
FO-DC600
OPERATION MANUAL
DOCUMENT COMMUNICATION SYSTEM
1.
Installation
2.
Sending and Receiving Documents
3.
Network Scanner Option
4.
Network Printer Option
5.
Making Copies
6.
Special Functions
7.
Optional Settings
8.
Printing Lists and Reports
9.
Maintenance
10.
Troubleshooting