Sharp MX-M200D Operation Manual
Sharp MX-M200D Manual
 |
View all Sharp MX-M200D manuals
Add to My Manuals
Save this manual to your list of manuals |
Sharp MX-M200D manual content summary:
- Sharp MX-M200D | Operation Manual - Page 1
MODEL MX-M160 MX-M160D MX-M200D DIGITAL MULTIFUNCTIONAL SYSTEM OPERATION MANUAL (for general information and copier) Page PART 1: GENERAL INFORMATION • BEFORE USING THE PRODUCT 12 • TROUBLESHOOTING AND MAINTENANCE 24 • PERIPHERAL DEVICES AND SUPPLIES 40 PART 2: COPIER OPERATION • COPY - Sharp MX-M200D | Operation Manual - Page 2
, SHARP Corporation makes no warranty of any kind with regard to its content. All information included herein is subject to change without notice. SHARP is not responsible for any loss or damages, direct or indirect, arising from or related to the use of this operation manual. © Copyright SHARP - Sharp MX-M200D | Operation Manual - Page 3
Part 1: General Information 1 - Sharp MX-M200D | Operation Manual - Page 4
used in conjunction with the machine and its peripheral devices and accessories. • Microsoft®, Windows®, Windows® 2000, Windows® XP, Windows Server® 2003, Windows Vista®, Windows • Sharpdesk is a trademark of Sharp Corporation. • Sharp OSA is a trademark of Sharp Corporation. • RealVNC is a trademark - Sharp MX-M200D | Operation Manual - Page 5
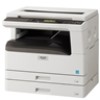
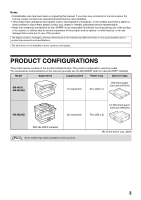
the models indicated below. The product configuration varies by model. The explanations and illustrations in this manual generally use the MX-M200D (with the optional RSPF installed). Model Appearance Copying speed Paper trays Optional trays MX-M160 MX-M160D 16 copies/min. One (250 x 1) 250 - Sharp MX-M200D | Operation Manual - Page 6
ON USING...6 ● LASER INFORMATION ...7 INSTALLATION REQUIREMENTS ...8 ● ENVIRONMENTAL INFORMATION...8 MANUALS PROVIDED WITH THE PRODUCT 9 MAIN FEATURES ...10 1 BEFORE USING THE PRODUCT PART NAMES AND FUNCTIONS 12 ● OPERATION PANEL 14 ● OPERATION IN COPY, PRINT, SCAN, AND FAX MODES 16 TURNING - Sharp MX-M200D | Operation Manual - Page 7
TO ALL FUNCTIONS OF THE MACHINE (COPY, FAX, PRINTER, AND NETWORK SCANNER FUNCTIONS 75 ● PROGRAMS FOR COPY MODE 75 ● PROGRAMMING AN ADMINISTRATOR PASSWORD ....75 PROGRAMMING AN ADMINISTRATOR PASSWORD 76 SYSTEM SETTINGS LIST 77 USING THE SYSTEM SETTINGS 78 ● ACCOUNT CONTROL 79 ● DEVICE CONTROL - Sharp MX-M200D | Operation Manual - Page 8
• Driver's licences • Do not touch the photoconductive drum. Scratches or smudges on the drum will cause dirty prints. • Store spare toner cartridges in a cool dry place without removing from the package before use. • If they are exposed to direct sunlight or excessive heat, poor copies may - Sharp MX-M200D | Operation Manual - Page 9
nm + 10 nm/- 15 nm (8.141 µs ± 0.1 µs)/7 mm 0.14 mW - 0.22 mW Caution Use of controls or adjustments or performance of procedures other than those specified herein may result in hazardous radiation exposure. This Digital Equipment is CLASS 1 LASER PRODUCT (IEC 60825-1 Edition 1.2-2001) For North - Sharp MX-M200D | Operation Manual - Page 10
is created inside the machine during printing. The amount of ozone created is not sufficient to be harmful; however, an unpleasant odor may be noticed during large copy runs, and thus the machine should be installed in a room with a ventilation fan or windows that provide sufficient air circulation - Sharp MX-M200D | Operation Manual - Page 11
. Software setup guide This explains how to install and configure the printer driver. Operation manual (for facsimile)*1: This explains how to use the fax function of the machine. To use the fax function, the optional facsimile expansion kit (AR-FX11) must be installed. Operation manual (for printer - Sharp MX-M200D | Operation Manual - Page 12
printer function / colour scanner function • The machine is equipped standard with a USB interface, enabling it to be used as a printer and a scanner. • To use the machine as a printer or scanner, the printer driver or scanner driver must first be installed as explained in the "Software setup guide - Sharp MX-M200D | Operation Manual - Page 13
Super G3 laser fax function to be used. Network connection (option) The optional network expansion kit (MX-NB10) can be installed to enable the machine to be used as a network printer and network scanner. Environment and people friendly design • Preheat and auto power shut-off modes are provided to - Sharp MX-M200D | Operation Manual - Page 14
wish to scan face down here. (Page 45) (5) Handles Use to move the machine. (6) Power switch Press to turn the machine power on and off. (7) Centre tray Copies and printed pages are output to this tray. (8) Top tray (when the job separator tray kit is installed) Received faxes (when the fax option - Sharp MX-M200D | Operation Manual - Page 15
19) (26) (25) (20) (28) (29) (13) Document cover (when installed) Open to make a copy from the document glass. (14) Side cover Open to remove misfed paper. (15) Side cover handle Pull to open the side cover. (16) Bypass tray guides Adjust to the width of the paper when using the bypass tray. (17 - Sharp MX-M200D | Operation Manual - Page 16
, see the "Operation manual (for printer and scanner)". To use the machine as a network scanner, see the "Operation manual (for network scanner)" that accompanies the optional network expansion kit.) (5) [FAX STATUS] key (when the fax option is installed) This key is used in fax mode. For more - Sharp MX-M200D | Operation Manual - Page 17
23) (24)(25) (26) (13) [FAX] key / indicator (when the fax option is installed) LINE indicator, DATA indicator This key is used in fax mode. For more information, see the "Operation manual (for facsimile)" that accompanies the optional facsimile expansion kit. (14) [SPECIAL FUNCTION] key Press to - Sharp MX-M200D | Operation Manual - Page 18
USING THE PRODUCT Display (base screen) Example: Copy mode (1) (2) (3) (4) Ready to copy. A4 AUTO 100% A4 AUTO (5) (6) (7) * The display shown is the MX-M200D (when the optional RSPF is installed) display. Icons appearing in the special function icon display 1-sided to 2-sided copy - Sharp MX-M200D | Operation Manual - Page 19
will be cancelled. 1 Note • If the fax option is installed, be sure to keep the power turned on. Faxes cannot be received when the power is turned off. • The machine is set at the factory to return all settings to the default settings one minute after a copy job is finished (auto clear function - Sharp MX-M200D | Operation Manual - Page 20
can be changed in the system settings. (Page 83) In the default state the display shown below appears. The default state of the display may vary depending on settings in the system settings. Ready to copy. A4 AUTO 100% A4 AUTO *The screen is that of the MX-M200D. LOADING PAPER The message "TRAY - Sharp MX-M200D | Operation Manual - Page 21
using special paper, contact your authorised service representative. • Before using other than SHARP recommended paper, make a test copy to see if the paper is suitable. LOADING PAPER Make sure that the machine is not copying or printing guide. Grasp the locking knob on the guide and slide the guide - Sharp MX-M200D | Operation Manual - Page 22
tray extension to load B4 and A3 (8-1/2" x 14" and 11" x 17") size paper. 2 Set the bypass tray guides to the paper width. 3 Insert the copy paper (print side down) all the way into the bypass tray. Make sure that the print side of the paper is face down. To prevent a misfeed, verify once more that - Sharp MX-M200D | Operation Manual - Page 23
be changed during copying, printing, fax printing (when the fax option is installed), or interrupt copying, or when a misfeed has occurred. However, if the machine is out of paper or out of toner, the paper size setting can be changed during copying, printing, and fax printing. See "PAPER" (page - Sharp MX-M200D | Operation Manual - Page 24
or when a fax is being printed.) This function has been enabled at the factory. If you prefer to disable the function, follow the steps below. 1 Press the [SPECIAL FUNCTION] key. 5 Press the [OK] key. ON LINE DATA SPECIAL FUNCTION LINE DATA COPY EXPOSURE PAPER SE SCAN COLOUR MODE RESOLUT The - Sharp MX-M200D | Operation Manual - Page 25
system settings. (For the counts in copy, print, and scan modes, see page 79. For the counts in fax mode, see the "Operation manual (for facsimile)" that accompanies the optional facsimile expansion kit.) NUMBER OF ACCOUNTS IN AUDITING MODE Mode (1) Same for copy, print, and scan modes (2) Fax - Sharp MX-M200D | Operation Manual - Page 26
, replacing the toner cartridge, and cleaning the machine, as well as troubleshooting for the copy function. For troubleshooting for the fax function, printer function, and scanner function, see the respective manuals for each function. TROUBLESHOOTING MACHINE/COPYING PROBLEMS The machine does - Sharp MX-M200D | Operation Manual - Page 27
and copying are described below. If a problem occurs in printer or scanner mode, see the "Operation manual (for printer and scanner)". If a problem occurs in fax mode, see the "Operation manual (for facsimile)" that accompanies the optional facsimile expansion kit. If the message "Call for service - Sharp MX-M200D | Operation Manual - Page 28
TROUBLESHOOTING AND MAINTENANCE Problem The paper size used for the copy is different from the selected setting. Set the tray's paper size setting to the same orientation/size as the paper loaded in the tray. The size or weight of the paper being used is not within the specified range. → Use copy - Sharp MX-M200D | Operation Manual - Page 29
→ Use a clean original. The scanner glass for the SPF is dirty. → Clean the long, narrow scanning glass. The transfer charger is dirty. → Clean the transfer charger. The COPY indicator is off. → Press the [COPY] key to select copy mode. A copy, print job, or received fax is being printed. → Set the - Sharp MX-M200D | Operation Manual - Page 30
, write down the 2-digit main code and 2-digit sub-code (" - "), turn off the power, and promptly contact your authorised service representative. The toner cartridge must be replaced soon. Check the toner cartridge. Check to see if the toner cartridge has been installed properly. Remove paper - Sharp MX-M200D | Operation Manual - Page 31
copies. First check the misfeed location. (See below) (Page 31) (Page 33) (Page 34) (Page 31) (Page 30) (Page 34) (Page 34) (Page 34) Misfeed locations in the optional 2 x 250-sheet paper feed unit (Page 34) (Page 34) 2 * The illustration shows misfeed locations in the MX-M200D. ORIGINAL - Sharp MX-M200D | Operation Manual - Page 32
TROUBLESHOOTING AND MAINTENANCE Section C Remove the misfed original from the exit area. If the misfed original cannot be easily removed from the exit area, open the moveable part of the document feeder tray and remove the original. 2 Open and close the SPF to make the misfeed location indicator - Sharp MX-M200D | Operation Manual - Page 33
TROUBLESHOOTING AND , hold the handle. • If the message does not clear, check again to make sure that no pieces of paper remain. Warning The fusing unit is hot. Do the photoconductive drum (green portion) when removing the misfed paper. Doing so may damage the drum and cause smudges on copies. 31 - Sharp MX-M200D | Operation Manual - Page 34
TROUBLESHOOTING the handle. • If the message does not clear, check again to make sure that no pieces of paper remain. Warning The fusing unit is hot drum (green portion) when removing the misfed paper. Doing so may damage the drum and cause smudges on copies. • Take care not to allow unfixed toner - Sharp MX-M200D | Operation Manual - Page 35
TROUBLESHOOTING AND MAINTENANCE Misfeed in C 1 Lower (1) in the illustration, open the fusing unit paper guide, and remove the misfed paper. Be careful not to tear the misfed paper during removal. 3 Close the side cover. The message " Clear paper path." will be cleared and copying will be possible - Sharp MX-M200D | Operation Manual - Page 36
TROUBLESHOOTING AND MAINTENANCE MISFEED IN TRAY 2 Note • Make sure that there is no misfed paper in the tray before pulling it out. (Page 31) • Also use the following cleared and copying will be possible. Note If the message does not clear, check again to make sure that no pieces of paper remain. - Sharp MX-M200D | Operation Manual - Page 37
this case, open and close the front cover. The machine will feed toner again for about two minutes and then copying can be resumed. • Before closing the front cover, make sure that the toner cartridge is correctly installed. • When closing the front cover, gently hold both ends. Caution • Do not - Sharp MX-M200D | Operation Manual - Page 38
of pages output in copy, print, and fax modes and the total scan count in scanner mode, hold down the [COPY] key when the machine is in the standby state. The counts will appear while the key is held down. The total output count and the total COPY scan count can be used as a guideline for cleaning - Sharp MX-M200D | Operation Manual - Page 39
(only when a SPF is installed) If white or black lines appear in copies made with using the SPF, use the provided glass cleaner to clean the original scanning glass. (If white or black lines appear in copies, printed pages, or printed fax pages when the SPF is not used, see "CLEANING THE TRANSFER - Sharp MX-M200D | Operation Manual - Page 40
TROUBLESHOOTING AND MAINTENANCE CLEANING THE TRANSFER CHARGER If white or black lines appear in copies or the image is blotchy, the two or three times. If the sheet metal on the transfer charger is smudged with toner, wipe it with a soft, clean cloth. Note Slide the charger cleaner from one - Sharp MX-M200D | Operation Manual - Page 41
" with the [ ] or [ ] key. PQ SPECIAL FUNCTION SPECIAL MODES ED COPY ORIG. SIZE ENTER LEX SCAN LEX SCAN PAPER SIZE SET ACC DISPLAY CONTRAST 4 Adjust the contrast with the [ ] or [ ] key. To reset the contrast to the default setting, press the [C] key. 5 Press the [SPECIAL FUNCTION] key - Sharp MX-M200D | Operation Manual - Page 42
Cannot be installed. *1 The network expansion kit (MX-NB10) must be installed. *2 The facsimile expansion kit (MX-FX10) must be installed. MX-M160 No Yes Standard Yes Yes Yes Yes Yes Yes*2 Yes Yes*1 Yes*1 Yes*1 MX-M160D Yes Yes Yes Yes Yes Yes Yes Yes Yes*2 Yes Yes*1 Yes*1 Yes*1 MX-M200D Yes Yes - Sharp MX-M200D | Operation Manual - Page 43
installed on MX-M160/MX-M160D: 16 pages/min. When installed on MX-M200D: 20 pages/min. Weight 5.3 kg (11.7 lbs.) 5.4 kg (12.0 lbs.) Dimensions 586 mm (W) x 440 mm (D) x 132 mm (H) (23-5/64" (W) x 17-21/64" (D) x 5-13/64" (H)) *1 Two-sided scanning is not possible. *2 During one-sided copying - Sharp MX-M200D | Operation Manual - Page 44
by the user are paper and toner cartridge. GENUINE SUPPLIES For best copying results, be sure to use only SHARP Genuine Supplies which are designed, engineered and tested to maximize the life and performance of SHARP copiers. Look for the Genuine Supplies label on the toner package. PROPER - Sharp MX-M200D | Operation Manual - Page 45
Part 2: Copier Operation 43 - Sharp MX-M200D | Operation Manual - Page 46
44 - Sharp MX-M200D | Operation Manual - Page 47
explains the basic procedures for making copies, including selection of the copy ratio and other copy settings. NORMAL COPYING This section explains how to make a regular copy. If "Auditing mode" has been enabled (page 23), enter your 5-digit account number. Copying from the document glass 1 Open - Sharp MX-M200D | Operation Manual - Page 48
The default output mode for copying from the SPF is sort AD-END mode. (Page 64) The output mode can be changed using the automatic sort selection setting in the system settings. (Page 87) Note • The centre tray can hold a maximum of 250 sheets (150 sheets when the job separator tray kit is - Sharp MX-M200D | Operation Manual - Page 49
holes. • Originals printed using an ink ribbon (thermal transfer printing), originals on thermal transfer paper. 4 Points concerning the position of the printed copy image Even if the same original is copied onto the same type of paper, differences in the original size, scanning location (document - Sharp MX-M200D | Operation Manual - Page 50
COPY FUNCTIONS MAKING A COPY DARKER OR LIGHTER The copy exposure can be adjusted as needed to the original. Three exposure modes are available: "AUTO", "TEXT" and "PHOTO". When "TEXT" or "PHOTO" is selected, the exposure can be manually adjusted to 5 levels. Auto This is the default exposure mode. - Sharp MX-M200D | Operation Manual - Page 51
the system settings. (Page 88) Important note when making a large number of copies If the number of sheets output to the centre tray exceed its maximum capacity (250 sheets when a job separator tray kit is not installed, 150 sheets when a job separator tray kit is installed) during a copy job, the - Sharp MX-M200D | Operation Manual - Page 52
] key. PQ SPECIAL FUNCTION SPECIAL MODES ED COPY ORIG. SIZE ENTER LEX SCAN LEX SCAN PAPER SIZE SET ACC DISPLAY CONTRAST 3 Press the 4 through 6 of the procedure in "USING THE BYPASS TRAY TO COPY A SPECIAL SIZE ORIGINAL" (page 51) to set the horizontal and vertical dimensions of the original - Sharp MX-M200D | Operation Manual - Page 53
used for copying and an original that is placed on the document glass is detected as being a special size, the display will prompt the user to set the original size. To make a copy original size with the [ ] or [ ] key. PQ ED COPY LEX SCAN LEX SCAN ACC 5 Press the [OK] key. If "SIZE INPUT" was - Sharp MX-M200D | Operation Manual - Page 54
. 4 Set the number of copies and press the [START] key ( ). WXYZ • To cancel automatic ratio selection, press the [AUTO IMAGE] key again. • When copying from the SPF, automatic ratio selection mode will automatically disable after the [START] key is pressed and the original is scanned. MANUAL RATIO - Sharp MX-M200D | Operation Manual - Page 55
key, or set the ratio (zoom) with the [ ] or [ ] key. PQ ED COPY LEX SCAN LEX SCAN ACC [ can be set in increments of 1%. You can use the [ ] or [ ] key to set the approximate Make sure that the desired paper tray is selected. If the auto paper select function has been enabled, the appropriate copy - Sharp MX-M200D | Operation Manual - Page 56
2 Press the [SPECIAL FUNCTION] key. ON LINE DATA SPECIAL FUNCTION LINE DATA COPY EXPOSURE PAPER SE SCAN COLOUR MODE RESOLUT The special function screen will appear. SPECIAL FUNCTION SPECIAL MODES ORIG. SIZE ENTER PAPER SIZE SET DISPLAY CONTRAST 3 Press the [OK] key. BACK OK GHI PQRS PY AN - Sharp MX-M200D | Operation Manual - Page 57
ratios. Image rotation will take place if necessary. 11 Select any other copy settings as needed and press the [START] key ( ). MNO WXYZ @.-_ AD-END Note If the [COPY RATIO] key is pressed when XY zoom ratios are set, the following screen appears. XY ZOOM ADJUST OFF To cancel the XY zoom ratio - Sharp MX-M200D | Operation Manual - Page 58
original → One side Note • If you are using the MX-M160, see "TWO-SIDED COPIES USING THE BYPASS TRAY" on page 61. • There are restrictions on the paper that can be used for automatic two-sided copying. See "Paper that can be used for automatic 2-sided printing" on page 18. • Automatic two-sided - Sharp MX-M200D | Operation Manual - Page 59
] key, or with the [2-SIDED COPY] key. PQ COPY MODE 1 to 1 ED COPY 1 to 2 LEX SCAN LEX SCAN 2 to 2 ACC BINDING CHANGE OFF 4 If you wish to have the orientation of the image on the back of the copy paper be opposite the orientation of the image on the front, set "BINDING CHANGE" to "ON" with - Sharp MX-M200D | Operation Manual - Page 60
glass, and close the SPF. 6 Make sure that the desired paper tray is selected. 7 Set the number of copies and press the [START] key ( ). WXYZ 2 Press the [2-SIDED COPY] key. OUTPUT 2-SIDED COPY ORIGINAL SIZE DUPLEX SCAN T ORIGINAL SIZE DUPLEX SCAN COPY MODE 1 to 1 1 to 2 2 to 2 The duplex - Sharp MX-M200D | Operation Manual - Page 61
screen. PQRS PY AN 2 Press the [2-SIDED COPY] key. Set the number of copies and press 5 the [START] key ( ). 4 To stop copying in the middle of WXYZ a run, press the [C] key. OUTPUT 2-SIDED COPY ORIGINAL SIZE DUPLEX SCAN T ORIGINAL SIZE DUPLEX SCAN COPY MODE 1 to 1 1 to 2 2 to 2 The duplex - Sharp MX-M200D | Operation Manual - Page 62
3 Select "2 to 1" with the [ ] or [ ] key, or with the [2-SIDED COPY] key. PQ COPY MODE 1 to 2 ED COPY 2 to 2 LEX SCAN LEX SCAN 2 to 1 ACC BINDING CHANGE OFF PY AN 6 Set the number of copies and press the [START] key ( ). To stop copying in the middle of WXYZ a run, press the [C] key. 60 - Sharp MX-M200D | Operation Manual - Page 63
the steps below to perform two-sided copying manually. Example: Copying original A and original B onto both sides of the paper 1 2 1 If you are using the MX-M160D/MX-M200D The MX-M160D/MX-M200D is equipped standard with an automatic two-sided copying function that automatically turns over the - Sharp MX-M200D | Operation Manual - Page 64
screen and you return to the base screen. 6 Make sure that the paper tray with A4 (8-1/2" x 11") paper is selected. A4R (8-1/2" x 11"R) paper can also be used if rotation copying is possible in auto paper select mode. 7 Select any other copy settings as needed and press the [START] key ( ). MNO - Sharp MX-M200D | Operation Manual - Page 65
• When 2 in 1 or 4 in 1 is selected, interrupt copying is not possible. • Sort copying, 2 in 1, and 4 in 1 and automatic two-sided copying cannot be used for an interrupt copy job. Configuring settings in the system settings, use as a scanner, and fax transmission are also not possible. 1 Press the - Sharp MX-M200D | Operation Manual - Page 66
settings. (Page 87) Note • The rotation copy function cannot be used in combination with the margin shift function. • Rotation copy will not operate when a copy the original Copy SORT MODE Copies of multiple original pages can collated into sets. The dual function board can scan approximately 100 - Sharp MX-M200D | Operation Manual - Page 67
be installed to increase the number of originals that can be scanned. The memory can be expanded up to a maximum of 272 MB (the amount expanded is 256 MB). Offset function This function offsets each set of copies from the previous set in centre tray, making it easy to separate sets of copies. The - Sharp MX-M200D | Operation Manual - Page 68
. PROGRAM RESOLUTION ADDRESS BRO 3 Press the [SPECIAL FUNCTION] key. ON LINE DATA SPECIAL FUNCTION LINE DATA COPY EXPOSURE PAPER SE SCAN COLOUR MODE RESOLUT The special function screen will appear. SPECIAL FUNCTION SPECIAL MODES ORIG. SIZE ENTER PAPER SIZE SET DISPLAY CONTRAST 4 Press - Sharp MX-M200D | Operation Manual - Page 69
with the [ ] or [ ] key. PQ SPECIAL MODES DUAL PAGE COPY ED COPY 2in1/4in1 LEX SCAN LEX SCAN XY ZOOM ACC [OK]:CHANGE 6 Press the [OK] • The copy ratio will be set automatically. • If you placed the originals in the document feeder tray, copying will start after all originals are scanned. • If - Sharp MX-M200D | Operation Manual - Page 70
edge of the paper. • Five selections are available for the margin width: 0 mm, 5 mm, 10 mm, 15 mm, 20 mm (0", 1/4", 1/2", 3/4", 1"). (The default setting is 10 mm (1/2").) • When making two-sided copies, a margin is created at the selected edge on the front side of the paper, and a margin is created - Sharp MX-M200D | Operation Manual - Page 71
key. PQ SPECIAL MODES MARGIN SHIFT ED COPY LEX SCAN LEX SCAN 5 ERASE DUAL PAGE COPY ACC The edge erase settings [OK]:ADJUST screen will appear. 5 Press the [OK] key. OK The edge erase settings screen will appear. ERASE OFF EDGE CENTRE 10 mm (0~20) 6 Select the desired erase mode with the - Sharp MX-M200D | Operation Manual - Page 72
7 Select the erasure width with the [ ] or [ ] key. If you select 0 mm (0"), the printed result is the same as when "OFF" is selected. 8 Press the [OK] key. OK You will return to the base screen. 9 Select other copy settings as needed and press the [START] key ( ). MNO To cancel an edge erase - Sharp MX-M200D | Operation Manual - Page 73
2 Press the [SPECIAL FUNCTION] key. ON LINE DATA SPECIAL FUNCTION LINE DATA COPY EXPOSURE PAPER SE SCAN COLOUR MODE RESOLUT The special function screen will appear. SPECIAL FUNCTION SPECIAL MODES ORIG. SIZE ENTER PAPER SIZE SET DISPLAY CONTRAST 3 Press the [OK] key. BACK OK GHI PQRS PY AN - Sharp MX-M200D | Operation Manual - Page 74
CONVENIENT COPY FUNCTIONS 8 Press the [START] key ( ). MNO The front side of the card is WXYZ scanned. @.-_ AD-END 9 Turn the original over on the document glass. 10 Press the [START] key ( ). Copying will start after both sides of the original have been scanned. 72 - Sharp MX-M200D | Operation Manual - Page 75
6 APPENDIX SPECIFICATIONS Name Digital Multifunctional System MX-M160/MX-M160D MX-M200D Type Desktop Photoconductive type OPC drum Document glass type Fixed Copy system Laser electrostatic method Originals Sheets, bound documents, max. original size A3 (11" x 17") Copy sizes Max. A3 ( - Sharp MX-M200D | Operation Manual - Page 76
APPENDIX Overall dimensions Weight (Not including toner cartridge) Dimensions Operating conditions Noise level Emission concentration (measured according to RALUZ122: Edition Jun. 2006) 590 mm (W) x 574 mm (D) (23-15/64" (W) x 22-38/64" (D)) MX-M160: MX-M160D: MX-M200D: Approx. 29.7 kg (65.5 lbs - Sharp MX-M200D | Operation Manual - Page 77
: Operation manual (for network scanner), Chapter 3 "SYSTEM SETTINGS" To use the system settings, the administrator password must be entered. PROGRAMS RELATED TO ALL FUNCTIONS OF THE MACHINE (COPY, FAX, PRINTER, AND NETWORK SCANNER FUNCTIONS) These programs are used to enable auditing mode, adjust - Sharp MX-M200D | Operation Manual - Page 78
4 Use the numeric keys to enter the five-digit administrator password. ABC DEF GHI JKL MNO PQRS TUV WXYZ @.-_ ACC. #-C READ-END INTERRU MODE SELECT CHANGE ADMIN PW COPIER PRINTER SCANNER • If this is the first time you are programming the administrator password, enter the factory default - Sharp MX-M200D | Operation Manual - Page 79
SYSTEM SETTINGS LIST A list of basic programs used for the machine and a list of programs used for the copy function are shown below. Programs for general use of the machine Program name ADMINISTRATOR PASSWORD CHANGE ADMINISTRATOR PASSWORD CHANGE ACCOUNT CONTROL AUDITING MODE TOTAL/ACCOUNT RESET - Sharp MX-M200D | Operation Manual - Page 80
CHANGE ADMIN PW COPIER PRINTER SCANNER Example: The screen when "COPIER" is selected. 6 Press the [OK] key. OK The settings of the selected mode appear. COPIER EXPOSURE ADJUST MARGIN DEFAULT ERASE ADJUST CARD SHOT Several programs will have checkboxes in front of them. To enable a function (make - Sharp MX-M200D | Operation Manual - Page 81
, the 5-digit account number programmed for the user's account must be entered. To enable auditing mode for the printer and scanner functions, the optional network expansion kit is required. If the network expansion kit is not installed, auditing mode cannot be used for printing and scanning that - Sharp MX-M200D | Operation Manual - Page 82
SYSTEM SETTINGS GUIDE Resetting a single account 1 Select "RESET 1 ACC." with the [ ] or [ ] key and then press the [OK] key. 2 Select the desired account with the [ ] or [ ] key. If "---,---" appears for a page limit, a limit has not been set. 3 Select the desired mode with the [ ] or [ ] key and - Sharp MX-M200D | Operation Manual - Page 83
SETTINGS GUIDE ACCOUNT LIMIT This program is used to set limits for the number of pages that can be printed by each account in print mode and copy mode to the screen of step 2. If you wish to set a limit for the other mode (copy or printer), select the mode in step 2 and repeat steps 3 to 4. To - Sharp MX-M200D | Operation Manual - Page 84
for easy separation when copying is performed in sort mode or non-sort mode. The offset function can be enabled separately for the top tray (this only appears if the job separator tray kit has been installed) and centre tray. The function is initially enabled (factory default setting) for both the - Sharp MX-M200D | Operation Manual - Page 85
SYSTEM SETTINGS GUIDE System requirements for USB 2.0 (Hi-Speed mode) The USB port on the machine supports USB 2.0 Hi-Speed mode. The following system is required to use USB 2.0 (Hi-Speed mode): The computer is running Windows Vista/XP/2000 and the Microsoft USB 2.0 driver is pre-installed, or the - Sharp MX-M200D | Operation Manual - Page 86
SIZE SET" in the special functions menu. When disabled, "PAPER SIZE SET" cannot be used when the [SPECIAL FUNCTIONS] key is pressed, which prevents users other than the administrator from easily changing the paper size setting. "DISABLE PAPER SIZE SET" is initially disabled (factory default setting - Sharp MX-M200D | Operation Manual - Page 87
the automatic and text, exposure modes. Copies will be lighter but still adequate for general use. Selection of this mode has no effect on the photo mode. The function is initially disabled (factory default setting). To turn on the toner save mode, highlight "TONER SAVE MODE" and press the [OK] key - Sharp MX-M200D | Operation Manual - Page 88
(When the dual function board is installed) This is used to set the default margin width. The factory default setting is "10 mm (1/2 inch)". Select "MARGIN DEFAULT" and press the [OK] key. The following screen will appear. MARGIN DEFAULT mm (0~20) 1 Adjust the default margin width with the [ ] or - Sharp MX-M200D | Operation Manual - Page 89
This function can be used when scanning originals in copy and scan modes. The function is initially disabled (factory default setting). To enable stream feeding, is installed) This program is used to select the default output mode when the SPF is used for copying. The initial factory setting is - Sharp MX-M200D | Operation Manual - Page 90
SYSTEM SETTINGS GUIDE RESOLUTION IN AUTO/TEXT MODE This program is used to set the resolution used when the exposure mode is set to "AUTO" or "TEXT". When "300dpi" is selected, the first copy time is shorter than when "600dpi" is selected. The factory default setting is "300dpi". Select "RESOLUTION - Sharp MX-M200D | Operation Manual - Page 91
originals 58 Dual page copy 62 E Envelopes 20 Erase copy 69 Exit area 13 Exposure - Making a copy darker or lighter 48 [EXPOSURE] key 15, 48 F [FAX] key / indicator 15 [FAX STATUS] key 14 Features 10 Feeding roller cover 13, 29 Front cover 12 Fusing unit paper guide 13, 33 Fusing unit - Sharp MX-M200D | Operation Manual - Page 92
of supplies 42 Stream feeding 87 Stream feeding mode 46 System settings 75 System settings list 77 T Toner cartridge 13, 35 Toner cartridge lock release lever 13, 35 Toner cartridge replacement required icon 28 Top tray 12 Tray 1 12 Tray 2 12 Troubleshooting - Machine/copying problems 25 - Sharp MX-M200D | Operation Manual - Page 93
Margin shift 68 Rotation copy 64 Sort mode 64 Copying Automatic ratio selection 52 Dual page copy 62 Interrupt copying 63 Making a copy darker or lighter 48 Manual ratio selection (preset copy ratios/zoom)......52 Normal copying - Copying from the document glass 45 - Copying from the SPF 46 - Sharp MX-M200D | Operation Manual - Page 94
92 - Sharp MX-M200D | Operation Manual - Page 95
93 - Sharp MX-M200D | Operation Manual - Page 96
94 - Sharp MX-M200D | Operation Manual - Page 97
• The Administrator Password Number is an important security number allowing the Administrator to configure the copier's functions and auditor's settings. • You should register your own code number - different from the factory setting above - immediately after your copier is installed. • Detach this - Sharp MX-M200D | Operation Manual - Page 98
- Sharp MX-M200D | Operation Manual - Page 99
Notice for Users in Europe SHARP ELECTRONICS (Europe) GmbH Sonninstraße 3, D-20097 Hamburg - Sharp MX-M200D | Operation Manual - Page 100
MX-M160/MX-M160D/MX-M200D This manual has been printed using a vegetable-based soy oil ink to help protect the environment. PRINTED IN THAILAND 2009H YT1 TINSE1977USZZ
-
 1
1 -
 2
2 -
 3
3 -
 4
4 -
 5
5 -
 6
6 -
 7
7 -
8
-
9
-
10
-
11
-
12
-
13
-
14
-
15
-
16
-
17
-
18
-
19
-
20
-
21
-
22
-
23
-
24
-
25
-
26
-
27
-
28
-
29
-
30
-
31
-
32
-
33
-
34
-
35
-
36
-
37
-
38
-
39
-
40
-
41
-
42
-
43
-
44
-
45
-
46
-
47
-
48
-
49
-
50
-
51
-
52
-
53
-
54
-
55
-
56
-
57
-
58
-
59
-
60
-
61
-
62
-
63
-
64
-
65
-
66
-
67
-
68
-
69
-
70
-
71
-
72
-
73
-
74
-
75
-
76
-
77
-
78
-
79
-
80
-
81
-
82
-
83
-
84
-
85
-
86
-
87
-
88
-
89
-
90
-
91
-
92
-
93
-
94
-
95
-
96
-
97
-
98
-
99
-
100
 |
 |
Be sure to become thoroughly familiar with this manual to
gain the maximum benefit from the product.
Before installing this product, be sure to read the
cautions and installation requirements sections.
Be sure to keep all operation manuals handy for reference
including this manual, the "Operation manual (for general
information and copier)" and operation manuals for any
optional equipment which has been installed.
MODEL
DIGITAL MULTIFUNCTIONAL
SYSTEM
OPERATION MANUAL
(for general information and copier)
PART 1: GENERAL INFORMATION
•
BEFORE USING THE PRODUCT
•
TROUBLESHOOTING
AND MAINTENANCE
•
PERIPHERAL DEVICES
AND SUPPLIES
PART 2: COPIER OPERATION
•
COPY FUNCTIONS
•
CONVENIENT COPY
FUNCTIONS
•
APPENDIX
•
SYSTEM SETTINGS GUIDE
12
24
40
45
64
73
75
Page
MX-M160
MX-M160D
MX-M200D