Sharp MX-M200D Operation Manual - Page 50
Making A Copy Darker Or Lighter
 |
View all Sharp MX-M200D manuals
Add to My Manuals
Save this manual to your list of manuals |
Page 50 highlights
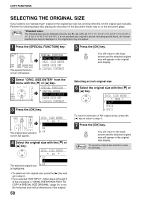
COPY FUNCTIONS MAKING A COPY DARKER OR LIGHTER The copy exposure can be adjusted as needed to the original. Three exposure modes are available: "AUTO", "TEXT" and "PHOTO". When "TEXT" or "PHOTO" is selected, the exposure can be manually adjusted to 5 levels. Auto This is the default exposure mode. In this mode, the characteristics of an original being copied are "read" by the exposure system and exposure adjustments are made automatically. The exposure level is lowered for coloured areas and background shadows. AUTO 100% Text/photo TEXT: This mode enhances low density areas of an original and suppresses high-density background areas to make text more legible. PHOTO: This mode provides clearer reproduction of halftones in photos. 1 Press the [EXPOSURE] key. COPY EXPOSURE PAPER SELECT COP SCAN COLOUR MODE RESOLUTION AD FAX PROGRAM RESOLUTION AD The copy exposure screen will appear. EXPOSURE AUTO AUTO TEXT PHOTO 2 Select the exposure mode that best suits the original with the [ ] or [ ] key. PQ EXPOSURE AUTO AUTO ED COPY LEX SCAN LEX SCAN TEXT PHOTO ACC 3 Adjust the exposure level as needed with the [ ] or [ ] key. EXPOSURE AUTO AUTO TEXT PHOTO • The exposure level cannot be adjusted when "AUTO" is selected. • For a darker image, press the [ ] key. For a lighter image, press the [ ] key. • The default exposure levels for "TEXT" and "PHOTO" can be set in the system settings. Note Exposure level guidelines 1 to 2: Dark originals such as newspapers 3: Normal density originals 4 to 5: Text written in pencil or light colour text The [EXPOSURE] key can also be pressed to select the exposure mode. Note When "PHOTO" is selected, "PHOTO MODE DEFAULT" in the system settings can be used to select the method for expressing halftones. (Page 88) 4 Press the [OK] key. BACK OK PY AN GHI To return to AUTO mode, press the [EXPOSURE] key, select PQRS "AUTO" with the [ ] key, and press the [OK] key. 48
-
 1
1 -
2
-
3
-
4
-
5
-
6
-
7
-
8
-
9
-
10
-
11
-
12
-
13
-
14
-
15
-
16
-
17
-
18
-
19
-
20
-
21
-
22
-
23
-
24
-
25
-
26
-
27
-
28
-
29
-
30
-
31
-
32
-
33
-
34
-
35
-
36
-
37
-
38
-
39
-
40
-
41
-
42
-
43
-
44
-
 45
45 -
 46
46 -
 47
47 -
 48
48 -
 49
49 -
 50
50 -
 51
51 -
 52
52 -
 53
53 -
 54
54 -
 55
55 -
56
-
57
-
58
-
59
-
60
-
61
-
62
-
63
-
64
-
65
-
66
-
67
-
68
-
69
-
70
-
71
-
72
-
73
-
74
-
75
-
76
-
77
-
78
-
79
-
80
-
81
-
82
-
83
-
84
-
85
-
86
-
87
-
88
-
89
-
90
-
91
-
92
-
93
-
94
-
95
-
96
-
97
-
98
-
99
-
100
 |
 |
