Sony HVR1500A Product Manual (HVE-1500A Operating Manuals) - Page 42
Recording and Playback, Recording, Settings for recording
 |
View all Sony HVR1500A manuals
Add to My Manuals
Save this manual to your list of manuals |
Page 42 highlights
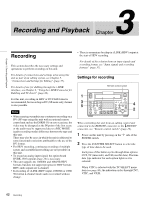
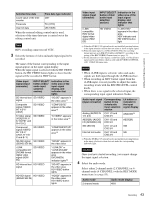
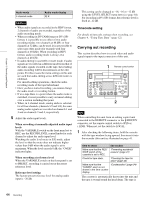
Recording and Playback 3 Chapter Chapter 3 Recording and Playback Recording This section describes the necessary settings and operations to perform recording on this unit. For details of connections and settings when using this unit as part of an editing system, see Chapter 5, "Connections and Settings for Editing" (page 57). For details of use for dubbing through the i.LINK interface, see Chapter 6, "Using the i.LINK Connector for Dubbing and TC Insert" (page 66). For this unit, recording in HDV or DVCAM format is recommended, but recording in DV (SP mode only) format is also possible. Notes • When carrying out multiscene continuous recording on a DV (SP) tape using this unit with an optional remote control unit such as the DSRM-10, on rare occasions, the video may be disrupted at the IN point of the first scene or the audio may be suppressed due to a REC MODE (audio recording mode) difference between the tape and this unit. There may also be cases in which the unit is subjected to some functional restrictions attributable to the use of the DV format. • For HDV recording, continuous recording of multiple scenes and assemble/insert editing are not possible on this unit. • To record an analog input signal, the option board HVBK-1505 (option) (page 10) is necessary. • This unit supports the 1080/60i and 1080/50i HDV formats, but does not support progressive HDV formats. HDV audio signals are 2-channel. • In recording of i.LINK (HDV) input, 1080/60i or 1080/ 50i format 4-channel mode audio is recorded without change. • There is momentary breakup in i.LINK (HDV) output at the start of HDV recording. For details of the relation between input signals and recording format, see "Input signals and recording formats" (page 37). Settings for recording Remote control switch 1 3 5 POWER EJECT INPUT SELECT HD VIDEO SD VIDEO CH1 1/2 CH2 3/4 REC/PB LEVEL 1 2 3 4 LEVEL PHONES VARIABLE REC PRESET PB CONTROL-S MONITOR SELECT REW LOCAL 9PIN i.LINK OVER OVER 0 REPEAT 1080 525 -12 -20 -30 -40 -60 CH1 CH2 EDIT MODE REC INHI TC VITC 44.1K 01:23:45:15 DISPLAY COUNTER SELECT MENU TC PRESET HDV DVCAM (DV) ASSIGN RESET(NO) SET(YES) PLAY F FWD STOP REC A B 4 2 When controlling this unit from an editing control unit connected to the REMOTE connector or the HDV/DV connector, see "Remote control switch" (page 19). 1 Power on this unit by pressing on the " " side of the POWER switch. 2 Press the COUNTER SELECT button to select the type of time data to be used. Each press of this button cycles through three options: CNT, TC (timecode), and UB (user bit data). The time data type indicator for each option lights as it is selected. When VITC is selected with the TC SELECT menu item (see page 80), the indication cycles through CNT, VITC, and VIUB. 42 Recording
-
 1
1 -
2
-
3
-
4
-
5
-
6
-
7
-
8
-
9
-
10
-
11
-
12
-
13
-
14
-
15
-
16
-
17
-
18
-
19
-
20
-
21
-
22
-
23
-
24
-
25
-
26
-
27
-
28
-
29
-
30
-
31
-
32
-
33
-
34
-
35
-
36
-
 37
37 -
 38
38 -
 39
39 -
 40
40 -
 41
41 -
 42
42 -
 43
43 -
 44
44 -
 45
45 -
 46
46 -
 47
47 -
48
-
49
-
50
-
51
-
52
-
53
-
54
-
55
-
56
-
57
-
58
-
59
-
60
-
61
-
62
-
63
-
64
-
65
-
66
-
67
-
68
-
69
-
70
-
71
-
72
-
73
-
74
-
75
-
76
-
77
-
78
-
79
-
80
-
81
-
82
-
83
-
84
-
85
-
86
-
87
-
88
-
89
-
90
-
91
-
92
-
93
-
94
-
95
-
96
-
97
-
98
-
99
-
100
-
101
-
102
-
103
-
104
-
105
-
106
-
107
-
108
-
109
-
110
-
111
 |
 |
