Sony HVR1500A Product Manual (HVE-1500A Operating Manuals) - Page 45
If REC INHI appears in the LCD monitor screen, in status display mode, To stop recording
 |
View all Sony HVR1500A manuals
Add to My Manuals
Save this manual to your list of manuals |
Page 45 highlights
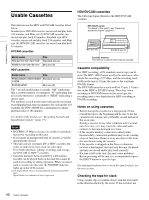
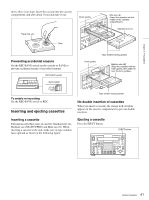
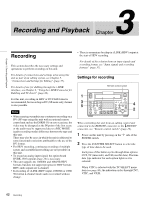
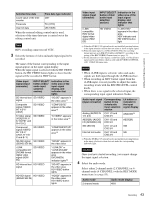
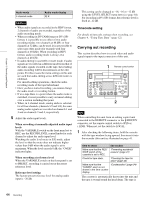
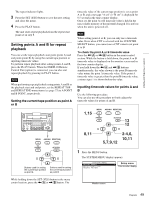
Chapter 3 Recording and Playback stationary while the head drum rotates, and the STOP button lights. If REC INHI appears in the LCD monitor screen (in status display mode) The probable causes are as follows. • It indicates that the REC/SAVE switch of the loaded cassette has been set to SAVE. Press the EJECT button to remove the cassette, then set the REC/ SAVE switch to REC and reload the cassette. • The REC INHIBIT menu item (see page 76) is set to ON. Set it to OFF. 2 Hold down the REC button and press the PLAY button. This puts the unit into recording mode, and the tape starts moving. Cautions • Once you have started recording, you cannot change the audio mode or recording format. • If on a tape there is a point where the audio mode is switched, it is not possible to carry out insert editing over a section including that point. If the following indicators light when a cassette is loaded Indicator CL It means: The loaded cassette contains a cassette memory. There is ClipLink log data stored in the cassette memory on the loaded cassette. Caution With such a cassette, carrying out recording destroys the ClipLink log data. Indicator NO EDIT indicator It means: • A tape recorded in DVCPRO format is inserted. Replace the tape with one recorded in DVCAM format. • The recording format selected on this unit is DV (SP). In this case, you cannot use the editing functions. • A tape recorded in HDV format is inserted. An HDV tape cannot be edited with this unit. During editing operation The audio recording mode selected on this unit does not coincide with that of the tape. • To continue editing, set the unit for the same audio recording mode as with the tape. • If your current purpose is recording only, you can use the tape as it is. For more details, see "Troubleshooting" (page 97). If a warning message appears on the monitor screen In full screen display or small screen display mode, if you attempt to record on a cassette tape with the REC/SAVE switch is set to SAVE (recording inhibited), a warning message appears on the monitor screen: "ALARM RECORD INHIBIT PLUG ON THE CASSETTE IS SET TO INHIBIT." Take out the cassette, and set the REC/SAVE switch to REC, then reinsert the cassette. To stop recording Press the STOP button. The unit enters stop mode, and will automatically switch to standby off mode after a while for tape protection. To take out cassette Press the EJECT button. After a few seconds, the tape is unwound from the head drum and the cassette is automatically ejected. If a CNT value is shown on the time counter display (the time data type indicator CNT is lit), the CNT value is reset. To inhibit the unit from outputting text information (time data, operating mode indications, etc.) to the monitor screen Set the CHARA. DISPLAY menu item (see page 77) to OFF. To change the time period before the unit switches from stop mode to standby off mode Change the setting of the FROM STOP >STOP TIMER menu item (see page 81). 45 Recording
-
 1
1 -
2
-
3
-
4
-
5
-
6
-
7
-
8
-
9
-
10
-
11
-
12
-
13
-
14
-
15
-
16
-
17
-
18
-
19
-
20
-
21
-
22
-
23
-
24
-
25
-
26
-
27
-
28
-
29
-
30
-
31
-
32
-
33
-
34
-
35
-
36
-
37
-
38
-
39
-
 40
40 -
 41
41 -
 42
42 -
 43
43 -
 44
44 -
 45
45 -
 46
46 -
 47
47 -
 48
48 -
 49
49 -
 50
50 -
51
-
52
-
53
-
54
-
55
-
56
-
57
-
58
-
59
-
60
-
61
-
62
-
63
-
64
-
65
-
66
-
67
-
68
-
69
-
70
-
71
-
72
-
73
-
74
-
75
-
76
-
77
-
78
-
79
-
80
-
81
-
82
-
83
-
84
-
85
-
86
-
87
-
88
-
89
-
90
-
91
-
92
-
93
-
94
-
95
-
96
-
97
-
98
-
99
-
100
-
101
-
102
-
103
-
104
-
105
-
106
-
107
-
108
-
109
-
110
-
111
 |
 |
