Sony HVR1500A Product Manual (HVE-1500A Operating Manuals) - Page 91
Assigning a Function to the ASSIGN Button
 |
View all Sony HVR1500A manuals
Add to My Manuals
Save this manual to your list of manuals |
Page 91 highlights
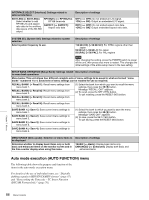
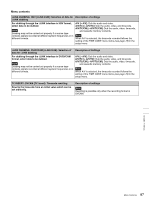
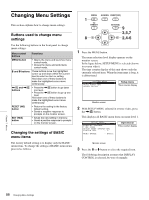
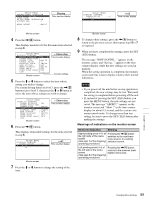
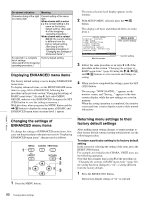
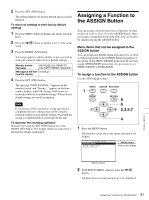
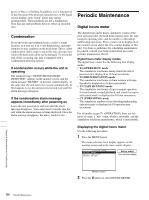
2 Press the SET (YES) button. The setting returns to its factory default and is saved in memory. To return all settings to their factory default settings 1 Press the MENU button to display the menu selection level. 2 Press the ,/B button to display level 1 of the setup menu. 3 Press the RESET (NO) button. A message appears, asking whether or not you wish to return all settings to their factory default settings. Monitor screen message INITIALIZE ALL ITEMS TO FACTORY PRESET VALLUES? Message in the time Init setup? counter display 4 Press the SET (YES) button. The message "NOW SAVING..." appears on the monitor screen, and "Saving..." appears in the time counter display, while the settings of all items are returned to their factory default settings. These factory default settings are saved in memory. Note If you power off the unit before saving operation is completed, the new settings may not be correctly returned to their factory default settings. Wait until the saving is completed before powering off the unit. To abandon the resetting operation Instead of pressing the SET (YES) button, press the RESET (NO) button. The display returns to menu level 1, leaving the settings unchanged. Assigning a Function to the ASSIGN Button You can assign a desired menu item (a function, in other words) on level 1 or level 2 to the ASSIGN button. Once you assign a frequently-used menu item, you can recall it by simply pressing the ASSIGN button. Menu items that can be assigned to the ASSIGN button You can assign any BASIC menu item on level 1 or level 2 of the setup menu to the ASSIGN button regardless of the setting of the MENU GRADE menu item. If you want assign a ENHANCED menu item, it is necessary to set MENU GRADE to ENHANCED. To assign a function to the ASSIGN button Use the following procedure. MENU ASSIGN RESET(NO) 1 TC PRESET SET(YES) 8 6 A B 2,3,5,7 4 1 Press the MENU button. The monitor screen shows the menu selection level display. SYSTEM SETUP MENU AUTO FUNCTION HOURS METER MENU Setup menu Time counter display Chapter 7 Menus Monitor screen 2 With SETUP MENU selected, press the ,/B button. All basic items in setup menu level 1 are displayed. 91 Assigning a Function to the ASSIGN Button
-
 1
1 -
2
-
3
-
4
-
5
-
6
-
7
-
8
-
9
-
10
-
11
-
12
-
13
-
14
-
15
-
16
-
17
-
18
-
19
-
20
-
21
-
22
-
23
-
24
-
25
-
26
-
27
-
28
-
29
-
30
-
31
-
32
-
33
-
34
-
35
-
36
-
37
-
38
-
39
-
40
-
41
-
42
-
43
-
44
-
45
-
46
-
47
-
48
-
49
-
50
-
51
-
52
-
53
-
54
-
55
-
56
-
57
-
58
-
59
-
60
-
61
-
62
-
63
-
64
-
65
-
66
-
67
-
68
-
69
-
70
-
71
-
72
-
73
-
74
-
75
-
76
-
77
-
78
-
79
-
80
-
81
-
82
-
83
-
84
-
85
-
 86
86 -
 87
87 -
 88
88 -
 89
89 -
 90
90 -
 91
91 -
 92
92 -
 93
93 -
 94
94 -
 95
95 -
 96
96 -
97
-
98
-
99
-
100
-
101
-
102
-
103
-
104
-
105
-
106
-
107
-
108
-
109
-
110
-
111
 |
 |
