Sony HVR1500A Product Manual (HVE-1500A Operating Manuals) - Page 67
Digitally dubbing signals in HDV/DVCAM/DV format, Setup menu, Auto func, i.LINK DUB
 |
View all Sony HVR1500A manuals
Add to My Manuals
Save this manual to your list of manuals |
Page 67 highlights
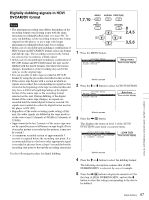
Digitally dubbing signals in HDV/ DVCAM/DV format Notes • The maximum recording time differs depending on the recording format even if using a tape with the same maximum recording/playback time (see page 40). To carry out dubbing, set the recording format to the format output from the player, or use a tape with longer maximum recording/playback time for recording. • In the case of a recorded tape including a combination of HDV format and DVCAM/DV format, select one format and dub the tape. The recording sections in the format not selected are recorded as a blank signal. • In the case of a recorded tape including a combination of DV (SP) format and DVCAM format, the tape can be dubbed with the mixed formats, but where the format changes, disturbance of the recording may not be the same as on the original tape. • It is not possible to dub a tape recorded in DV (LP) format by using the procedure described in this section. • If the source tape begins with a section in which no signals are recorded, the corresponding no-signal section created at the beginning of the tape recorded on this unit may have a different length depending on the digital format of the source tape or the recording format selected on this unit. During dubbing, if the digital format of the source tape changes, no signals are recorded until the initial digital format is restored. No signals are recorded also when the digital format used on the player is DV (LP). • Regardless of the audio recording mode setting of this unit, the audio signals are dubbed in the same mode as on the source tape (2 channels at 48 kHz or 4 channels at 32 kHz). • Approximately the last 2 minutes of the source tape may not be copied because of difference in tape length. (Even if an index picture is recorded in this portion, it may not be copied.) • A continuous recorded section of approximately 5 seconds is required before the recording start point. It is recommended that a color bar or other appropriate signal is recorded in advance from at least 5 seconds before the recording start point to beyond the recording start point. Use the following procedure for digital dubbing. 1,7,10 MENU TC PRESET ASSIGN RESET(NO) SET(YES) 8 2,4,5 A B 3,5,6 1 Press the MENU button. SYSTEM MENU SETUP MENU AUTO FUNCTION HOURS METER Setup menu Time counter display Monitor screen 2 Press the M or m button to select AUTO FUNCTION. SYSTEM MENU SETUP MENU AUTO FUNCTION HOURS METER Auto func Time counter display Monitor screen 3 Press the ,/B button. This displays the items on level 1 of the AUTO FUNCTION (auto mode execution) menu. AUTO FUNCTION MENU i.LINK DUBBING :HDV i.LINK DUBBING :DV/DVCAM TC INSERT :DVCAM i.LINK DUB Time counter display Monitor screen 4 Press the M or m button to select the dubbing format. The following description assumes that i.LINK DUBBING:HDV is selected, by way of example. 5 Press the ,/B button to display the menu level 2 for the item i.LINLK DUBBING:HDV, and use the m button to select the setting corresponding to the data to be dubbed. Chapter 6 Using the i.LINK Connector for Dubbing and TC Insert 67 Digital Dubbing
-
 1
1 -
2
-
3
-
4
-
5
-
6
-
7
-
8
-
9
-
10
-
11
-
12
-
13
-
14
-
15
-
16
-
17
-
18
-
19
-
20
-
21
-
22
-
23
-
24
-
25
-
26
-
27
-
28
-
29
-
30
-
31
-
32
-
33
-
34
-
35
-
36
-
37
-
38
-
39
-
40
-
41
-
42
-
43
-
44
-
45
-
46
-
47
-
48
-
49
-
50
-
51
-
52
-
53
-
54
-
55
-
56
-
57
-
58
-
59
-
60
-
61
-
 62
62 -
 63
63 -
 64
64 -
 65
65 -
 66
66 -
 67
67 -
 68
68 -
 69
69 -
 70
70 -
 71
71 -
 72
72 -
73
-
74
-
75
-
76
-
77
-
78
-
79
-
80
-
81
-
82
-
83
-
84
-
85
-
86
-
87
-
88
-
89
-
90
-
91
-
92
-
93
-
94
-
95
-
96
-
97
-
98
-
99
-
100
-
101
-
102
-
103
-
104
-
105
-
106
-
107
-
108
-
109
-
110
-
111
 |
 |
