Sony HVR1500A Product Manual (HVE-1500A Operating Manuals) - Page 66
Using the i.LINK Connector for Dubbing and TC Insert, Digital Dubbing
 |
View all Sony HVR1500A manuals
Add to My Manuals
Save this manual to your list of manuals |
Page 66 highlights
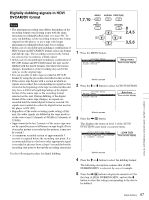
Using the i.LINK Connector for Dubbing and TC Insert 6 Chapter Chapter 6 Using the i.LINK Connector for Dubbing and TC Insert Digital Dubbing HVR-Z1 (player) In addition to straightforward tape dubbing, you can also use this unit to dub signals in HDV 1080i or DVCAM/DV format automatically from the beginning of the tape to the end through the i.LINK interface. Connections and settings The following figure shows an example of the connections for carrying out dubbing through the i.LINK interface, using this unit as the recorder, and an HVR-Z1 as the player. HDV/DV (4-pin) HVR-1500A (this unit as recorder) VIDEO IN Y/S-Y/CPST R-Y/S-C B-Y AC IN AUDIO IN 1/3 2/4 REF.VIDEO IN(SD/HD) Y/CPST VIDEO OUT (SUPER) Pr/R-Y/S-C Pb/B-Y/S-Y CPST AUDIO OUT IN(SD/HD) SDI OUT1 OUT2 SDI OUT1 OUT2 HD SDI 1/3 2/4 IN AUDIO I/O (AES/EBU) OUT TC IN OUT MONITOR AUDIO 1/2 3/4 1/2 3/4 HDV/DV REMOTE HDV/DV (6-pin) i.LINK cable (not supplied) HVR-Z1 (player) setting VCR HDV/DV 1) in the (IN/OUT REC) menu: HDV or DV Settings on this unit Depending on what you want to input, press the HD VIDEO button in the video/audio input selection section to display i.LINK:HDV in the input signal display, or press the SD VIDEO button to display i.LINK:DV or i.LINK:DVCAM. 1) The i.LINK output format must be set. For details of the HVR-Z1 settings, refer to the HVR-Z1 Operating Instructions. 66 Digital Dubbing
-
 1
1 -
2
-
3
-
4
-
5
-
6
-
7
-
8
-
9
-
10
-
11
-
12
-
13
-
14
-
15
-
16
-
17
-
18
-
19
-
20
-
21
-
22
-
23
-
24
-
25
-
26
-
27
-
28
-
29
-
30
-
31
-
32
-
33
-
34
-
35
-
36
-
37
-
38
-
39
-
40
-
41
-
42
-
43
-
44
-
45
-
46
-
47
-
48
-
49
-
50
-
51
-
52
-
53
-
54
-
55
-
56
-
57
-
58
-
59
-
60
-
 61
61 -
 62
62 -
 63
63 -
 64
64 -
 65
65 -
 66
66 -
 67
67 -
 68
68 -
 69
69 -
 70
70 -
 71
71 -
72
-
73
-
74
-
75
-
76
-
77
-
78
-
79
-
80
-
81
-
82
-
83
-
84
-
85
-
86
-
87
-
88
-
89
-
90
-
91
-
92
-
93
-
94
-
95
-
96
-
97
-
98
-
99
-
100
-
101
-
102
-
103
-
104
-
105
-
106
-
107
-
108
-
109
-
110
-
111
 |
 |
