Sony HVR1500A Product Manual (HVE-1500A Operating Manuals) - Page 47
Playback operations, Variable speed playback, Variable speed playback operations on
 |
View all Sony HVR1500A manuals
Add to My Manuals
Save this manual to your list of manuals |
Page 47 highlights
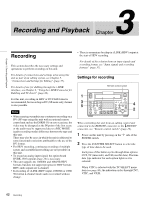
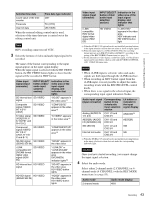
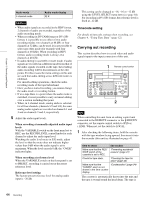
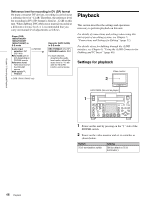
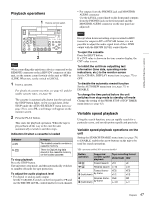
Chapter 3 Recording and Playback Playback operations 1 Remote control switch POWER EJECT INPUT SELECT HD VIDEO SD VIDEO CH1 1/2 CH2 3/4 REC/PB LEVEL 1 2 3 4 LEVEL PHONES VARIABLE REC PRESET PB CONTROL-S MONITOR SELECT REW LOCAL 9PIN i.LINK OVER OVER 0 REPEAT 1080 525 -12 -20 -30 -40 -60 CH1 CH2 EDIT MODE REC INHI TC VITC 44.1K 01:23:45:15 DISPLAY COUNTER SELECT MENU TC PRESET HDV DVCAM (DV) ASSIGN RESET(NO) SET(YES) PLAY F FWD STOP REC A B 2 Note When controlling this unit from a device connected to the REMOTE connector or the HDV/DV connector of this unit, set the remote control switch of this unit to 9PIN or i.LINK. When not, set the switch to LOCAL. 1 Insert a cassette. For details of cassette insertion, see page 41, and for usable cassette types, see page 40. The cassette is automatically drawn into the unit and the STOP button lights. A few seconds later, if the STOP under the AUTO EE SELECT menu item (see page 76) is set to PB, a still image will appear on the monitor screen. 2 Press the PLAY button. This starts the playback operation. When the tape is played back all the way to the end, the unit automatically rewinds it and then stops. Indicators lit when a cassette is loaded Indicator CL It means: The loaded cassette contains a cassette memory. There is ClipLink log data stored in the cassette memory on the loaded cassette. To stop playback Press the STOP button. The unit enters stop mode, and then automatically switches to standby off mode for tape protection. To adjust the audio playback level • For digital or analog audio output Set the VARIABLE switch on the front panel to PB and use the REC/PB LEVEL control knobs for each channel. • For outputs from the PHONES jack and MONITOR AUDIO connector Use the LEVEL control knob on the front panel (outputs from the PHONES jack on the front panel and the MONITOR AUDIO connector on the rear panel are adjusted). Note Except when downconverting a tape recorded in HDV format for output in DV or DVCAM format, it is not possible to adjust the audio signal level of the i.LINK output with the REC/PB LEVEL control knobs. To eject the cassette Press the EJECT button. If a CNT value is shown in the time counter display, the CNT value is reset. To inhibit the unit from outputting text information (time data, operating mode indications, etc.) to the monitor screen Set the CHARA. DISPLAY menu item (see page 77) to OFF. To disable the automatic rewind function Set the AUTO REW menu item (see page 77) to DISABLE. To change the time period before the unit switches from stop mode to standby off mode Change the setting of the FROM STOP >STOP TIMER menu item (see page 81). Variable speed playback Using the search function, you can rapidly search for a particular scene, and set edit points rapidly and precisely. Variable speed playback operations on the unit Setting the SEARCH ENABLE menu item (see page 76) to ENABLE, enables the arrow buttons on the unit to be used for search operations. YES: operation enabled, NO: operation disabled Button operation Supported Tape recording format variable speed playback DV/DVCAM HDV ,/B Foward search ×10 ×8
-
 1
1 -
2
-
3
-
4
-
5
-
6
-
7
-
8
-
9
-
10
-
11
-
12
-
13
-
14
-
15
-
16
-
17
-
18
-
19
-
20
-
21
-
22
-
23
-
24
-
25
-
26
-
27
-
28
-
29
-
30
-
31
-
32
-
33
-
34
-
35
-
36
-
37
-
38
-
39
-
40
-
41
-
 42
42 -
 43
43 -
 44
44 -
 45
45 -
 46
46 -
 47
47 -
 48
48 -
 49
49 -
 50
50 -
 51
51 -
 52
52 -
53
-
54
-
55
-
56
-
57
-
58
-
59
-
60
-
61
-
62
-
63
-
64
-
65
-
66
-
67
-
68
-
69
-
70
-
71
-
72
-
73
-
74
-
75
-
76
-
77
-
78
-
79
-
80
-
81
-
82
-
83
-
84
-
85
-
86
-
87
-
88
-
89
-
90
-
91
-
92
-
93
-
94
-
95
-
96
-
97
-
98
-
99
-
100
-
101
-
102
-
103
-
104
-
105
-
106
-
107
-
108
-
109
-
110
-
111
 |
 |
