Sony HVR1500A Product Manual (HVE-1500A Operating Manuals) - Page 89
Meanings of indications on the monitor screen, On-screen indication, Meaning
 |
View all Sony HVR1500A manuals
Add to My Manuals
Save this manual to your list of manuals |
Page 89 highlights
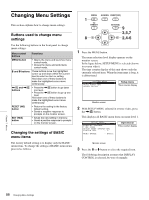
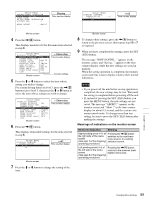
SETUP MENU OPERATIONAL FUNCTION DISPLAY CONTROL TIME CODE SETUP BANK OPERATION SYSTEM SEL : J MENU GRADE : BASIC Display Time counter display SETUP MENU DISPLAY CONTROL CHARA.VSIZE : x1 * x1 x2 >>x2 Time counter display Monitor screen 4 Press the ,/B button. This displays menu level 2 for the menu item selected in step 3. SETUP MENU DISPLAY CONTROL CHARA.DISPLAY : CHARA.POSITION CHARA.TYPE : CHARA.VSIZE : DISPLAY INFO : SUB STATUS : MENU DISPLAY : PEAK HOLD : OVER DISP HOLD: LCD : ON WHITE x1 T&STA OFF WHITE OFF OFF Monitor screen > Chara disp Time counter display Current settings 5 Press the M or m button to select the item whose setting you wish to change. For a menu having items on level 3, press the ,/B button to go to level 3, then press the M or m button to select the item whose setting you wish to change. SETUP MENU DISPLAY CONTROL CHARA.DISPLAY : CHARA.POSITION CHARA.TYPE : CHARA.VSIZE : DISPLAY INFO : SUB STATUS : MENU DISPLAY : PEAK HOLD : OVER DISP HOLD : LCD : ON WHITE x1 T&STA OFF WHITE OFF OFF Monitor screen > Chara size Time counter display 6 Press the ,/B button. This displays all possible settings for the item selected in step 5. SETUP MENU DISPLAY CONTROL CHARA.VSIZE : x1 * x1 x2 >>x1 Time counter display Monitor screen 7 Press the M or m button to change the setting of the item. Monitor screen 8 To change other settings, press the
-
 1
1 -
2
-
3
-
4
-
5
-
6
-
7
-
8
-
9
-
10
-
11
-
12
-
13
-
14
-
15
-
16
-
17
-
18
-
19
-
20
-
21
-
22
-
23
-
24
-
25
-
26
-
27
-
28
-
29
-
30
-
31
-
32
-
33
-
34
-
35
-
36
-
37
-
38
-
39
-
40
-
41
-
42
-
43
-
44
-
45
-
46
-
47
-
48
-
49
-
50
-
51
-
52
-
53
-
54
-
55
-
56
-
57
-
58
-
59
-
60
-
61
-
62
-
63
-
64
-
65
-
66
-
67
-
68
-
69
-
70
-
71
-
72
-
73
-
74
-
75
-
76
-
77
-
78
-
79
-
80
-
81
-
82
-
83
-
 84
84 -
 85
85 -
 86
86 -
 87
87 -
 88
88 -
 89
89 -
 90
90 -
 91
91 -
 92
92 -
 93
93 -
 94
94 -
95
-
96
-
97
-
98
-
99
-
100
-
101
-
102
-
103
-
104
-
105
-
106
-
107
-
108
-
109
-
110
-
111
 |
 |
