Sony HVR1500A Product Manual (HVE-1500A Operating Manuals) - Page 98
Alarm messages, Monitor problems, Audio problem, Editing restriction
 |
View all Sony HVR1500A manuals
Add to My Manuals
Save this manual to your list of manuals |
Page 98 highlights
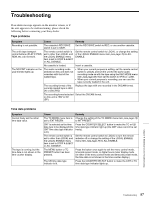
Monitor problems Symptom Data is not superimposed on the monitor screen. The image on the monitor screen is too bright. The image on the monitor screen is too dark. The image is too dark when recording a composite video signal. Cause Remedy The CHARA. DISPLAY menu Set the CHARA. DISPLAY menu item (see page 77) to ON. item is set to OFF. The monitor is not connected Connect the monitor to the (SUPER) CPST connector. to the (SUPER) CPST (You must make this connection to display any type of text on connector of this unit. the monitor.) The 75 Ω termination switch for video input on the monitor is in the OFF position, or a 75 Ω terminator is not fitted to its video input connector. Set the 75 Ω termination switch to ON or connect a terminator. In a video signal loop-through connection of multiple video monitors, 75 Ω termination switches for video input on monitors other than the loopend monitor are in the ON position. Set the 75 Ω termination switches to OFF on all monitors other than the loop-end monitor. Audio problem Symptom The REC/PB LEVEL control knobs do not work. Cause Remedy The VARIABLE switch on the Set the VARIABLE switch to REC when recording, or set it to front panel is set to PRESET. PB when playing back. Editing restriction Symptom Execution of video editing in insert mode erases subcode data (user bit data, etc.) recorded on tape other than timecode data. Cause This phenomenon cannot be avoided with an editing system using this unit as the recorder. Alarm messages When operating this unit, the unit may sometimes output alarm messages such as the one shown below to the monitor screen and the time counter display. ALARM Cause of alarm REMOTE MODE IS SELECTED. SET REMOTE/LOCAL SWITCH TO LOCAL. Direction Note To display alarm messages on the monitor screen, it is necessary to connect the monitor to the (SUPER) CPST connector, and set the following menu items to ON. • CHARA. DISPLAY (see page 77) • ALARM (see page 79) • REF ALARM (see page 79) Monitor screen REMOTE! Time counter display If such an alarm message appears, it suggests occurrence of a connection or operation error or condensation on heads. Follow the direction indicated on the monitor screen. Chapter 8 Maintenance and Troubleshooting 98 Troubleshooting
-
 1
1 -
2
-
3
-
4
-
5
-
6
-
7
-
8
-
9
-
10
-
11
-
12
-
13
-
14
-
15
-
16
-
17
-
18
-
19
-
20
-
21
-
22
-
23
-
24
-
25
-
26
-
27
-
28
-
29
-
30
-
31
-
32
-
33
-
34
-
35
-
36
-
37
-
38
-
39
-
40
-
41
-
42
-
43
-
44
-
45
-
46
-
47
-
48
-
49
-
50
-
51
-
52
-
53
-
54
-
55
-
56
-
57
-
58
-
59
-
60
-
61
-
62
-
63
-
64
-
65
-
66
-
67
-
68
-
69
-
70
-
71
-
72
-
73
-
74
-
75
-
76
-
77
-
78
-
79
-
80
-
81
-
82
-
83
-
84
-
85
-
86
-
87
-
88
-
89
-
90
-
91
-
92
-
 93
93 -
 94
94 -
 95
95 -
 96
96 -
 97
97 -
 98
98 -
 99
99 -
 100
100 -
 101
101 -
 102
102 -
 103
103 -
104
-
105
-
106
-
107
-
108
-
109
-
110
-
111
 |
 |
