Sony HVR1500A Product Manual (HVE-1500A Operating Manuals) - Page 43
Notes, Caution, INPUT SELECT
 |
View all Sony HVR1500A manuals
Add to My Manuals
Save this manual to your list of manuals |
Page 43 highlights
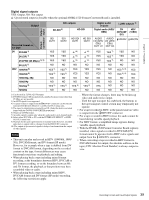
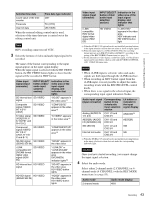
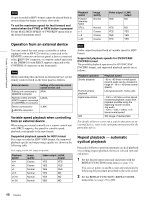
Chapter 3 Recording and Playback Selected time data Count value of the time counter Timecode User bit data Time data type indicator CNT TC (VITC) UB (VIUB) When the external editing control unit is used, selection of the time data type is carried out at the editing control unit. Note HDV recording cannot record VITC. 3 Select the formats of video and audio input signal to be recorded. The name of the format corresponding to the input signal appears in the input signal display. When the input signal is selected with the HD VIDEO button, the HD VIDEO button lights to show that the signal will be recorded in HDV format. Video input signal (input connector) INPUT SELECT Indication in the button (video/ video area of the audio input input signal selection display, and section) indicator that lights SD internal test SD VIDEO signal "SG:SD" appears in the video area c) Composite signal (VIDEO IN: Y/S-Y/ CPST) SD VIDEO "COMPOSITE" appears in the video area a) S-Video signal (VIDEO IN: Y/ S-Y/CPST and R-Y/S-C) SD VIDEO "S VIDEO" appears in the video area a) Component signal (VIDEO IN: Y/S-Y/ CPST, R-Y/SC and B-Y) SD VIDEO "COMPONENT SD" appears in the video area a) SD-SDI signal SD VIDEO (SD/HD SDI IN) "SDSDI" appears in the video area i.LINK compatible DV/ DVCAM format digital video signal (HDV/ DV) SD VIDEO "i.LINK:DV" or "i.LINK:DVCAM" appears in the video area DVCAM(DV) indicator lights b) HD internal test HD VIDEO signal "SG:HD" appears in the video area HD VIDEO button lights HD-SDI signal HD VIDEO (SD/HD SDI IN) "HDSDI" appears in the video area HD VIDEO button lights Video input signal (input connector) i.LINK compatible HDV format digital video signal (HDV/ DV) INPUT SELECT Indication in the button (video/ video area of the audio input input signal selection display, and section) indicator that lights HD VIDEO "i.LINK:HDV" appears in the video area HDV indicator and HD VIDEO button light a) When the HVBK-1505 option board is not installed, pressing buttons in the input selection section does not select or show an input signal. b) When the input signal is i.LINK (DV/DVCAM), the recording format appears as i.LINK:DVCAM or i.LINK:DV, according to the setting of the REC FORMAT menu item (see page 76). c) For the internal test video signal, a color bars signal, or a black burst signal can be used. Select which is used with the VIDEO CONTROL >INT VIDEO SG menu item. Notes • When i.LINK input is selected, video and audio signals are both input through the i.LINK interface. • When recording an HDV format signal from the i.LINK input, it is not possible to adjust the audio recording levels with the REC/PB LEVEL control knobs. • When there is no signal in the selected input, the corresponding input signal indication flashes. Audio input signal (input connector) Corresponding button in the video/audio input selection section Analog (AUDIO IN CH1 1/2 and 1/3, 2/4) CH2 3/4 AES/EBU (AUDIO CH1 1/2 and I/O (AES/EBU) IN) CH2 3/4 SDI (SDI IN) CH1 1/2 and CH2 3/4 Internal test audio CH1 1/2 and CH2 3/4 Lit button or indicator in the input signal display ANALOG a) AES/EBU SDI SG a) When the HVBK-1505 option board is not installed, pressing buttons in the input selection section does not make the corresponding indicators light. Caution Once you have started recording, you cannot change the input signal selection. 4 Select the audio mode. Select either 2-channel mode (2 CHANNEL) or 4channel mode (4 CHANNEL) with the REC MODE menu item (see page 83). Audio mode 2-channel mode Audio mode display 48 K 43 Recording
-
 1
1 -
2
-
3
-
4
-
5
-
6
-
7
-
8
-
9
-
10
-
11
-
12
-
13
-
14
-
15
-
16
-
17
-
18
-
19
-
20
-
21
-
22
-
23
-
24
-
25
-
26
-
27
-
28
-
29
-
30
-
31
-
32
-
33
-
34
-
35
-
36
-
37
-
 38
38 -
 39
39 -
 40
40 -
 41
41 -
 42
42 -
 43
43 -
 44
44 -
 45
45 -
 46
46 -
 47
47 -
 48
48 -
49
-
50
-
51
-
52
-
53
-
54
-
55
-
56
-
57
-
58
-
59
-
60
-
61
-
62
-
63
-
64
-
65
-
66
-
67
-
68
-
69
-
70
-
71
-
72
-
73
-
74
-
75
-
76
-
77
-
78
-
79
-
80
-
81
-
82
-
83
-
84
-
85
-
86
-
87
-
88
-
89
-
90
-
91
-
92
-
93
-
94
-
95
-
96
-
97
-
98
-
99
-
100
-
101
-
102
-
103
-
104
-
105
-
106
-
107
-
108
-
109
-
110
-
111
 |
 |
