Sony HVR1500A Product Manual (HVE-1500A Operating Manuals) - Page 49
Setting points A and B for repeat playback, playback
 |
View all Sony HVR1500A manuals
Add to My Manuals
Save this manual to your list of manuals |
Page 49 highlights
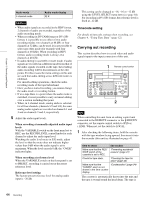
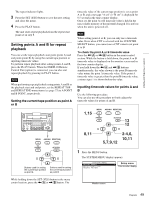
Chapter 3 Recording and Playback The repeat indicator lights. 3 Press the SET (YES) button to save the new setting and close the menu. 4 Press the PLAY button. The unit starts repeat playback from the repeat start point set in step 1. Setting points A and B for repeat playback You can set the repeat playback start point (point A) and end point (point B) by using the current tape position or inputting timecode values. To perform repeat playback after setting points A and B, press the PLAY button. When the DSRM-10 Remote Control Unit (option) is connected, you can also start repeat playback by pressing its PLAY button. Note When performing repeat playback using points A and B as the playback start and end points, set the REPEAT TOP and REPEAT END menu items (see page 75) to A POINT and B POINT, respectively. Setting the current tape position as point A or B POWER EJECT INPUT SELECT HD VIDEO SD VIDEO CH1 1/2 CH2 3/4 REC/PB LEVEL 1 2 3 4 LEVEL PHONES VARIABLE REC PRESET PB CONTROL-S MONITOR SELECT REW LOCAL 9PIN i.LINK OVER OVER 0 REPEAT 1080 525 -12 -20 -30 -40 -60 CH1 CH2 EDIT MODE REC INHI TC VITC 44.1K 01:23:45:15 DISPLAY COUNTER SELECT MENU TC PRESET HDV DVCAM (DV) ASSIGN RESET(NO) SET(YES) PLAY F FWD STOP REC A B MENU ASSIGN RESET(NO) TC PRESET SET(YES) A B Buttons used for setting the current tape position as point A Buttons used for setting the current tape position as point B timecode value of the current tape position is set as point A or B, and a message "A set" or "B set" is displayed for 0.5 second in the time counter display. Once set, the point A or B timecode value is held in the non-volatile memory of the unit until changed. It is not lost when the unit is powered off. Note When setting point A or B, you can only use a timecode value. Even when CNT is selected with the COUNTER SELECT button, you cannot use a CNT value to set point A or B. To check the point A or B timecode value Press the
-
 1
1 -
2
-
3
-
4
-
5
-
6
-
7
-
8
-
9
-
10
-
11
-
12
-
13
-
14
-
15
-
16
-
17
-
18
-
19
-
20
-
21
-
22
-
23
-
24
-
25
-
26
-
27
-
28
-
29
-
30
-
31
-
32
-
33
-
34
-
35
-
36
-
37
-
38
-
39
-
40
-
41
-
42
-
43
-
 44
44 -
 45
45 -
 46
46 -
 47
47 -
 48
48 -
 49
49 -
 50
50 -
 51
51 -
 52
52 -
 53
53 -
 54
54 -
55
-
56
-
57
-
58
-
59
-
60
-
61
-
62
-
63
-
64
-
65
-
66
-
67
-
68
-
69
-
70
-
71
-
72
-
73
-
74
-
75
-
76
-
77
-
78
-
79
-
80
-
81
-
82
-
83
-
84
-
85
-
86
-
87
-
88
-
89
-
90
-
91
-
92
-
93
-
94
-
95
-
96
-
97
-
98
-
99
-
100
-
101
-
102
-
103
-
104
-
105
-
106
-
107
-
108
-
109
-
110
-
111
 |
 |
