Sony HVR1500A Product Manual (HVE-1500A Operating Manuals) - Page 51
Cuing up to any desired position set as point A or B, If you want to discard the changed value
 |
View all Sony HVR1500A manuals
Add to My Manuals
Save this manual to your list of manuals |
Page 51 highlights
Chapter 3 Recording and Playback 11Press the
-
 1
1 -
2
-
3
-
4
-
5
-
6
-
7
-
8
-
9
-
10
-
11
-
12
-
13
-
14
-
15
-
16
-
17
-
18
-
19
-
20
-
21
-
22
-
23
-
24
-
25
-
26
-
27
-
28
-
29
-
30
-
31
-
32
-
33
-
34
-
35
-
36
-
37
-
38
-
39
-
40
-
41
-
42
-
43
-
44
-
45
-
 46
46 -
 47
47 -
 48
48 -
 49
49 -
 50
50 -
 51
51 -
 52
52 -
 53
53 -
 54
54 -
 55
55 -
 56
56 -
57
-
58
-
59
-
60
-
61
-
62
-
63
-
64
-
65
-
66
-
67
-
68
-
69
-
70
-
71
-
72
-
73
-
74
-
75
-
76
-
77
-
78
-
79
-
80
-
81
-
82
-
83
-
84
-
85
-
86
-
87
-
88
-
89
-
90
-
91
-
92
-
93
-
94
-
95
-
96
-
97
-
98
-
99
-
100
-
101
-
102
-
103
-
104
-
105
-
106
-
107
-
108
-
109
-
110
-
111
 |
 |

51
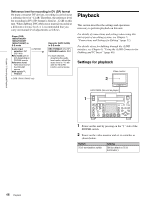
Playback
Chapter 3
Recording and Playback
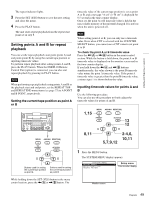
11
Press the
<
/
A
or
,
/
B
button to select the digit in
the timecode value display that you want to change.
Each press of the button causes the digit to the left or
right to begin flashing.
Holding the button down moves the flashing digit
continuously.
If you want to clear the timecode value, press the
RESET (NO) button. The value is cleared to
00:00:00:00, and the leftmost digit begins flashing.
12
Press the
M
or
m
button to increment or decrement the
value of the flashing digit.
Each press of the button increments or decrements the
value. Holding the button down increments or
decrements the value continuously. To change other
digits, return to step
11
.
13
Press the SET (YES) button to confirm the defined
value.
The message “NOW SAVING...” is displayed on the
monitor screen and “Saving...” is shown in the time
counter display while the new setting is being saved in
memory.
The new setting may be lost if you power off the unit
during the saving operation. Wait until the saving
operation is completed before powering the unit off.
If you want to discard the changed value
Press the MENU button instead of pressing the SET
(YES) button to return to the menu display, then press
the MENU button again to end the menu operation
without saving the changed value into memory.
After the saving operation is completed, the monitor
screen and time counter display return to the REPEAT
FUNCTION setting display as shown in step
9
.
14
To set point B, carry out similar operations to those to
set point A by basically following steps
5
to
13
.
(Select REPEAT END in step
5
, B POINT in step
7
,
and B PRESET in step
9
.)
15
Press the MENU button to close the menu.
Cuing up to any desired position set
as point A or B
You can set any desired tape position as point A or B and
cue up to the set point when required.
Proceed as follows.
Cueing up to point A:
Hold down the
<
/
A
button, and
press the F FWD button or REW button.
Cueing up to point B:
Hold down the
,
/
B
button, and
press the F FWD button or REW button.
For the methods of setting points A and B, see “Setting the
current tape position as point A or B” (page 49).
Caution