Sony HVR1500A Product Manual (HVE-1500A Operating Manuals) - Page 52
Using Time Data, Recording Timecode and User Bit Data, Setting the timecode initial value
 |
View all Sony HVR1500A manuals
Add to My Manuals
Save this manual to your list of manuals |
Page 52 highlights
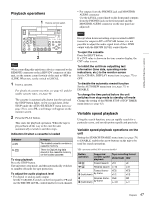
Using Time Data 4 Chapter Chapter 4 Using Time Data Recording Timecode and User Bit Data For timecode recording, there are three methods as described below. Internal Preset (Internal preset) mode: Set an initial value, and generate a timecode internally to this unit, which is recorded. You can select either of the following advance modes. • Free Run: Timecode advances continually. • Rec Run: Timecode advances only during recording. Internal Regen (Internal regeneration) mode: Generate a timecode internally to this unit, to run consecutively from the timecode already recorded on the tape, and record this. External Regen (External regeneration) mode: Generate a timecode internally to this unit, synchronized to an external input timecode, and record this. The external timecode can be selected from among the timecode inputs to the following connectors. • TC IN connector: LTC • HDV/DV connector: LTC/VITC (VITC is available only when the recording format setting of this unit is DVCAM.) • SD/HD SDI IN connector: SD/HD SDI embedded timecode (LTC/VITC) (SD-SDI signal: RP188. HD-SDI signal: ARIB STD-B4.2.0, and RP188.) • Video input connectors: VITC (only available when the recording format setting of this unit is DVCAM) timecode (or user bit data) from any initial value set on this unit (TC insert function). • When i.LINK input is selected, signals played back on this unit do not synchronize to the input reference video signal. When controlling this unit via the RS-422A interface (REMOTE connector), use a video and audio interface other than i.LINK, such as SDI. For details of TC insert function, see page 70. Setting the timecode initial value, and setting user bit data Internal Preset mode You can set the initial timecode value before recording the timecode generated by the internal TC (timecode) generator onto a tape. In DVCAM/DV format recording, you can preset the timecode user bit data, to record such data as the date, time, scene number, reel number, or other useful information. 13 3,8 POWER EJECT INPUT SELECT HD VIDEO SD VIDEO CH1 1/2 CH2 3/4 REC/PB LEVEL 1 2 3 4 LEVEL PHONES VARIABLE REC PRESET PB CONTROL-S MONITOR SELECT REW LOCAL 9PIN i.LINK OVER OVER 0 60i 720 30p 720 60p -12 -20 -30 -40 -60 CH1 CH2 EDIT MODE REPEAT TC VITC 48K 01:23:45:15 DISPLAY COUNTER SELECT MENU TC PRESET HDV DVCAM (DV) ASSIGN RESET(NO) SET(YES) PLAY F FWD STOP REC A B Notes • For linear editing using an editing control unit, when using this unit as the recorder, set the timecode recording mode to Internal Preset, and the advance mode to Free Run. • If the recording format is DVCAM and timecode is recorded discontinuously, you can overwrite the 2 4 5,6,7 1 Press the DISPLAY button to set the LCD monitor display to status display mode or small screen display mode (see page 16). 52 Recording Timecode and User Bit Data
-
 1
1 -
2
-
3
-
4
-
5
-
6
-
7
-
8
-
9
-
10
-
11
-
12
-
13
-
14
-
15
-
16
-
17
-
18
-
19
-
20
-
21
-
22
-
23
-
24
-
25
-
26
-
27
-
28
-
29
-
30
-
31
-
32
-
33
-
34
-
35
-
36
-
37
-
38
-
39
-
40
-
41
-
42
-
43
-
44
-
45
-
46
-
 47
47 -
 48
48 -
 49
49 -
 50
50 -
 51
51 -
 52
52 -
 53
53 -
 54
54 -
 55
55 -
 56
56 -
 57
57 -
58
-
59
-
60
-
61
-
62
-
63
-
64
-
65
-
66
-
67
-
68
-
69
-
70
-
71
-
72
-
73
-
74
-
75
-
76
-
77
-
78
-
79
-
80
-
81
-
82
-
83
-
84
-
85
-
86
-
87
-
88
-
89
-
90
-
91
-
92
-
93
-
94
-
95
-
96
-
97
-
98
-
99
-
100
-
101
-
102
-
103
-
104
-
105
-
106
-
107
-
108
-
109
-
110
-
111
 |
 |
