Sony HVR1500A Product Manual (HVE-1500A Operating Manuals) - Page 97
Troubleshooting, Tape problems, Time data problems
 |
View all Sony HVR1500A manuals
Add to My Manuals
Save this manual to your list of manuals |
Page 97 highlights
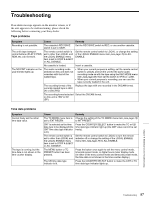
Troubleshooting If an alarm message appears on the monitor screen, or if the unit appears to be malfunctioning, please check the following before contacting your Sony dealer. Tape problems Symptom Cause Remedy Recording is not possible. The cassette's REC/SAVE switch is set to SAVE. Set the REC/SAVE switch to REC, or use another cassette. The unit's tape transport control buttons (PLAY, F FWD, REW, etc.) do not work. The remote control switch is set to other than LOCAL and the LOCAL ENABLE menu item is set to STOP & EJECT or ALL DISABLE. Set the remote control switch to LOCAL, or change the setting of the LOCAL ENABLE menu item (see page 76) to ALL ENABLE. No cassette is loaded. Insert a cassette. The NO EDIT indicator on the LCD monitor lights up. The audio recording mode selected on this unit does not coincides with that of the loaded tape. • When your current purpose is editing, set the remote control switch to LOCAL and set the unit for the same audio recording mode as with the tape using the REC MODE menu item (see page 83), then set the switch to 9PIN or i.LINK. • When your current purpose is recording, you can use the tape currently loaded in the unit. The recording format of the Replace the tape with one recorded in the DVCAM format. currently loaded tape is HDV, DV or DVCPRO. The recording format selected Select the DVCAM format. on this unit is HDV or DV (SP). Time data problems Symptom Cannot freely set the initial time data value. The tape is running, but the time data is not shown in the time counter display. Cause Remedy The TC MODE menu item is Change the setting of the TC MODE menu item (see page 79) set to EXT REGEN. to INT PRESET. CNT is selected as the time data type to be displayed (the CNT time data type indicator is lit). Press the COUNTER SELECT button to make the TC or UB time data type indicator light up (the CNT value cannot be set freely). The remote control switch is set to other than LOCAL and the LOCAL ENABLE menu item is set to STOP & EJECT or ALL DISABLE. Set the remote control switch to LOCAL to turn the remote indicator off or change the setting of the LOCAL ENABLE menu item (see page 76) to ALL ENABLE. The MENU button or TC PRESET button has been pressed. Press the button once again to exit the menu control mode, timecode preset mode, or digital hours meter display mode. (In either of the menu control mode and timecode preset mode, the time data is not shown in the time counter display.) The UB time data type indicator is lit. Press the COUNTER SELECT button to make the CNT or TC time data type indicator lights up. Chapter 8 Maintenance and Troubleshooting 97 Troubleshooting
-
 1
1 -
2
-
3
-
4
-
5
-
6
-
7
-
8
-
9
-
10
-
11
-
12
-
13
-
14
-
15
-
16
-
17
-
18
-
19
-
20
-
21
-
22
-
23
-
24
-
25
-
26
-
27
-
28
-
29
-
30
-
31
-
32
-
33
-
34
-
35
-
36
-
37
-
38
-
39
-
40
-
41
-
42
-
43
-
44
-
45
-
46
-
47
-
48
-
49
-
50
-
51
-
52
-
53
-
54
-
55
-
56
-
57
-
58
-
59
-
60
-
61
-
62
-
63
-
64
-
65
-
66
-
67
-
68
-
69
-
70
-
71
-
72
-
73
-
74
-
75
-
76
-
77
-
78
-
79
-
80
-
81
-
82
-
83
-
84
-
85
-
86
-
87
-
88
-
89
-
90
-
91
-
 92
92 -
 93
93 -
 94
94 -
 95
95 -
 96
96 -
 97
97 -
 98
98 -
 99
99 -
 100
100 -
 101
101 -
 102
102 -
103
-
104
-
105
-
106
-
107
-
108
-
109
-
110
-
111
 |
 |
