Sony HVR1500A Product Manual (HVE-1500A Operating Manuals) - Page 70
Rerecording the Timecode - TC Insert Function (DVCAM Format Only - hdv dvcam vtr
 |
View all Sony HVR1500A manuals
Add to My Manuals
Save this manual to your list of manuals |
Page 70 highlights
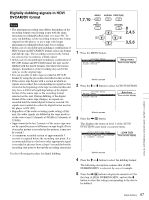
Rerecording the Timecode - TC Insert Function (DVCAM Format Only) The TC insert function allows you to replace the timecode recorded on a tape with continuous timecode generated by this unit's internal timecode generator, for example when the timecode recorded on a tape is discontinuous (user bit data can also be replaced with new data at the same time). When recording in DVCAM format, you can start recording timecode from an initial value (see page 52) which can be set freely. Notes • Use a tape which is recorded in DVCAM format. (You cannot use the TC insert function with a tape recorded in HDV/DV format.) • The timecode recording starts from the current tape position. Cue the tape up to the desired start position beforehand. • If you use a tape on which ClipLink log data is recorded, the ClipLink log data will be lost. Press the TC PRESET button to set the initial value of the timecode to be inserted, then carry out the following procedure. MENU ASSIGN RESET(NO) 1 TC PRESET SET(YES) 7,8 2 A B 3,5 2,4 1 Press the MENU button. SYSTEM MENU SETUP MENU AUTO FUNCTION HOURS METER Setup menu Time counter display Monitor screen 2 Press the M or m button to select AUTO FUNCTION. SYSTEM MENU SETUP MENU AUTO FUNCTION HOURS METER Auto func Time counter display Monitor screen 3 Press the ,/B button. This displays the items in the level 1 of the AUTO FUNCTION (auto mode execution) menu. AUTO FUNCTION MENU i.LINK DUBBING :HDV i.LINK DUBBING :DV/DVCAM TC INSERT :DVCAM i.LINK DUB Time counter display Monitor screen 4 Press the m button to select TC INSERT: DVCAM. AUTO FUNCTION MENU i.LINK DUBBING :HDV i.LINK DUBBING :DV/DVCAM TC INSERT :DVCAM TC insert Time counter display Monitor screen 5 Press the ,/B button. The following message appears. TC INSERT :DVCAM INSERT THE TAPE IN THIS VTR. ABORT: MENU KEY Set tape! Time counter display Chapter 6 Using the i.LINK Connector for Dubbing and TC Insert Monitor screen 70 Rerecording the Timecode - TC Insert Function (DVCAM Format Only)
-
 1
1 -
2
-
3
-
4
-
5
-
6
-
7
-
8
-
9
-
10
-
11
-
12
-
13
-
14
-
15
-
16
-
17
-
18
-
19
-
20
-
21
-
22
-
23
-
24
-
25
-
26
-
27
-
28
-
29
-
30
-
31
-
32
-
33
-
34
-
35
-
36
-
37
-
38
-
39
-
40
-
41
-
42
-
43
-
44
-
45
-
46
-
47
-
48
-
49
-
50
-
51
-
52
-
53
-
54
-
55
-
56
-
57
-
58
-
59
-
60
-
61
-
62
-
63
-
64
-
 65
65 -
 66
66 -
 67
67 -
 68
68 -
 69
69 -
 70
70 -
 71
71 -
 72
72 -
 73
73 -
 74
74 -
 75
75 -
76
-
77
-
78
-
79
-
80
-
81
-
82
-
83
-
84
-
85
-
86
-
87
-
88
-
89
-
90
-
91
-
92
-
93
-
94
-
95
-
96
-
97
-
98
-
99
-
100
-
101
-
102
-
103
-
104
-
105
-
106
-
107
-
108
-
109
-
110
-
111
 |
 |
