Toshiba AT7-B8 Android 4.2 Jellybean User's Guide for Excite AT7-B Series - Page 59
Add an account, Remove an account, Sample Image Accounts screen
 |
View all Toshiba AT7-B8 manuals
Add to My Manuals
Save this manual to your list of manuals |
Page 59 highlights
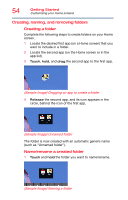
Getting Started Managing your accounts 59 Add an account Add multiple Google™ Accounts and Microsoft® Exchange ActiveSync accounts to have all your accounts available on your tablet device. For more information, see "Accounts settings" on page 77. 1 Touch the Settings ( ) icon. The Settings menu appears. 2 Scroll down to the Accounts setting. The Accounts menu appears displaying a list of the current accounts. (Sample Image) Accounts screen 3 Touch the Add account ( ) icon. 4 Follow the onscreen instructions to enter the required account information. 5 Configure the account settings. For more information, see "Accounts settings" on page 77. The account is added to the list in the Accounts settings. Remove an account To remove an account and all the associated information, including email, contacts, settings, etc.: 1 Touch the Settings ( ) icon. The Settings menu appears.
-
 1
1 -
2
-
3
-
4
-
5
-
6
-
7
-
8
-
9
-
10
-
11
-
12
-
13
-
14
-
15
-
16
-
17
-
18
-
19
-
20
-
21
-
22
-
23
-
24
-
25
-
26
-
27
-
28
-
29
-
30
-
31
-
32
-
33
-
34
-
35
-
36
-
37
-
38
-
39
-
40
-
41
-
42
-
43
-
44
-
45
-
46
-
47
-
48
-
49
-
50
-
51
-
52
-
53
-
 54
54 -
 55
55 -
 56
56 -
 57
57 -
 58
58 -
 59
59 -
 60
60 -
 61
61 -
 62
62 -
 63
63 -
 64
64 -
65
-
66
-
67
-
68
-
69
-
70
-
71
-
72
-
73
-
74
-
75
-
76
-
77
-
78
-
79
-
80
-
81
-
82
-
83
-
84
-
85
-
86
-
87
-
88
-
89
-
90
-
91
-
92
-
93
-
94
-
95
-
96
-
97
-
98
-
99
-
100
-
101
-
102
-
103
-
104
-
105
-
106
-
107
-
108
-
109
-
110
-
111
-
112
-
113
-
114
-
115
-
116
-
117
-
118
-
119
-
120
-
121
-
122
-
123
-
124
-
125
-
126
-
127
-
128
-
129
-
130
 |
 |