Toshiba AT7-B8 Android 4.2 Jellybean User's Guide for Excite AT7-B Series - Page 99
Check for application updates, Downloading updates, Installing updates
 |
View all Toshiba AT7-B8 manuals
Add to My Manuals
Save this manual to your list of manuals |
Page 99 highlights
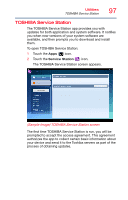
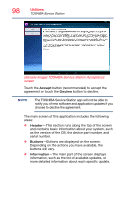
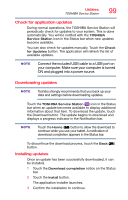
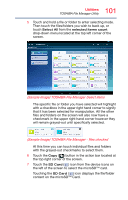
Utilities TOSHIBA Service Station 99 Check for application updates During normal operations, the TOSHIBA Service Station will periodically check for updates to your system. This is done automatically. You will be notified with the TOSHIBA Service Station icon in the Status bar when new updates become available. You can also check for updates manually. Touch the Check for Updates button. The application will refresh the list of available updates. NOTE Connect the included USB cable to a USB port on your computer. Make sure your computer is turned ON and plugged into a power source. Downloading updates NOTE Toshiba strongly recommends that you back up your data and settings before downloading updates. Touch the TOSHIBA Service Station ( ) icon in the Status bar when an update becomes available to display additional information about that item. To download the update, touch the Download button. The update begins to download and displays a progress indicator in the Notification bar. NOTE Touch the Home ( ) button to allow the download to continue while you use your tablet. A notification of download completion appears in the Status bar. To discontinue the download process, touch the Back ( ) button. Installing updates Once an update has been successfully downloaded, it can be installed. 1 Touch the Download completion notice on the Status bar. 2 Touch the Install button. The application installer launches. 3 Confirm the installation to continue.
-
 1
1 -
2
-
3
-
4
-
5
-
6
-
7
-
8
-
9
-
10
-
11
-
12
-
13
-
14
-
15
-
16
-
17
-
18
-
19
-
20
-
21
-
22
-
23
-
24
-
25
-
26
-
27
-
28
-
29
-
30
-
31
-
32
-
33
-
34
-
35
-
36
-
37
-
38
-
39
-
40
-
41
-
42
-
43
-
44
-
45
-
46
-
47
-
48
-
49
-
50
-
51
-
52
-
53
-
54
-
55
-
56
-
57
-
58
-
59
-
60
-
61
-
62
-
63
-
64
-
65
-
66
-
67
-
68
-
69
-
70
-
71
-
72
-
73
-
74
-
75
-
76
-
77
-
78
-
79
-
80
-
81
-
82
-
83
-
84
-
85
-
86
-
87
-
88
-
89
-
90
-
91
-
92
-
93
-
 94
94 -
 95
95 -
 96
96 -
 97
97 -
 98
98 -
 99
99 -
 100
100 -
 101
101 -
 102
102 -
 103
103 -
 104
104 -
105
-
106
-
107
-
108
-
109
-
110
-
111
-
112
-
113
-
114
-
115
-
116
-
117
-
118
-
119
-
120
-
121
-
122
-
123
-
124
-
125
-
126
-
127
-
128
-
129
-
130
 |
 |