Toshiba AT7-B8 Android 4.2 Jellybean User's Guide for Excite AT7-B Series - Page 77
Accounts settings, Sample Image Accounts menu screen
 |
View all Toshiba AT7-B8 manuals
Add to My Manuals
Save this manual to your list of manuals |
Page 77 highlights
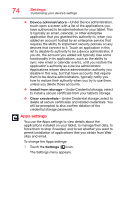
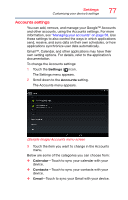
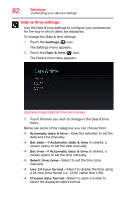
Settings Customizing your device's settings 77 Accounts settings You can add, remove, and manage your Google™ Accounts and other accounts, using the Accounts settings. For more information, see "Managing your accounts" on page 58. Use these settings to also control the ways in which applications send, receive, and sync data on their own schedules, or how applications synchronize user data automatically. Gmail™, Calendar, and other applications may have their own setting options. For details, refer to the application's documentation. To change the Accounts settings: 1 Touch the Settings ( ) icon. The Settings menu appears. 2 Scroll down to the Accounts setting. The Accounts menu appears. (Sample Image) Accounts menu screen 3 Touch the item you want to change in the Accounts menu. Below are some of the categories you can choose from: ❖ Calendar-Touch to sync your calendar with your device. ❖ Contacts-Touch to sync your contacts with your device. ❖ Gmail-Touch to sync your Gmail with your device.
-
 1
1 -
2
-
3
-
4
-
5
-
6
-
7
-
8
-
9
-
10
-
11
-
12
-
13
-
14
-
15
-
16
-
17
-
18
-
19
-
20
-
21
-
22
-
23
-
24
-
25
-
26
-
27
-
28
-
29
-
30
-
31
-
32
-
33
-
34
-
35
-
36
-
37
-
38
-
39
-
40
-
41
-
42
-
43
-
44
-
45
-
46
-
47
-
48
-
49
-
50
-
51
-
52
-
53
-
54
-
55
-
56
-
57
-
58
-
59
-
60
-
61
-
62
-
63
-
64
-
65
-
66
-
67
-
68
-
69
-
70
-
71
-
 72
72 -
 73
73 -
 74
74 -
 75
75 -
 76
76 -
 77
77 -
 78
78 -
 79
79 -
 80
80 -
 81
81 -
 82
82 -
83
-
84
-
85
-
86
-
87
-
88
-
89
-
90
-
91
-
92
-
93
-
94
-
95
-
96
-
97
-
98
-
99
-
100
-
101
-
102
-
103
-
104
-
105
-
106
-
107
-
108
-
109
-
110
-
111
-
112
-
113
-
114
-
115
-
116
-
117
-
118
-
119
-
120
-
121
-
122
-
123
-
124
-
125
-
126
-
127
-
128
-
129
-
130
 |
 |