Yamaha Tyros4 Reference Manual - Page 90
PUNCH IN OUT / PUNCH IN OUT MERGE, Execute Steps 1-2 in Editing the Recorded Data Multi Track
 |
UPC - 086792947280
View all Yamaha Tyros4 manuals
Add to My Manuals
Save this manual to your list of manuals |
Page 90 highlights
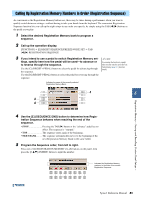
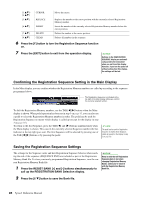
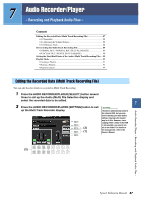
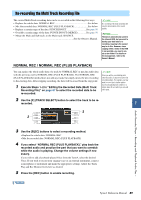
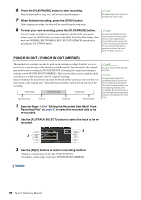
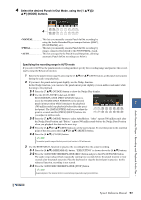
6 Press the [PLAY/PAUSE] button to start recording. Play the keyboard (or sing, etc.) and record your performance. 7 When finished recording, press the [STOP] button. After stopping recording, the data will be erased from the stop point. 8 To hear your new recording, press the [PLAY/PAUSE] button. If you've made a mistake or you're not completely satisfied with your performance, press the [EXIT] button to return to the Multi Track Recorder display, then undo the NORMAL REC/NORMAL REC (PLUS PLAYBACK) operation by pressing the [G] (UNDO) button. NOTE The playback sound of the other (not rerecorded) track is not recorded. NOTE The Audio Recorder/Player automatically reduces the level of the previous track by a certain, slight amount to accommodate the new recording. This is done to minimize possible distortion. You can use the Normalize effect to maximize the volume of the overall sound. For details, see page 88. PUNCH IN OUT / PUNCH IN OUT (MERGE) This method of recording can only be used on an existing recording. It allows you to rerecord over a specific part of the already-recorded material. You can replace the original part with the new recording by PUNCH IN/OUT, or keeping the original and mixing it with the new by PUNCH IN/OUT (MERGE). This lets you either correct a mistake in the recording or overdub new parts onto the original recording. Keep in mind that the parts before and after the Punch In/Out section are not recorded over and remain as the original data-they play back normally to guide you in and out of the recording. Original Data Re-recorded Data Original Data Start Recording Punch In Punch Out Stop Recording NOTE You can re-record over only one range at one time. NOTE The beginning and ending of the recorded data using the Punch In/Out function is faded in/out automatically. This is done to minimize possible noise at the beginning and ending of the recorded data. We recommend that you specify the beginning and ending points at sections in the data where the volume is low. 1 Execute Steps 1-2 in "Editing the Recorded Data (Multi Track Recording File)" on page 87 to select the recorded data to be re-recorded. 2 Use the [F] (TRACK SELECT) button to select the track to be re- recorded. 2 3 3 Use the [B]/[C] buttons to select a recording method. • Replace a certain range of the data: PUNCH IN/OUT • Overdub a certain range of the data: PUNCH IN/OUT (MERGE) NEXT PAGE 90 Tyros4 Reference Manual
-
 1
1 -
2
-
3
-
4
-
5
-
6
-
7
-
8
-
9
-
10
-
11
-
12
-
13
-
14
-
15
-
16
-
17
-
18
-
19
-
20
-
21
-
22
-
23
-
24
-
25
-
26
-
27
-
28
-
29
-
30
-
31
-
32
-
33
-
34
-
35
-
36
-
37
-
38
-
39
-
40
-
41
-
42
-
43
-
44
-
45
-
46
-
47
-
48
-
49
-
50
-
51
-
52
-
53
-
54
-
55
-
56
-
57
-
58
-
59
-
60
-
61
-
62
-
63
-
64
-
65
-
66
-
67
-
68
-
69
-
70
-
71
-
72
-
73
-
74
-
75
-
76
-
77
-
78
-
79
-
80
-
81
-
82
-
83
-
84
-
 85
85 -
 86
86 -
 87
87 -
 88
88 -
 89
89 -
 90
90 -
 91
91 -
 92
92 -
 93
93 -
 94
94 -
 95
95 -
96
-
97
-
98
-
99
-
100
-
101
-
102
-
103
-
104
-
105
-
106
-
107
-
108
-
109
-
110
-
111
-
112
-
113
-
114
-
115
-
116
-
117
-
118
-
119
-
120
-
121
-
122
-
123
-
124
-
125
-
126
-
127
-
128
-
129
-
130
-
131
-
132
-
133
-
134
-
135
-
136
-
137
-
138
-
139
-
140
-
141
 |
 |