Yamaha Tyros4 Reference Manual - Page 92
Setting the Start/End Points of the Audio (Multi Track Recording File)
 |
UPC - 086792947280
View all Yamaha Tyros4 manuals
Add to My Manuals
Save this manual to your list of manuals |
Page 92 highlights
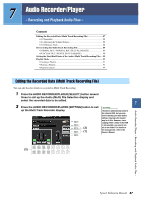
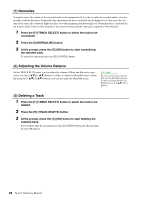
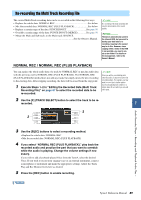
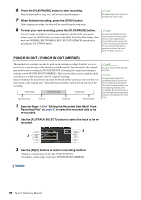
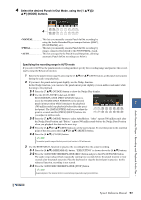
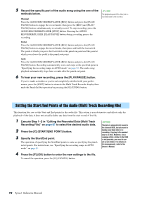
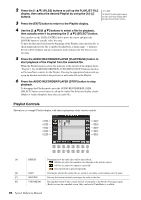
5 Record the specific part of the audio song using the one of the methods below. Manual Press the AUDIO RECORDER/PLAYER [REC] button and press the [PLAY/ PAUSE] button to engage the record mode, then press the [REC] and [PLAY/ PAUSE] buttons simultaneously to actually record. To stop recording, press the AUDIO RECORDER/PLAYER [STOP] button. Pressing the AUDIO RECORDER/PLAYER [PLAY/PAUSE] button during recording pauses the recording. Pedal Press the AUDIO RECORDER/PLAYER [REC] button and press the [PLAY/ PAUSE] button to engage the record mode, then press and hold the footswitch. The point at which you press the footswitch is the punch in point and the point at which you release the pedal is the punch out point. Auto Press the AUDIO RECORDER/PLAYER [REC] button and press the [PLAY/ PAUSE] button. Recording automatically starts and stops at the specified point in "Specifying the recording range in AUTO mode" on page 91. The audio song playback automatically stops four seconds after the punch out point. NOTE The playback sound of the other (not rerecorded) track is not recorded. 6 To hear your new recording, press the [PLAY/PAUSE] button. If you've made a mistake or you're not completely satisfied with your performance, press the [EXIT] button to return to the Multi Track Recorder display then undo the Punch In/Out operation by pressing the [G] (UNDO) button. Setting the Start/End Points of the Audio (Multi Track Recording File) This function lets you set the Start and End points for the audio file. This action is non-destructive and affects only the playback of the data; it does not actually delete any data from the start or end of the file. 1 Execute Step 1-2 in "Editing the Recorded Data (Multi Track Recording File)" on page 87 to select the desired audio data. 2 Press the [C] (START/END POINT) button. 3 Specify the Start/End point. The operation of specifying the Start/End points is same as specifying the punch in/out points. For instructions, see "Specifying the recording range in AUTO mode" on page 91. NOTICE The data is automatically saved in the internal HDD, but you want to backup your data before rerecording. Copying is the easiest way to do this. However, since copying within a folder in the HDD is not possible, you need to create a new folder. For details on file management, refer to the Owner's Manual. 4 Press the [F] (OK) button to enter the new settings to the file. To cancel the operation, press the [G] (CANCEL) button. 92 Tyros4 Reference Manual
-
 1
1 -
2
-
3
-
4
-
5
-
6
-
7
-
8
-
9
-
10
-
11
-
12
-
13
-
14
-
15
-
16
-
17
-
18
-
19
-
20
-
21
-
22
-
23
-
24
-
25
-
26
-
27
-
28
-
29
-
30
-
31
-
32
-
33
-
34
-
35
-
36
-
37
-
38
-
39
-
40
-
41
-
42
-
43
-
44
-
45
-
46
-
47
-
48
-
49
-
50
-
51
-
52
-
53
-
54
-
55
-
56
-
57
-
58
-
59
-
60
-
61
-
62
-
63
-
64
-
65
-
66
-
67
-
68
-
69
-
70
-
71
-
72
-
73
-
74
-
75
-
76
-
77
-
78
-
79
-
80
-
81
-
82
-
83
-
84
-
85
-
86
-
 87
87 -
 88
88 -
 89
89 -
 90
90 -
 91
91 -
 92
92 -
 93
93 -
 94
94 -
 95
95 -
 96
96 -
 97
97 -
98
-
99
-
100
-
101
-
102
-
103
-
104
-
105
-
106
-
107
-
108
-
109
-
110
-
111
-
112
-
113
-
114
-
115
-
116
-
117
-
118
-
119
-
120
-
121
-
122
-
123
-
124
-
125
-
126
-
127
-
128
-
129
-
130
-
131
-
132
-
133
-
134
-
135
-
136
-
137
-
138
-
139
-
140
-
141
 |
 |