Yamaha Tyros4 Reference Manual - Page 95
Tyros4, Reference Manual, Audio Recorder/Player - Recording and Playback Audio Files, Cut and Insert
 |
UPC - 086792947280
View all Yamaha Tyros4 manuals
Add to My Manuals
Save this manual to your list of manuals |
Page 95 highlights
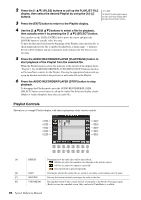
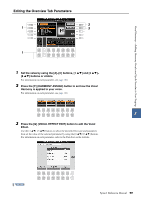
[E] EXPORT AUDIO Calls up the Export operation for exporting the selected audio file to a hard disk drive or USB storage devices. (See "Exporting an Audio File" in the Owner's Manual.) [F] PROPERTY Calls up the Property popup window which shows the file name and path of the audio song at the cursor position. [G]-[J] [1 ] [2 ] [3 ] [3 ] [4 ] FILES MOVE Up/Down CUT INSERT COPY Playlist navigation controls. [G]: Moves cursor/selection to the top of the list. [H]: Moves cursor/selection one page up (when there are multiple pages). [I]: Moves cursor/selection one page down (when there are multiple pages). [J]: Moves cursor/selection to the bottom of the list (just below last entered file). Opens the PLAYLIST FILE display. From this display, you can rename, copy, delete or save the playlists. Use these buttons to move the selected file to another location in the list. These operations let you copy or cut and paste individual list entries. Keep in mind that these have no effect on the actual audio data, but just entries in the list. Cut and Insert 1 Press the [3 ] (CUT) button. 2 Select the desired file entry by using the [5 ] buttons and press the [6 ] button to actually select it. Then press the [8 ] (OK) button. The entry is deleted. 3 Move the cursor to the desired location in the list (with the [5 ]/[6 ] buttons) and press the [3 ] (INSERT) button. [4 ] [5 ]/ [6 ] [7 ] [8 ] DELETE Up/Down SELECT MARK Copy and Insert 1 Press the [4 ] (COPY) button. 2 Select the desired file entry by using the [5 ] buttons and press the [6 ] button to actually select it. Then press the [8 ] (OK) button. The entry is copied. 3 Move the cursor to the desired location in the list (with the [5 ]/[6 ] buttons) and press the [3 ] (INSERT) button. Deletes files from the Playlist. Keep in mind that this does not affect the actual audio data, but simply deletes an entry of the file from the list. Use these buttons to move the cursor in the list. Use the [DATA ENTRY] dial to quickly move 7 the cursor (red border) through the entries and press the [ENTER] button. Actually selects the file at the cursor position. Adds or removes the checkmark to/from the selected data. Only the checkmarked files will be played. Holding this button adds (or removes) the checkmark to (or from) all files. Audio Recorder/Player - Recording and Playback Audio Files - Tyros4 Reference Manual 95
-
 1
1 -
2
-
3
-
4
-
5
-
6
-
7
-
8
-
9
-
10
-
11
-
12
-
13
-
14
-
15
-
16
-
17
-
18
-
19
-
20
-
21
-
22
-
23
-
24
-
25
-
26
-
27
-
28
-
29
-
30
-
31
-
32
-
33
-
34
-
35
-
36
-
37
-
38
-
39
-
40
-
41
-
42
-
43
-
44
-
45
-
46
-
47
-
48
-
49
-
50
-
51
-
52
-
53
-
54
-
55
-
56
-
57
-
58
-
59
-
60
-
61
-
62
-
63
-
64
-
65
-
66
-
67
-
68
-
69
-
70
-
71
-
72
-
73
-
74
-
75
-
76
-
77
-
78
-
79
-
80
-
81
-
82
-
83
-
84
-
85
-
86
-
87
-
88
-
89
-
 90
90 -
 91
91 -
 92
92 -
 93
93 -
 94
94 -
 95
95 -
 96
96 -
 97
97 -
 98
98 -
 99
99 -
 100
100 -
101
-
102
-
103
-
104
-
105
-
106
-
107
-
108
-
109
-
110
-
111
-
112
-
113
-
114
-
115
-
116
-
117
-
118
-
119
-
120
-
121
-
122
-
123
-
124
-
125
-
126
-
127
-
128
-
129
-
130
-
131
-
132
-
133
-
134
-
135
-
136
-
137
-
138
-
139
-
140
-
141
 |
 |