Brother International MFC-7050C Users Manual - English - Page 216
Ink Cartridge Maintenance
 |
View all Brother International MFC-7050C manuals
Add to My Manuals
Save this manual to your list of manuals |
Page 216 highlights
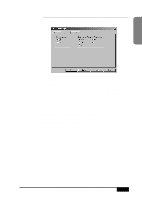
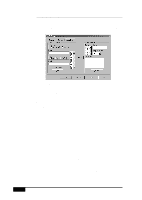
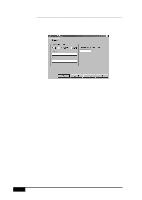
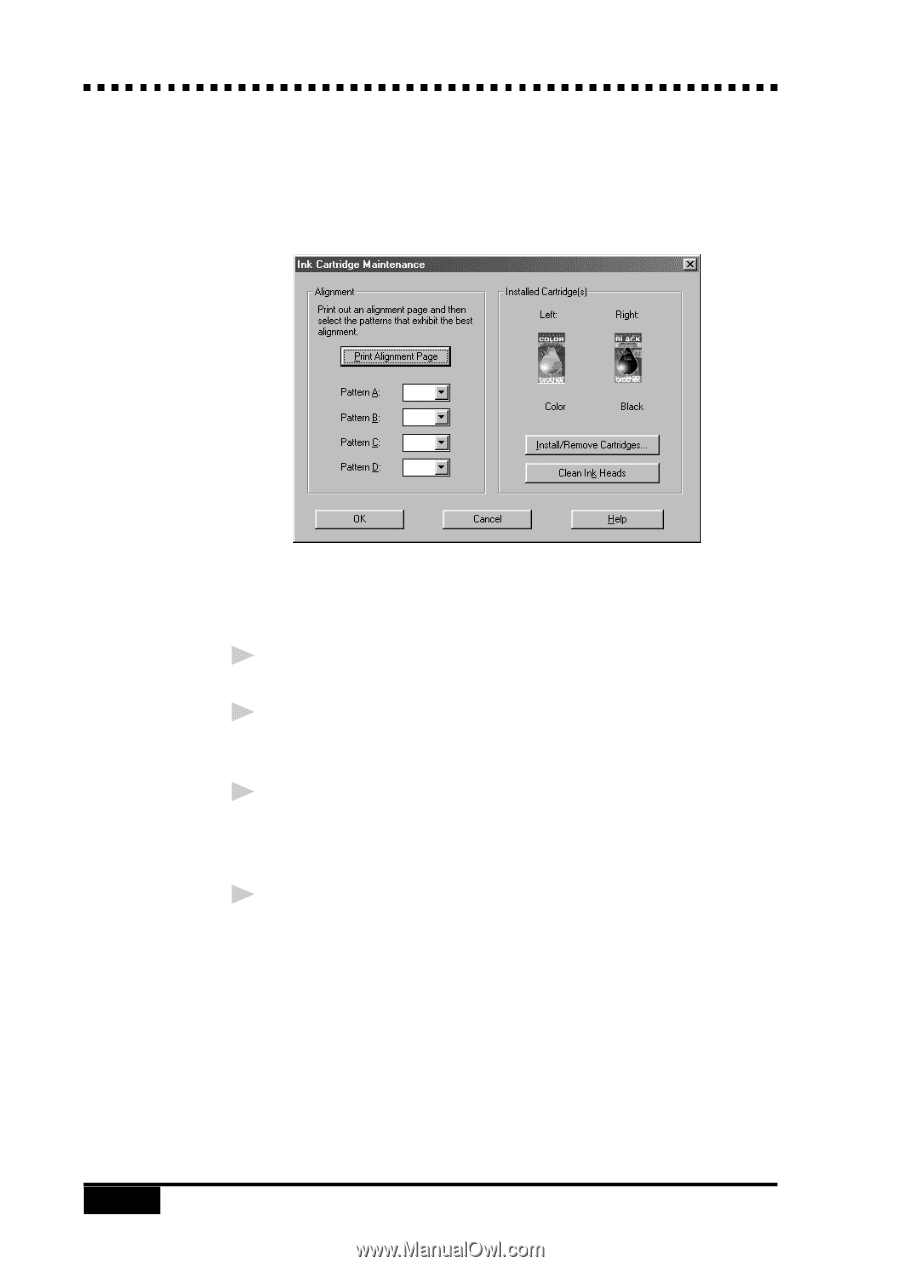
Ink Cartridge Maintenance Double-click the Ink Cartridge Maintenance icon on the Brother Control Panel screen to display the Ink Cartridge Maintenance screen. Click the OK button to save your settings. Aligning the Ink Cartridges 1 Click the Print Alignment Page button to print the Alignment Test Sheet. 2 Study the Alignment Test Sheet and decide which sample number, in each of the patterns (A, B, C and D), shows the most evenly printed ink lines. 3 In the list boxes for Pattern A, B, C and D in the Ink Cartridge Maintenance screen, select the best pattern number. If you are using the Photo ink cartridge, only ink patterns A and B will be printed. 4 Click the OK button. 21- 12 BROTHER CONTROL PANEL
-
 1
1 -
2
-
3
-
4
-
5
-
6
-
7
-
8
-
9
-
10
-
11
-
12
-
13
-
14
-
15
-
16
-
17
-
18
-
19
-
20
-
21
-
22
-
23
-
24
-
25
-
26
-
27
-
28
-
29
-
30
-
31
-
32
-
33
-
34
-
35
-
36
-
37
-
38
-
39
-
40
-
41
-
42
-
43
-
44
-
45
-
46
-
47
-
48
-
49
-
50
-
51
-
52
-
53
-
54
-
55
-
56
-
57
-
58
-
59
-
60
-
61
-
62
-
63
-
64
-
65
-
66
-
67
-
68
-
69
-
70
-
71
-
72
-
73
-
74
-
75
-
76
-
77
-
78
-
79
-
80
-
81
-
82
-
83
-
84
-
85
-
86
-
87
-
88
-
89
-
90
-
91
-
92
-
93
-
94
-
95
-
96
-
97
-
98
-
99
-
100
-
101
-
102
-
103
-
104
-
105
-
106
-
107
-
108
-
109
-
110
-
111
-
112
-
113
-
114
-
115
-
116
-
117
-
118
-
119
-
120
-
121
-
122
-
123
-
124
-
125
-
126
-
127
-
128
-
129
-
130
-
131
-
132
-
133
-
134
-
135
-
136
-
137
-
138
-
139
-
140
-
141
-
142
-
143
-
144
-
145
-
146
-
147
-
148
-
149
-
150
-
151
-
152
-
153
-
154
-
155
-
156
-
157
-
158
-
159
-
160
-
161
-
162
-
163
-
164
-
165
-
166
-
167
-
168
-
169
-
170
-
171
-
172
-
173
-
174
-
175
-
176
-
177
-
178
-
179
-
180
-
181
-
182
-
183
-
184
-
185
-
186
-
187
-
188
-
189
-
190
-
191
-
192
-
193
-
194
-
195
-
196
-
197
-
198
-
199
-
200
-
201
-
202
-
203
-
204
-
205
-
206
-
207
-
208
-
209
-
210
-
 211
211 -
 212
212 -
 213
213 -
 214
214 -
 215
215 -
 216
216 -
 217
217 -
 218
218 -
 219
219 -
 220
220 -
 221
221 -
222
-
223
-
224
-
225
-
226
-
227
-
228
-
229
-
230
-
231
-
232
-
233
-
234
-
235
-
236
-
237
-
238
-
239
-
240
-
241
-
242
-
243
-
244
-
245
-
246
-
247
-
248
-
249
-
250
-
251
-
252
-
253
-
254
-
255
-
256
-
257
-
258
-
259
-
260
-
261
-
262
-
263
-
264
 |
 |
BROTHER
CONTROL
PANEL
21-12
Ink Cartridge Maintenance
Double-click the
Ink Cartridge Maintenance
icon on the
Brother Control Panel
screen to display the
Ink Cartridge Maintenance
screen.
Click the
OK
button to save your settings.
Aligning the Ink Cartridges
1
Click the
Print Alignment Page
button to print the
Alignment Test Sheet
.
2
Study the Alignment Test Sheet and decide which sample
number, in each of the patterns (A, B, C and D), shows the
most evenly printed ink lines.
3
In the list boxes for
Pattern A, B, C
and
D
in the
Ink Cartridge Maintenance
screen, select the best pattern
number. If you are using the Photo ink cartridge, only ink
patterns A and B will be printed.
4
Click the
OK
button.