Brother International MFC 9420CN Software Users Manual - English - Page 42
Scanning a document into the PC
 |
UPC - 012502614074
View all Brother International MFC 9420CN manuals
Add to My Manuals
Save this manual to your list of manuals |
Page 42 highlights
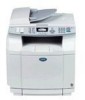
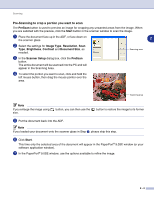
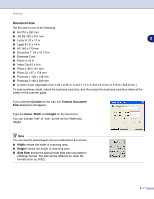
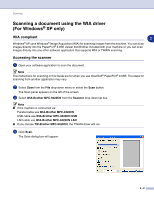
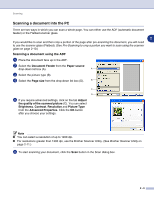
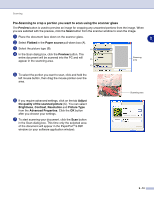
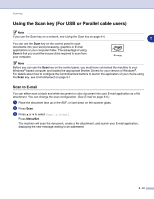
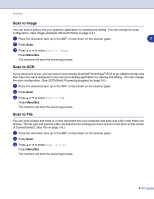
Scanning Scanning a document into the PC There are two ways in which you can scan a whole page. You can either use the ADF (automatic document feeder) or the Flatbed scanner glass. 2 If you would like to scan and then crop a portion of the page after pre-scanning the document, you will need to use the scanner glass (Flatbed). (See Pre-Scanning to crop a portion you want to scan using the scanner glass on page 2-10.) Scanning a document using the ADF 1 Place the document face up in the ADF. 2 Select the Document Feeder from the Paper source drop-down list box (A). A 3 Select the picture type (B). 4 Select the Page size from the drop-down list box (D). B C D 5 If you require advanced settings, click on the tab Adjust the quality of the scanned picture (C). You can select Brightness, Contrast, Resolution and Picture Type from the Advanced Properties. Click the OK button after you choose your settings. Note ■ You can select a resolution of up to 1200 dpi. ■ For resolutions greater than 1200 dpi, use the Brother Scanner Utility. (See Brother Scanner Utility on page 2-11.) 6 To start scanning your document, click the Scan button in the Scan dialog box. 2 - 9
-
 1
1 -
2
-
3
-
4
-
5
-
6
-
7
-
8
-
9
-
10
-
11
-
12
-
13
-
14
-
15
-
16
-
17
-
18
-
19
-
20
-
21
-
22
-
23
-
24
-
25
-
26
-
27
-
28
-
29
-
30
-
31
-
32
-
33
-
34
-
35
-
36
-
 37
37 -
 38
38 -
 39
39 -
 40
40 -
 41
41 -
 42
42 -
 43
43 -
 44
44 -
 45
45 -
 46
46 -
 47
47 -
48
-
49
-
50
-
51
-
52
-
53
-
54
-
55
-
56
-
57
-
58
-
59
-
60
-
61
-
62
-
63
-
64
-
65
-
66
-
67
-
68
-
69
-
70
-
71
-
72
-
73
-
74
-
75
-
76
-
77
-
78
-
79
-
80
-
81
-
82
-
83
-
84
-
85
-
86
-
87
-
88
-
89
-
90
-
91
-
92
-
93
-
94
-
95
-
96
-
97
-
98
-
99
-
100
-
101
-
102
-
103
-
104
-
105
-
106
-
107
-
108
-
109
-
110
-
111
-
112
-
113
-
114
-
115
-
116
-
117
-
118
-
119
-
120
-
121
-
122
-
123
-
124
-
125
-
126
-
127
-
128
-
129
-
130
-
131
-
132
-
133
-
134
-
135
-
136
-
137
-
138
-
139
-
140
-
141
-
142
-
143
-
144
-
145
 |
 |