Brother International MFC 9420CN Software Users Manual - English - Page 68
Configuring Network Scanning, Scanners and Cameras
 |
UPC - 012502614074
View all Brother International MFC 9420CN manuals
Add to My Manuals
Save this manual to your list of manuals |
Page 68 highlights
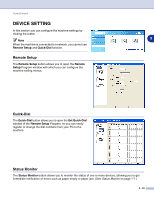
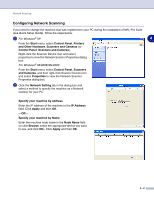
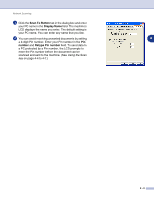
Network Scanning Configuring Network Scanning If you need to change the machine that was registered to your PC during the installation of MFL-Pro Suite (see Quick Setup Guide), follow the steps below. 1 For Windows® XP 4 From the Start menu, select Control Panel, Printers and Other Hardware, Scanners and Cameras (or Control Panel, Scanners and Cameras). Right-click the Scanner Device icon and select properties to view the Network Scanner Properties dialog box. For Windows® 98/98SE/Me/2000 From the Start menu, select Control Panel, Scanners and Cameras, and then right-click Scanner Device icon and select Properties to view the Network Scanner Properties dialog box. 2 Click the Network Setting tab in the dialog box and select a method to specify the machine as a Network scanner for your PC. Specify your machine by address Enter the IP address of the machine in the IP Address field. Click Apply and then OK. -OR- Specify your machine by Name Enter the machine node name in the Node Name field (or click Browse, select the appropriate device you want to use, and click OK). Click Apply and then OK. 4 - 2
-
 1
1 -
2
-
3
-
4
-
5
-
6
-
7
-
8
-
9
-
10
-
11
-
12
-
13
-
14
-
15
-
16
-
17
-
18
-
19
-
20
-
21
-
22
-
23
-
24
-
25
-
26
-
27
-
28
-
29
-
30
-
31
-
32
-
33
-
34
-
35
-
36
-
37
-
38
-
39
-
40
-
41
-
42
-
43
-
44
-
45
-
46
-
47
-
48
-
49
-
50
-
51
-
52
-
53
-
54
-
55
-
56
-
57
-
58
-
59
-
60
-
61
-
62
-
 63
63 -
 64
64 -
 65
65 -
 66
66 -
 67
67 -
 68
68 -
 69
69 -
 70
70 -
 71
71 -
 72
72 -
 73
73 -
74
-
75
-
76
-
77
-
78
-
79
-
80
-
81
-
82
-
83
-
84
-
85
-
86
-
87
-
88
-
89
-
90
-
91
-
92
-
93
-
94
-
95
-
96
-
97
-
98
-
99
-
100
-
101
-
102
-
103
-
104
-
105
-
106
-
107
-
108
-
109
-
110
-
111
-
112
-
113
-
114
-
115
-
116
-
117
-
118
-
119
-
120
-
121
-
122
-
123
-
124
-
125
-
126
-
127
-
128
-
129
-
130
-
131
-
132
-
133
-
134
-
135
-
136
-
137
-
138
-
139
-
140
-
141
-
142
-
143
-
144
-
145
 |
 |
