Brother International MFC 9420CN Software Users Manual - English - Page 43
Pre-Scanning to crop a portion you want to scan using the scanner glass
 |
UPC - 012502614074
View all Brother International MFC 9420CN manuals
Add to My Manuals
Save this manual to your list of manuals |
Page 43 highlights
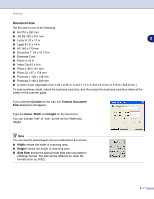
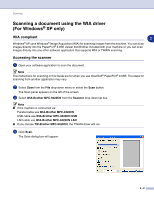
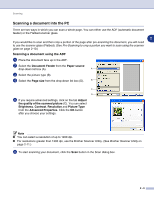
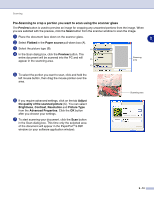
Scanning Pre-Scanning to crop a portion you want to scan using the scanner glass The Preview button is used to preview an image for cropping any unwanted portions from the image. When you are satisfied with the preview, click the Scan button from the scanner window to scan the image. 1 Place the document face down on the scanner glass. 2 2 Select Flatbed in the Paper source pull-down box (A). 3 Select the picture type (B). A 4 In the Scan dialog box, click the Preview button. The entire document will be scanned into the PC and will B appear in the scanning area. Scanning area C 5 To select the portion you want to scan, click and hold the left mouse button, then drag the mouse pointer over the area. 6 If you require advanced settings, click on the tab Adjust the quality of the scanned picture (C). You can select Brightness, Contrast, Resolution and Picture Type from the Advanced Properties. Click the OK button after you choose your settings. 7 To start scanning your document, click the Scan button in the Scan dialog box. This time only the selected area of the document will appear in the PaperPort® 9.0SE window (or your software application window). Scanning area 2 - 10
-
 1
1 -
2
-
3
-
4
-
5
-
6
-
7
-
8
-
9
-
10
-
11
-
12
-
13
-
14
-
15
-
16
-
17
-
18
-
19
-
20
-
21
-
22
-
23
-
24
-
25
-
26
-
27
-
28
-
29
-
30
-
31
-
32
-
33
-
34
-
35
-
36
-
37
-
 38
38 -
 39
39 -
 40
40 -
 41
41 -
 42
42 -
 43
43 -
 44
44 -
 45
45 -
 46
46 -
 47
47 -
 48
48 -
49
-
50
-
51
-
52
-
53
-
54
-
55
-
56
-
57
-
58
-
59
-
60
-
61
-
62
-
63
-
64
-
65
-
66
-
67
-
68
-
69
-
70
-
71
-
72
-
73
-
74
-
75
-
76
-
77
-
78
-
79
-
80
-
81
-
82
-
83
-
84
-
85
-
86
-
87
-
88
-
89
-
90
-
91
-
92
-
93
-
94
-
95
-
96
-
97
-
98
-
99
-
100
-
101
-
102
-
103
-
104
-
105
-
106
-
107
-
108
-
109
-
110
-
111
-
112
-
113
-
114
-
115
-
116
-
117
-
118
-
119
-
120
-
121
-
122
-
123
-
124
-
125
-
126
-
127
-
128
-
129
-
130
-
131
-
132
-
133
-
134
-
135
-
136
-
137
-
138
-
139
-
140
-
141
-
142
-
143
-
144
-
145
 |
 |
