Canon PowerShot G9 X Mark II User Manual - Page 183
Adding Images to a Photobook
 |
View all Canon PowerShot G9 X Mark II manuals
Add to My Manuals
Save this manual to your list of manuals |
Page 183 highlights
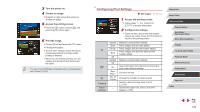
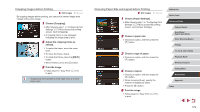
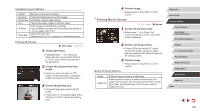
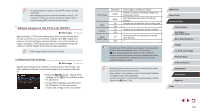
Printing Images Added to the Print List (DPOF) Still Images Movies zzWhen images have been added to the print list (=181 - =182), this screen is displayed after you connect the camera to a PictBridge-compatible printer. Choose [Print now], and then simply press the [ ] button to print the images in the print list. zzAny DPOF print job that you temporarily stop will be resumed from the next image. Adding Images to a Photobook Still Images Movies Photobooks can be set up on the camera by choosing up to 998 images on a memory card and using CameraWindow to import them to your computer (=175), where they are copied to their own folder. This is convenient when ordering printed photobooks online or printing photobooks with your own printer. Choosing a Selection Method zzPress the [ ] button, choose [Photobook Set-up] on the [ 4] tab, and then choose how you will select images. ●● [ ] may be displayed on the camera to warn you that the memory card has print settings that were configured on another camera. Changing the print settings using this camera may overwrite all previous settings. Adding Images Individually Still Images Movies 1 Choose [Select]. zzFollowing the procedure in "Choosing a Selection Method" (= 183), choose [Select] and press the [ ] button. 2 Choose an image. zzChoose an image after dragging left or right to browse. Press the [ ] button. zz[ ] is displayed. zzTo remove the image from the photobook, press the [ ] button again. [ ] is no longer displayed. zzRepeat this process to specify other images. zzWhen finished, press the [ to return to the menu screen. ] button Adding All Images to a Photobook Still Images Movies zzFollowing the procedure in "Choosing a Selection Method" (= 183), choose [Select All Images] and press the [ ] button. zzTouch [OK]. Before Use Basic Guide Advanced Guide Camera Basics Auto Mode / Hybrid Auto Mode Other Shooting Modes P Mode Tv, Av, M, and C Mode Playback Mode Wireless Features Setting Menu Accessories Appendix Index 183
-
 1
1 -
2
-
3
-
4
-
5
-
6
-
7
-
8
-
9
-
10
-
11
-
12
-
13
-
14
-
15
-
16
-
17
-
18
-
19
-
20
-
21
-
22
-
23
-
24
-
25
-
26
-
27
-
28
-
29
-
30
-
31
-
32
-
33
-
34
-
35
-
36
-
37
-
38
-
39
-
40
-
41
-
42
-
43
-
44
-
45
-
46
-
47
-
48
-
49
-
50
-
51
-
52
-
53
-
54
-
55
-
56
-
57
-
58
-
59
-
60
-
61
-
62
-
63
-
64
-
65
-
66
-
67
-
68
-
69
-
70
-
71
-
72
-
73
-
74
-
75
-
76
-
77
-
78
-
79
-
80
-
81
-
82
-
83
-
84
-
85
-
86
-
87
-
88
-
89
-
90
-
91
-
92
-
93
-
94
-
95
-
96
-
97
-
98
-
99
-
100
-
101
-
102
-
103
-
104
-
105
-
106
-
107
-
108
-
109
-
110
-
111
-
112
-
113
-
114
-
115
-
116
-
117
-
118
-
119
-
120
-
121
-
122
-
123
-
124
-
125
-
126
-
127
-
128
-
129
-
130
-
131
-
132
-
133
-
134
-
135
-
136
-
137
-
138
-
139
-
140
-
141
-
142
-
143
-
144
-
145
-
146
-
147
-
148
-
149
-
150
-
151
-
152
-
153
-
154
-
155
-
156
-
157
-
158
-
159
-
160
-
161
-
162
-
163
-
164
-
165
-
166
-
167
-
168
-
169
-
170
-
171
-
172
-
173
-
174
-
175
-
176
-
177
-
 178
178 -
 179
179 -
 180
180 -
 181
181 -
 182
182 -
 183
183 -
 184
184 -
 185
185 -
 186
186 -
 187
187 -
 188
188 -
189
-
190
-
191
-
192
-
193
-
194
-
195
-
196
-
197
-
198
-
199
-
200
-
201
-
202
-
203
-
204
-
205
-
206
-
207
-
208
-
209
-
210
-
211
-
212
-
213
-
214
-
215
-
216
-
217
-
218
-
219
 |
 |
