Canon PowerShot G9 X Mark II User Manual - Page 61
Shoot., Have the person stay still until the, lamp blinks.
 |
View all Canon PowerShot G9 X Mark II manuals
Add to My Manuals
Save this manual to your list of manuals |
Page 61 highlights
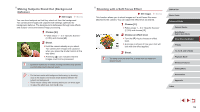
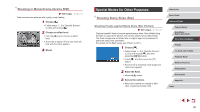
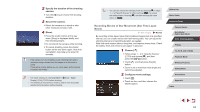
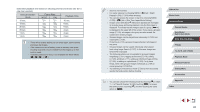
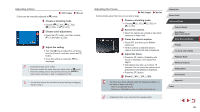
4 Shoot. zzPress the shutter button. The flash fires as the camera takes the first shot. zzThe second and third shots are now taken, without firing the flash. 5 Have the person stay still until the lamp blinks. zzThe person you are shooting should stay still until the lamp blinks three times after the third shot, which may take up to about two seconds. zzAll the shots are combined to create a single image. ●● Under some shooting conditions, images may not look as expected. ●● For better shots, have the person stand away from illumination such as street lights, and make sure the flash is raised. ●● There will be a delay before you can shoot again, as the camera processes the images. ●● To avoid blurry shots, make sure the person you shoot in steps 4 - 5 stays still. ●● For easier viewing, try choosing MENU > [ 2] tab > [Night Display] > [On] (=163) before shooting. ●● To adjust subject brightness, try changing the flash exposure compensation (=90). ●● To adjust background brightness, try changing the exposure compensation (=73). However, images may not look as expected under some shooting conditions, and the person should stay still in steps 4 - 5, which may take up to about 15 seconds. ●● To capture more stars and brighter starlight, choose MENU (=29) > [ 6] tab > [Star Portrait Settings] > [Star Visibility] > [Prominent]. However, images may not look as expected under some shooting conditions, and the person should stay still in steps 4 - 5, which may take up to about 8 seconds. ●● To make stars brighter, choose MENU (=29) > [ 6] tab > [Star Emphasis] > [Sharp]. To emphasize the bright stars in a starry sky, set [Star Emphasis] to [Soft]. This setting can produce eye-catching shots by enlarging bright stars while de-emphasizing dimmer stars. To disable starlight processing, select [Off]. ●● You can also choose the shooting mode by choosing [ ] in steps 1 - 2 of "Specific Scenes" (=53), touching [ ] to access the setting screen, touching [ ], and then touching the same option or [ ]. Before Use Basic Guide Advanced Guide Camera Basics Auto Mode / Hybrid Auto Mode Other Shooting Modes P Mode Tv, Av, M, and C Mode Playback Mode Wireless Features Setting Menu Accessories Appendix Index 61
-
 1
1 -
2
-
3
-
4
-
5
-
6
-
7
-
8
-
9
-
10
-
11
-
12
-
13
-
14
-
15
-
16
-
17
-
18
-
19
-
20
-
21
-
22
-
23
-
24
-
25
-
26
-
27
-
28
-
29
-
30
-
31
-
32
-
33
-
34
-
35
-
36
-
37
-
38
-
39
-
40
-
41
-
42
-
43
-
44
-
45
-
46
-
47
-
48
-
49
-
50
-
51
-
52
-
53
-
54
-
55
-
 56
56 -
 57
57 -
 58
58 -
 59
59 -
 60
60 -
 61
61 -
 62
62 -
 63
63 -
 64
64 -
 65
65 -
 66
66 -
67
-
68
-
69
-
70
-
71
-
72
-
73
-
74
-
75
-
76
-
77
-
78
-
79
-
80
-
81
-
82
-
83
-
84
-
85
-
86
-
87
-
88
-
89
-
90
-
91
-
92
-
93
-
94
-
95
-
96
-
97
-
98
-
99
-
100
-
101
-
102
-
103
-
104
-
105
-
106
-
107
-
108
-
109
-
110
-
111
-
112
-
113
-
114
-
115
-
116
-
117
-
118
-
119
-
120
-
121
-
122
-
123
-
124
-
125
-
126
-
127
-
128
-
129
-
130
-
131
-
132
-
133
-
134
-
135
-
136
-
137
-
138
-
139
-
140
-
141
-
142
-
143
-
144
-
145
-
146
-
147
-
148
-
149
-
150
-
151
-
152
-
153
-
154
-
155
-
156
-
157
-
158
-
159
-
160
-
161
-
162
-
163
-
164
-
165
-
166
-
167
-
168
-
169
-
170
-
171
-
172
-
173
-
174
-
175
-
176
-
177
-
178
-
179
-
180
-
181
-
182
-
183
-
184
-
185
-
186
-
187
-
188
-
189
-
190
-
191
-
192
-
193
-
194
-
195
-
196
-
197
-
198
-
199
-
200
-
201
-
202
-
203
-
204
-
205
-
206
-
207
-
208
-
209
-
210
-
211
-
212
-
213
-
214
-
215
-
216
-
217
-
218
-
219
 |
 |
