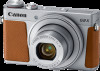
Canon PowerShot G9 X Mark II User Manual - Page 20
Setting the Date and Time - release date
 |
View all Canon PowerShot G9 X Mark II manuals
Add to My Manuals
Save this manual to your list of manuals |
Page 20 highlights
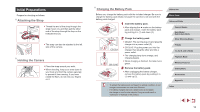
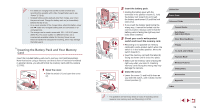
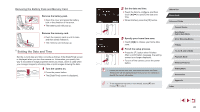
Removing the Battery Pack and Memory Card Remove the battery pack. zzOpen the cover and press the battery lock in the direction of the arrow. zzThe battery pack will pop up. Remove the memory card. zzPush the memory card in until it clicks, and then slowly release it. zzThe memory card will pop up. Setting the Date and Time Set the current date and time correctly as follows if the [Date/Time] screen is displayed when you turn the camera on. Information you specify this way is recorded in image properties when you shoot, and it is used when you manage images by shooting date or print images showing the date. 1 Turn the camera on. zzPress the power button. zzThe [Date/Time] screen is displayed. 2 Set the date and time. zzTouch the item to configure, and then touch [ ][ ] to specify the date and time. zzWhen finished, press the [ ] button. 3 Specify your home time zone. zzTouch [ ][ ] to choose your home time zone. 4 Finish the setup process. zzPress the [ ] button when finished. After a confirmation message, the setting screen is no longer displayed. zzTo turn off the camera, press the power button. ●● Unless you set the date, time, and home time zone, the [Date/ Time] screen will be displayed each time you turn the camera on. Specify the correct information. ●● To set daylight saving time (1 hour ahead), touch [ ] and choose [ ] in step 2. Before Use Basic Guide Advanced Guide Camera Basics Auto Mode / Hybrid Auto Mode Other Shooting Modes P Mode Tv, Av, M, and C Mode Playback Mode Wireless Features Setting Menu Accessories Appendix Index 20
-
 1
1 -
2
-
3
-
4
-
5
-
6
-
7
-
8
-
9
-
10
-
11
-
12
-
13
-
14
-
 15
15 -
 16
16 -
 17
17 -
 18
18 -
 19
19 -
 20
20 -
 21
21 -
 22
22 -
 23
23 -
 24
24 -
 25
25 -
26
-
27
-
28
-
29
-
30
-
31
-
32
-
33
-
34
-
35
-
36
-
37
-
38
-
39
-
40
-
41
-
42
-
43
-
44
-
45
-
46
-
47
-
48
-
49
-
50
-
51
-
52
-
53
-
54
-
55
-
56
-
57
-
58
-
59
-
60
-
61
-
62
-
63
-
64
-
65
-
66
-
67
-
68
-
69
-
70
-
71
-
72
-
73
-
74
-
75
-
76
-
77
-
78
-
79
-
80
-
81
-
82
-
83
-
84
-
85
-
86
-
87
-
88
-
89
-
90
-
91
-
92
-
93
-
94
-
95
-
96
-
97
-
98
-
99
-
100
-
101
-
102
-
103
-
104
-
105
-
106
-
107
-
108
-
109
-
110
-
111
-
112
-
113
-
114
-
115
-
116
-
117
-
118
-
119
-
120
-
121
-
122
-
123
-
124
-
125
-
126
-
127
-
128
-
129
-
130
-
131
-
132
-
133
-
134
-
135
-
136
-
137
-
138
-
139
-
140
-
141
-
142
-
143
-
144
-
145
-
146
-
147
-
148
-
149
-
150
-
151
-
152
-
153
-
154
-
155
-
156
-
157
-
158
-
159
-
160
-
161
-
162
-
163
-
164
-
165
-
166
-
167
-
168
-
169
-
170
-
171
-
172
-
173
-
174
-
175
-
176
-
177
-
178
-
179
-
180
-
181
-
182
-
183
-
184
-
185
-
186
-
187
-
188
-
189
-
190
-
191
-
192
-
193
-
194
-
195
-
196
-
197
-
198
-
199
-
200
-
201
-
202
-
203
-
204
-
205
-
206
-
207
-
208
-
209
-
210
-
211
-
212
-
213
-
214
-
215
-
216
-
217
-
218
-
219
 |
 |
